How to Create an E-Commerce Business Plan

If you ever plan on finding investors, partners, or employees for your e-commerce startup, you’ll need to know how to create a business plan. A lot of people make this process out to be more complicated than it needs to be. When you do it right, creating a business plan doesn’t have to be so difficult.
In this guide, I’m breaking down step-by-step everything you need to know about creating a powerful e-commerce business plan.
What is an E-Commerce Business Plan?
Have you ever thought about something you wanted to accomplish in your business? You’d likely jot down a few lines discussing strategies, costs, and methods behind the steps you would take to achieve those goals.
If you’ve ever done that, you’ve created a basic business plan, and there isn’t too much more to it than that. An e-commerce business plan is a strategy for how your business will work, how you’ll fund it, who your audience will be, and how you plan to succeed.
Understanding how to create a business plan is key. It requires research, understanding your audience, budgeting, and more.
The overall key to writing a business plan is to create something comprehensive enough, so you never have to wonder what step is coming next. As you navigate the sometimes challenging process of starting an e-commerce business, don’t leave anything to chance.
When you’re struggling or having a hard time envisioning the next step, you don’t have to worry because your business plan thoroughly outlines everything you’re going to do, when you’ll do it, and how much it’ll cost.
Another aspect of business plan writing is looking for investors or partners. You need to pitch your e-commerce business in a way that is easy to understand. Investors aren’t going to jump aboard something that lacks vision or appears unorganized.
Having a thorough business plan that gets straight to the point will show investors that you know what you’re doing and you have a concrete strategy for success.
How is an E-Commerce Business Plan Different From Other Kinds?
The way e-commerce businesses reach their customers is much different. At a brick and mortar store, for example, foot or vehicle traffic will contribute to a lot of free advertising for the business.
E-commerce stores, on the other hand, can very easily get buried in the SERPs, never to be seen by anyone if you don’t know how to get the word out. You need to keep these types of things in mind when putting together your business plan.
As for research and development of your business plan, standard businesses need to factor in local licenses, ordinances, building codes, and other factors that may influence where and how they can conduct business.
Luckily, e-commerce doesn’t have to worry as much about that, but it doesn’t mean you can ignore it either. It’s your responsibility to understand any restrictions or requirements that may prevent you from sourcing and selling your products.
Why E-Commerce Business Plans Are Important
Understanding how to create a business plan means nothing if you can’t see the importance behind it. While I believe there are more important aspects of starting a successful business, every e-commerce venture should have a stable foundation, beginning with a business plan.
Business Plan = GPS
You’re the driver of this business, but you’ll end up going in circles, wasting time and money, if you don’t know where you’re going. Having a solid business plan guides you through the steps of starting and growing a business. Think of the plan as the GPS of your business. If you ever get lost, you can fall back on your original plan.
It Helps You Generate Ideas
This process is much easier than it seems. It might seem like this looming dark cloud of horror, but once you dive in, the juices will start flowing, and you’ll find out that you probably have a lot of great ideas. This may be the first project of your new venture, so business plan templates and how-to guides can help.
It Can Help You Understand the Market
Getting your audience right is the most important aspect of an e-commerce business. If you’re trying to reach everyone, you’ll reach no one. A big part of your business plan needs to be the development of a customer avatar. This avatar is your perfect customer. They’re the ones that buy everything you sell because they love you and your brand.
It Helps with Funding
Whether you’re looking for funding or business partners, you’ll need a business plan. Having a strong strategy shows investors that you’re confident in what you’re doing, you understand the business, and investing with you is a smart choice for them.
It’s a Great Way to Keep Track of Accomplishments
What better way to look back and see everything you’ve dreamed of come to life? You can map out the next few years in a business plan and look back as everything comes together, and keep track of everything you’ve accomplished. A business plan acts as a “to-do” list for your new venture.
What Does an E-Commerce Business Plan Look Like?
If you’re wondering what a business plan should include, it might look a little different than you originally thought. The days of massive 15-page business plans are over; you don’t need a super complicated plan to find investors and sell your products.
Lean business plans are growing in popularity. This e-commerce business plan involves a one-page “pitch” of your business. You’ll document the problem you’re solving, your unique solution, your market, the competition, your team, and a little information about your company culture.
Part 1: Executive Summary
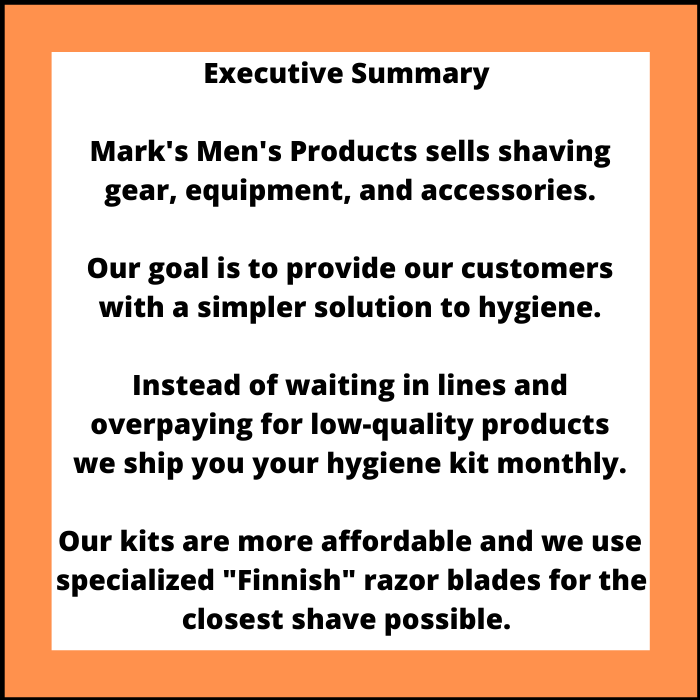
Think of an Executive Summary as an overview of your company’s goals and objectives. If you had to hand someone a piece of paper explaining as much about your business in 250 words or less, what would you say?
It should include information such as:
- A description of your products and what you sell
- Your goals as an e-commerce provider
- Identifying your target audience
- Explanation of your competition and how you stack up
- Overall growth potential
- Funding requirements
While you’re not going in-depth in any one area here, this is the most important aspect of the business plan because it’s your overview. When people think of your e-commerce brand, this is what they’ll think.
Part 2: Description of the Company
Who are you, what is your experience, and why should you have the right to sell products to other people?
The company’s description is a lot less about what you want it to “be like” and more of what “you’re like.” You’re pitching yourself, your experience, and your ability here.
A great business example here might be:

In this description, we covered what we’re selling and provide the credentials of the owner, which will create confidence in potential investors and partners.
Step 3: Market and Industry Research
If you don’t understand your audience or the industry you’re working in, you’re doomed. Researching the market is critical, and there’s a big difference between standard business and e-commerce here.
When you’re researching the market for a retail store, you’re very limited in who your audience is, so it’s a bit more cut and dry.
As for e-commerce, the world is your audience, but you need to narrow it down to a specific demographic to cater to your products and marketing to those people.
Ask questions like:
- What problems do my customers have?
- How can I solve these problems?
- What products solve those problems?
- When do people shop for these products?
- How often do they purchase them?
Step 4: Operations Plans
Forget learning how to create a business plan; we all go into business to profit, right? Having an operations plan helps ensure you remain profitable by keeping all your costs in line. This section of the business plan discusses managing, staffing, preparing products, fulfilling orders, inventory management, customer service, and more.
This part is where you get to start outlining what a typical day will look like in your business. How will it run, how will people convert, and how will you fulfill those orders?
Start thinking about things such as:
- What equipment and supplies do I need?
- What is the chain of command; who is in charge?
- Do I need to develop products, or am I reselling others?
- What are my staffing needs?
- Will my operations change or remain the same as I grow?
Make sure you keep your industry, market, and target audience in mind as you prepare your operations plan. You don’t want to venture off in the wrong direction as you dive deeper into it.
Step 5: Marketing Plans
It’s a no-brainer that you’ll have to market your business if you want to have success, but you need a plan. In e-commerce, you have a few different options, and the choices you make will determine a lot.
You need to highlight the methods you plan on using so partners and investors can see that you have a clear path to success. Some of your choices may be:
- PPC (Pay-Per-Click)
- SEO/Content Marketing
- Guest Posting
- Social Media
I recommend using a combination of all of these because they each have upsides and downsides. For example, SEO is a relatively low cost to get started, but it takes time, and if you don’t possess the knowledge yourself, you’ll have to hire an agency to do it for you.
PPC can be costly if you don’t know what you’re doing, but the results can come quickly because you’re leapfrogging over a lot of the competition.
Regardless of what marketing methods you choose for your e-commerce business plan, you need to highlight them and explain how you plan to use them.
Step 6: Costs and Revenue Predictions
Now you need to wrap up your business plan and put a nice bow on top. Based on everything you’ve included so far in your business plan, what are your costs versus your revenue? Keep in mind that first-year revenues aren’t always extravagant, but you need the potential to gain more revenue in the future.
As long as investors and partners see that you have the growth potential, they won’t worry too much about first-year losses. The goal should be to keep your costs as low as possible and your revenue as high as possible (makes sense, right?).
Predict the total cost of operation in your business in the first year or two and include that in the plan. Then, anticipate the revenue prediction as well and include that.
If you’ve followed everything in this guide, there should be a clear path that brings you to those numbers. You should know how much everything will cost to get started and operate the business for a year.
Based on your market and what your competition is doing, that’s where you get your first-year revenue predictions.
Make it transparent and keep it simple.
What Do I Do With an E-Commerce Business Plan?
Now that you know how to create a business plan, what are your next steps? What do you plan to do with the business plan? Most people will use their business plan to find investors, partners, and employees when they’re getting started.
If you’re thinking about pitching to investors, you’ll want to choose carefully because not all investors are the right choice for you. Even if someone is willing to give you what you ask, they might not be the right fit, and taking their money will lead you down the wrong path.
First, you want to look at an investor’s expertise. When they have experience in a certain area, it makes it easier for them to understand your potential, and they can offer guidance to help you succeed.
Second, in what stage is your business? Different investors specialize in different stages. Some invest in pre-seed, while others won’t even hear your pitch until you have revenue.
Third, how much do you think you need? What you think you need and what you need are two different things.
Lastly, how do you plan on involving your investors? Some investors will back you financially and offer nothing more, while others will demand consistent financial updates and reports while offering guidance and assistance. You need to determine how involved you want your investor to be in your operations.
Conclusion
Now that you know how to create a business plan, the rest is up to you. Remember that gathering information and understanding something is important, but it’s nothing if you don’t implement what you learn. Take the steps outlined in this guide and put them to work.
If this seems a little daunting, we have plenty of resources to help you. Your business plan doesn’t need to be this elaborate essay; you can complete it in a day with the right strategy.
What do you think is the most important part of creating a solid business plan?
The post How to Create an E-Commerce Business Plan appeared first on Neil Patel.
How to Write PPC Ad Copy Using AI

It’s no secret: the world of PPC advertising is not for the faint-hearted. If you don’t know what you’re doing, you could end up throwing money down the drain.
How can you increase the chances of the right people clicking on your ads? You need to learn how to write ad copy that converts.
Thankfully, technological advancements like artificial intelligence (AI) are here to save the day. AI tools can help you write ad copy that produces results.
How Can Artificial Intelligence Help Your PPC Campaigns?
Just so we’re on the same page, let’s quickly look at a simple definition of AI.
Artificial intelligence (AI) is a multidisciplinary branch of science that includes machine learning (ML), natural language processing (NLP), deep learning, and many other emerging technologies.
The main benefits of AI when it comes to creating compelling PPC ad copy include:
- Unmatched data processing power
- Ability to better “predict” click-through rates and quality scores
- Identify bids that will get the most traffic
- Saves you time managing campaigns
However, no matter how much data you have at your fingertips and how well you can identify lucrative bids, all that will be to no avail if your ad copy sucks.
AI can help you with that. I’ll show you how below.
6 Ways AI Can Help You Write Good PPC Ad Copy
Many tools can help you write ad copy. However, many AI-powered tools have one huge advantage: unlike their predecessors that relied on historical data, AI-powered tools give you real-time data. This process allows you to refine your copy to better suit the market situation when the content is created and published.
These are tips that will help optimize your ad copy, whether you’re advertising on Google, Bing, Facebook, or any other of the myriad platforms available.
Use AI for Audience Research
The very first thing you need to do before writing ad copy is to understand your target audience. The key to successful ad copy is to know not only who your target audience is, but also to know:
- What they’re looking for
- Why they’re looking for it
In short, understanding your audience will help you understand the intent behind your prospect’s search. Knowing this could help you write personalized ad copy that will resonate with your audience, eliciting a click through to your offer.
It will also help you create ads that are so targeted that only the right people will click on them. Additionally, it will help you write ad copy that addresses any objections your audience may have.
When you know how to write ad copy that speaks directly to your audience, you’ll likely enjoy a reduction in wasted clicks and an increase in your return on ad spend (ROAS).
How do you get to know your audience? This process is where AI shines best.

AI-powered audience research tools like IBM’s Watson are great for helping you with predictive audiences. These consumers may not look anything alike but have some common threads that make them relevant targets for your PPC ads. By processing data from multiple sources, AI helps you understand the type of people you should target with your ads.
These insights help you significantly reduce the risk of ad waste, as your ad copy will be hyper-personalized, making it appealing to the right people. With ad spend steadily increasing across all industries, AI will help ensure that you get a good ROI from your campaigns.
Conduct Competitor Research Using AI
Before you put pen to paper, you must study the competitive environment.
You must conduct competitor research. This data will help you understand (among other things):
- The type of ad copy that generates clicks
- Ad formats that work best in your niche
- Opportunities your competitors are missing that you can leverage
The data you get from your competitors’ ad campaigns is invaluable in helping you know how to write ad copy that will perform exceptionally well.
This process is where AI-powered competitor research tools like Adthena come to play.
By gaining insights into your competitors’ PPC activity and market shifts, you’ll be better armed to write compelling PPC ad copy.
The real-time data AI technologies provide may help you gain or keep a corner the market by ensuring you’re up-to-date with trends and news that affect your market audience. Real-time data is also essential when conducting competitor analysis, as any lag in time could result in the competition cornering the market.
Don’t delay to get on the AI bandwagon, especially when it comes to writing ad copy.
AI Can Help You Discover Keyword Opportunities
Everyone knows keywords are the foundation of every good PPC campaign. Unfortunately, with more businesses vying for the same target audience, relevant keyword opportunities are becoming harder to find.
AI can help.
With the competition for profitable keywords being uber-stiff, normal keyword research just doesn’t cut it anymore. You must leverage AI to help you uncover hidden keyword gems.
This fact is especially true since keyword research for SEO and PPC is not the same. For PPC, your money rides or sinks on the keywords you use. That’s why you must find keywords that will give you a good return when you bid for them.
AI-powered tools like BrightEdge, for example, not only help you discover profitable keywords but are also able to give insight into the intent behind those keywords.

Because they offer real-time data, you are in a better position to write ad copy based on keyword opportunities as they arise. Of course, this will give you an edge over the competition, as your ads will have a better chance of being served to users while keeping your ad spend low.
Headline Optimization Is Easy with AI
Saying that your headline is a critical part of your ad copy is an understatement. Its value can never be overstated because it’s your first chance to hook your customers.
If your headers are poorly crafted, users will just scroll past your ad. But if you write your headline well, it will stop them from scrolling so they look at the rest of your ad copy. AI can help you craft headlines that stop people in their tracks by helping you write headlines that result in much-coveted clicks.
A great example is Persado. The AI-powered copywriting tool helped Chase Bank increase the CTR on their ads by as much as 450%. How? By crafting headlines that resonate more with their target audience.

There are AI-powered tools that are designed to help you optimize your headers to elicit users to click on your ads.
The success of your ad campaigns rides on your headlines.
The next part users look at is the ad description.
Use AI to Nail Your Ad Description
Next to your headline, your ad description is the most crucial part of your ad copy. While the headline is the hook that grabs your prospect’s attention, your ad description is the sales pitch that gets them to click on your ad.
However, there’s a catch: you have a limited number of characters to use to convince your prospects to click-through to your offer. This means every character counts. It must help elicit a positive reaction from users. That’s why you must make sure you know how to write ad copy that drives clicks.
Fortunately, AI can help you write compelling ad copy.
With AI copywriting tools like Phrasee, you don’t have to guess what kind of copy works.
Using machine learning and gathering data from different platforms, AI copywriting tools have “mastered” the art of writing great ad copy.
Using machine learning (ML), natural language generation (NLG), deep learning, and other technologies, AI-powered copywriting tools can help you create compelling ad copy that stands out from the crowd. AI takes into consideration many facets, such as language, semantics, sentence structure, and a whole lot more to help you create optimized ad copy at scale.
Another great AI-powered ad creation tool you can consider is CopyAI.
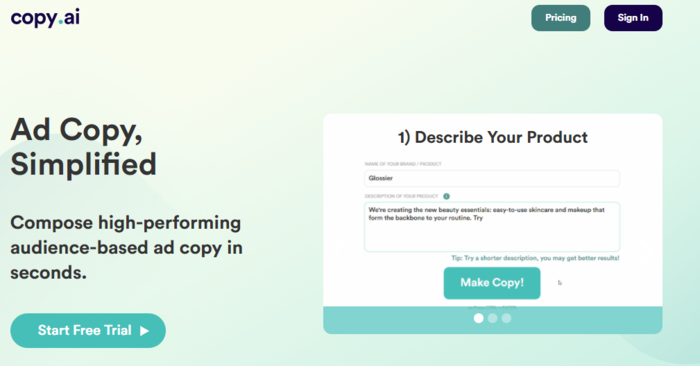
Copy AI is designed to take the grunt work out of brainstorming unique ad ideas. It will help you increase your ROAS by helping you come up with relevant audience-based copy that your customers won’t be able to resist. The deep learning platform that powers CopyAI can personalize your ad copy to suit any holiday, occasion, or campaign.
AI-powered copywriting tools are a great way to save time and money as they work faster and more efficiently. And at the end of the day, they’ll help you boost your bottom line.
Calls-to-Action: AI Can Help With That Too
Calls-to-action (CTAs) are a tricky part of writing ad copy. That’s because your CTA is usually made up of 2-5 words to inspire people to take action.
While platforms like Google and Facebook give you some CTA options to choose from as you create your campaigns, it’s always better to create your own CTAs. After all, if you use the options generated by search engines and social media platforms, you won’t stand out from the competition.
Your CTA plays a crucial role in pushing your prospects across the finish line. As such, give it careful consideration. You may get every other element of your ad copy correct, but if your CTA is weak, your hard work will be in vain.
What makes for a strong clickable CTA? One word: personalization.
Different audiences respond differently to CTAs. That’s why you must pay special attention to the language your audience uses and try as much as possible to implement it in your CTAs. This is one area where audience research pays off because it helps you craft personalized CTAs. Studies show that personalized CTAs perform up to 202% better than generic ones.
Note: make sure to create a different CTA for each campaign. Don’t just regurgitate past CTAs, even if they worked well in previous campaigns.
Yes, it may be a lot of work if you do it manually. That’s why you shouldn’t do it manually; use AI instead.
Again, tools like Persado make creating impactful CTAs easier.
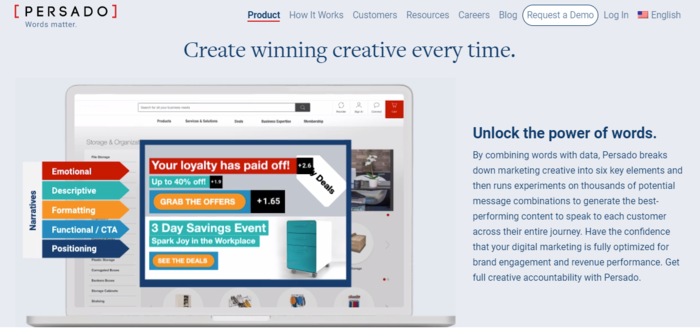
Leveraging data such as sentiment analysis (or emotion AI), AI-powered tools help you create CTAs that tug at your prospects’ heartstrings. Of course, every marketer knows that it is easier to loosen your prospects’ purse strings if you can do that.
By leveraging AI in crafting your CTAs, you increase your ad copy’s chances of achieving its goal of boosting your bottom line.
Conclusion
It’s impossible to ignore AI as a digital marketer. It’s everywhere around us. From AI SEO to AI in website design, every facet of digital marketing is becoming more efficient thanks to artificial intelligence.
As a marketer, if you’re looking to know how to write ad copy that converts, you must lean heavily on AI-powered tools to help you. From the planning stage to deployment, AI can help you optimize every part of your PPC ad campaigns.
Though remember: without good ad copy, your ad spend will be wasted. How do you write good ad copy? By using AI.
Sure, AI may not be able to handle the creative side of writing ad copy completely alone. However, it does go a long way in helping you create ad copy that sells.
Are you ready to embrace the power of AI in your ad copy creation?
The post How to Write PPC Ad Copy Using AI appeared first on Neil Patel.
Ubersuggest 8.0: The Ultimate Competitor Analysis Tool
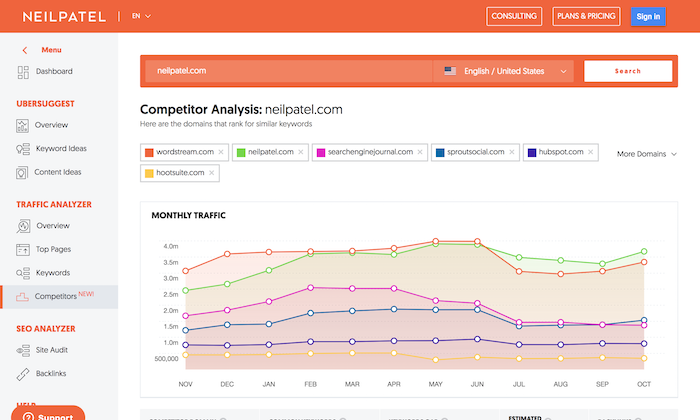
You may have noticed some small changes to Ubersuggest recently, but now it is time for another major release.
In the last few months, you have seen the application get faster, we are slowly (but surely) working on increasing data quality, and we have even made multiple updates to our Chrome Extension.
But today, we are announcing a new feature that will make finding lucrative keywords even easier.
So, what is it?
It’s a competitor analysis report!
An easier way to find keywords
I want you to head to Ubersuggest and type in the name of one of your competitors.
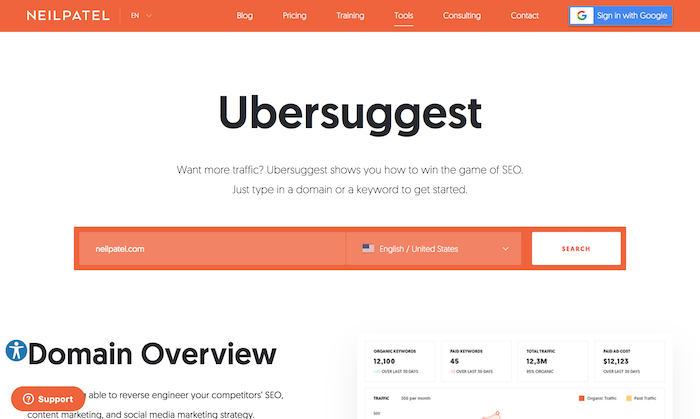
Ideally, you’ll add a popular one. The more popular the competitor the more keywords it will show you.
If you don’t know of a competitor, just perform a Google search for any keyword that you are trying to rank for and grab the top site.
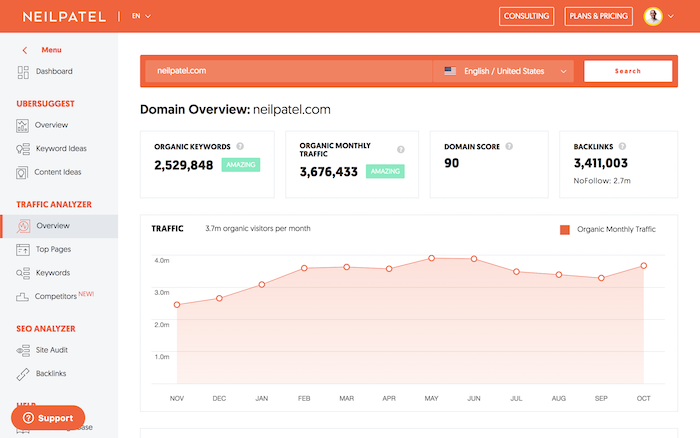
Or you could just use “neilpatel.com” to see how it works.
At this point, you should see a report that looks something like this.
I want you to go to the sidebar and click on “competitors.”
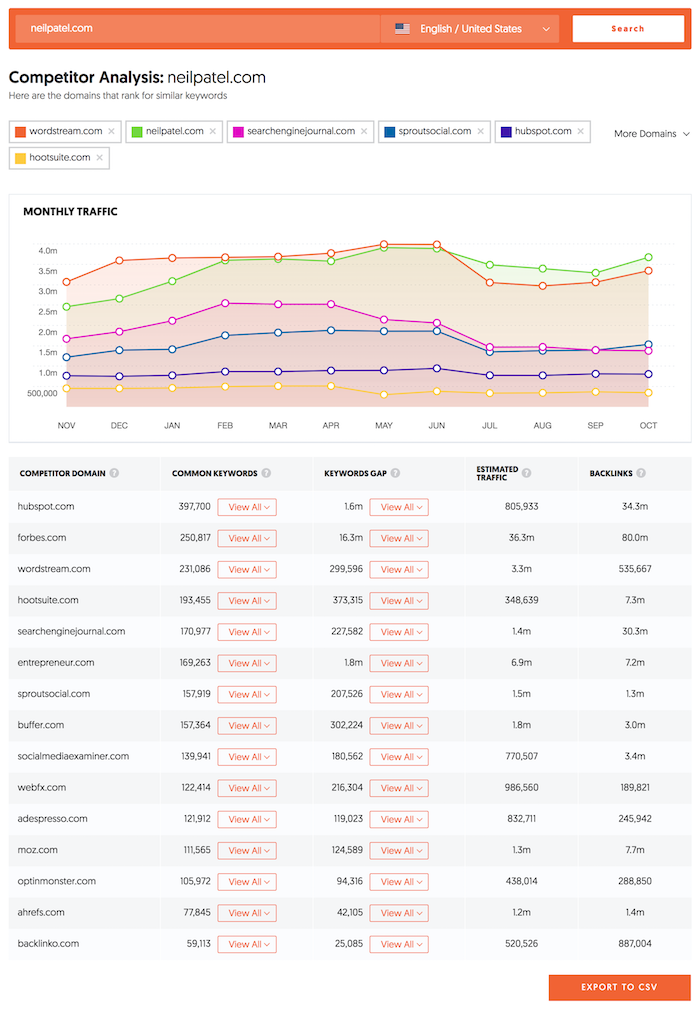
From there you should see a report that looks something like this.
The top part of the report shows your main competitors in a graph.
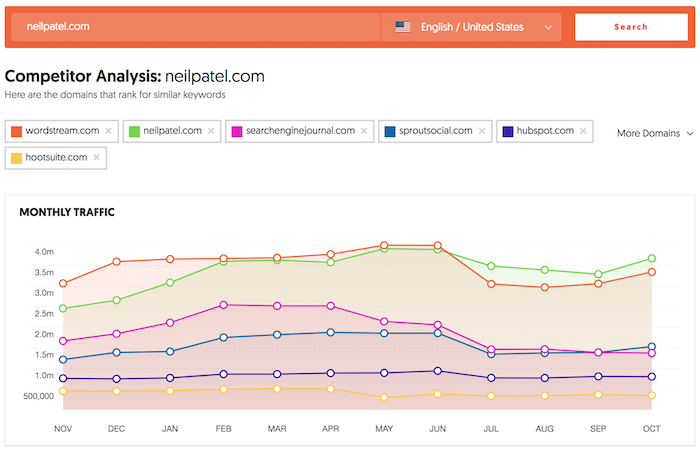
You can easily see who is getting more traffic (keep in mind subdomains are counted as separate sites).
And, if you want, you can click on the “more domains” drop-down and unselect some of the competitors or even add more that may not be listed.
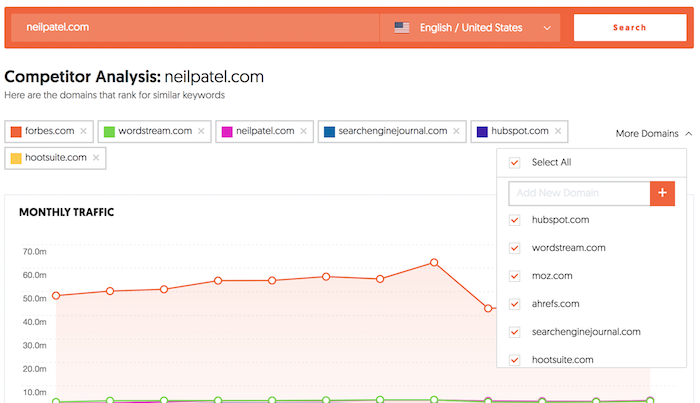
As you scroll down you’ll also see a long table.
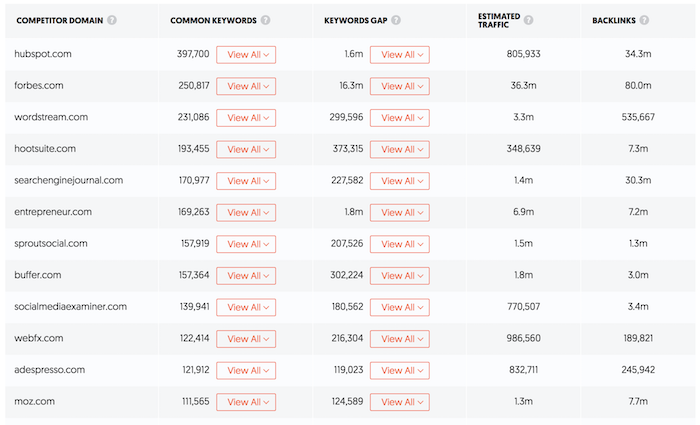
In the table, you’ll see the competitor domain, the number of common keywords you rank for, keyword gaps (the keywords they rank for that you don’t rank for – this is your main opportunity), their estimated traffic, and the number of backlinks that you have.
So, let’s dive into the keywords.
Common keywords and keywords gap
Within the table you can drill down on the common keywords. All you have to do is click the “view all” button under that table column and you’ll see something like this.
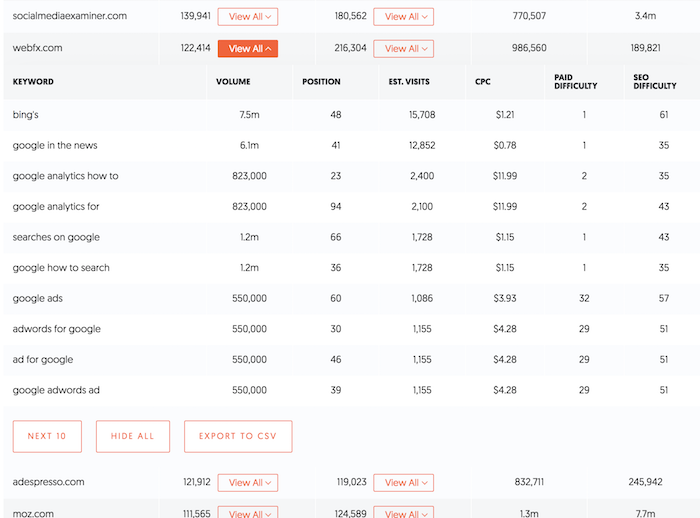
It breaks down the common keywords that both you and your competition are ranking for.
This is useful because it shows you which keywords you are focusing on that they may also be focusing on.
When drilling down on this table, pay attention to volume, position, estimated visits, and CPC.
- Volume tells you how many times a keyword is searched.
- Position tells you where your competition is ranking on Google.
- Estimated visits breaks down roughly how much traffic they get from that keyword.
- CPC tells you how expensive a keyword is if you had to pay for it through advertising.
Generally, you want to make sure you rank higher than your competition for keywords with high volume and high CPC. Ideally, they need both. That way you know a keyword can not only drive traffic but also sales.
And my favorite part about this report is the keywords gap. This shows you the keywords that your competition ranks for that you don’t.
To see those keywords, you just have to click on “view all” and you’ll see a list.

Again, you’ll want to pay attention to the same metrics and you’ll want to look for keywords that have a high volume and high CPC.
It means those keywords drive traffic and typically drive conversions as well.
I highly recommend that you go through all of the keywords that each of your competitors rank for that you don’t.
Within the table just keep clicking the “next 10” button to keep seeing more keywords.
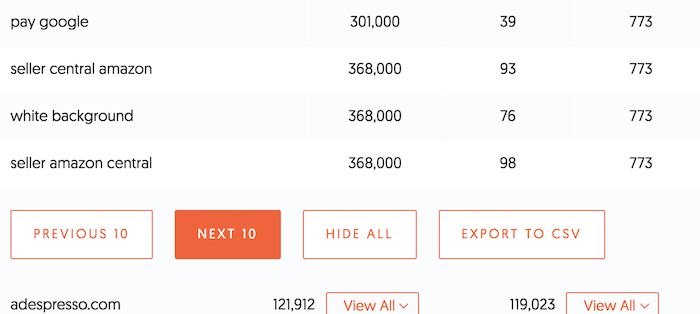
Or you can just click “export to CSV” if you want to download all of the keywords.
Now head to Ubersuggest and give it a try to find more keyword opportunities.
So, what’s next?
Well, hopefully you’ll start using the Competitors report because it will give you more keywords.
But over the next few months you’ll see some big changes that will make all of the reports more useful.
- More accurate data – from traffic estimations to keyword volume, you’ll start seeing better estimations that are much closer to people’s actual traffic. Our new estimation formulas take much more data into account, so we are able to come up with better data for you.
- More link data – over the next few months you’ll see a much more robust link dataset as we are working to expand our database. It will be much more comparable to competing products and the link data will be indexed much faster. So, when you build new links or lose new links, we will pick it up faster.
- More accurate metrics – from domain authority to keyword difficulty scores, the data will also be more accurate on that end so you can make better-informed decisions.
- Better filtering of keywords – within Ubersuggest and even other SEO tools, sometimes you see keyword recommendations that don’t make sense. We have new logic that is coming out soon that will remove most of these irrelevant keywords so you can focus your efforts going after terms that don’t just drive more traffic, but they also drive sales.
Conclusion
You’ll see big improvements in the accuracy of our data by the end of the year if not in January, worst-case scenario.
We are already starting to slowly roll out the changes over the next few weeks and it will continue until the end of January.
And after that we even have a few cool new features coming out that you haven’t seen on any competing tools yet, which will help you get more SEO traffic faster. ?
So, what are you waiting for? Go give Ubersuggest a try.
What do you think about the new feature?
The post Ubersuggest 8.0: The Ultimate Competitor Analysis Tool appeared first on Neil Patel.
source https://neilpatel.com/blog/ubersuggest-competitor-analysis/
How to Become a Successful Vlogger

If I told you that you could become a sucessful vlogger, would you believe me?
Or do you think that there is too much competition?
YouTube is saturated — 500 hours of video are uploaded to YouTube every minute. There are dozens of million-dollar YouTubers creating thousands of hours of video a year.
How could you possibly break through the noise?
Well, I’m here to tell you that video blogging still has huge potential.
Just look at the growth of video ad investment among brands and agencies and where it’s predicted to go:

Investment is growing because it’s following consumption. More than 85% of US internet users watch video ads.
It might not be as easy as it was five or seven years ago to break onto the vlogging scene, video is more important than ever to build a successful online marketing strategy.
Why?
First, video remains one of the best and most effective ways for people to get to know you.
When they see you, their brain develops an impression of you that helps to build trust. You’re not just an anonymous content creator trying to drive your business. You’re a real person.
Second, video is a preferred method people have for gaining information. The stats don’t lie. People spend up to 2.6 times as long on web pages with video than without video.
Third, the cost of good equipment keeps on falling, and the cameras in our phones keep getting better.
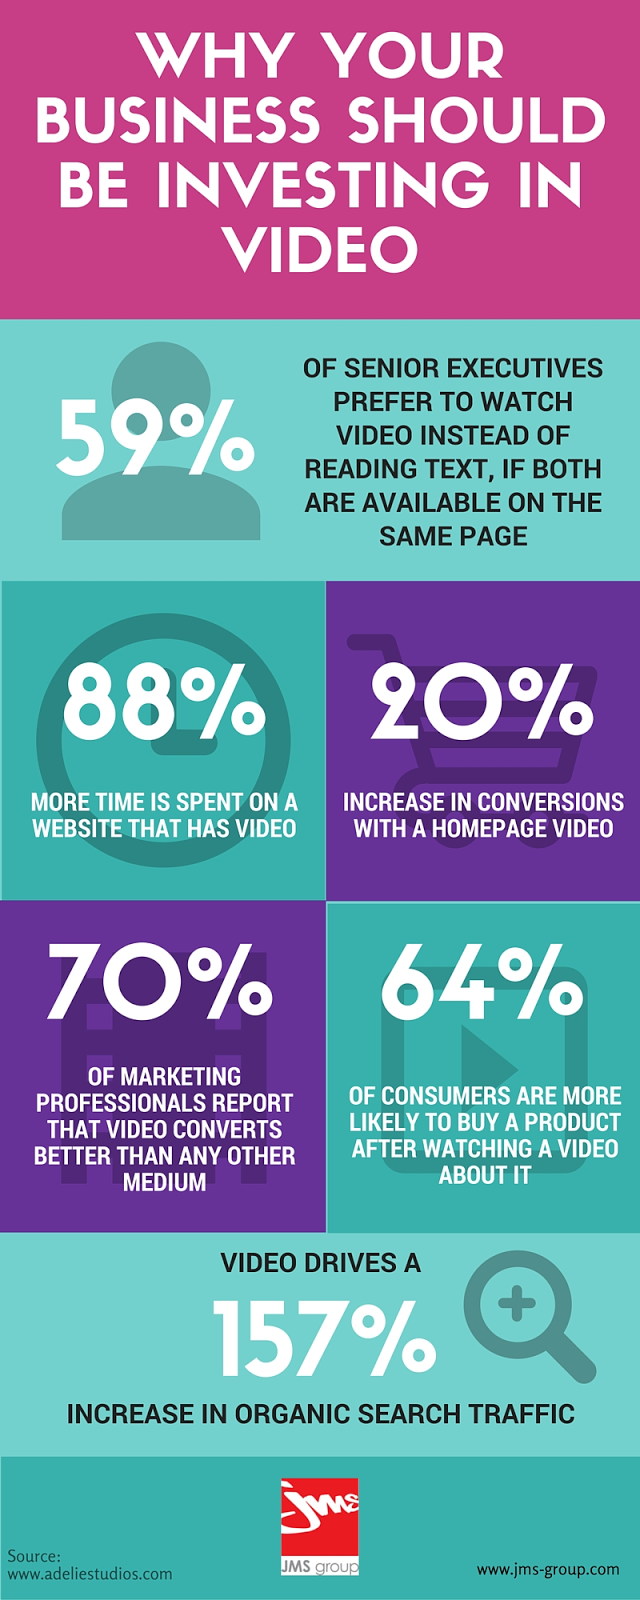
Fourth, video has a strong impact on the user experience, and therefore SEO. A video on your site can increase organic traffic by 157%. Check out this infographic:
Finally, video blogging can be lucrative in itself. The top YouTubers make between $14 and $22 million dollars a year.
The power of video is undeniable.
All of this brings up the question: how can you become a successful vlogger?
I’m going to explain the steps you need to take to become a successful vlogger, from starting a vlog and coming up with concepts for a video series to making a quality video and making sure people find your videos.
Let’s jump in.
How to Come up With a Concept for a Series of Videos
Many people follow the desire to make a video by coming up with one idea for one video.
That would be like starting a blog with an idea for only one article.
As you probably know, that wouldn’t get you very far.
I explain how long content marketing takes in this video:
Video, like any other form of content marketing, needs a long-term strategy defined by a subject, tone of voice, and approach.
Here’s a question to ask yourself:
“What am I trying to convey to my audience?”
Once you know what you’re trying to do, you can define your vlogging content concept:
- What should the format be? Should I do screen capture demos of step-by-step instructions? Should I be out and about talking to people? Should I talk into the camera?
- What can I do with video that I can’t do in other formats like the written word?
- How often am I going to make videos? How much time can I dedicate to them?
You have to document your plan to determine if it’s going to be feasible for long enough to achieve your goals.
The reality is people need to see consistency in order to understand why they should subscribe to your channel.
If you are making random, sporadic videos, it’s going to be harder to convince people to follow you.
The content of your video will be what determines your success.
That is, of course, only if you make quality videos.
How to Create Quality Video Content for Your Vlog
Video making is a complicated profession. When you see all of the elements that go into shooting a television broadcast or feature film you can be forgiven for thinking that you could never make anything like that.

And you probably can’t.
That’s OK.
People who are going to watch your video on your blog are not expecting a Steven Spielberg production.
People understand what vlogging is.
But that doesn’t mean that you should not care about quality. Quality is still super important.
Luckily, the cost of creating quality video has been steadily dropping and continues to drop. There are more and more types of equipment available that can make your video go from amateur to professional-looking.
Step 1. Get a Camera and Tripod
You might be tempted to use your iPhone.
And honestly, cameras on smartphones have gotten amazing over the years. You have probably taken some great photos and videos on your phone already.
But smartphone cameras are difficult for serious video blogging for the following reasons:
- They are hard to mount properly
- They have very limited field of depth
- They have very limited exposure options
- Sound sucks
Selfie videos are best used for things like Instagram Stories.
They can be a part of your video strategy but shouldn’t be the foundation of it.
Cameras range in quality a lot, from basic models that run in the low hundreds to professional gear that can cost tens of thousands of dollars.
Most DSLR cameras also have video modes, though the options can be just as limited as on smartphones.
If you don’t know, DSLR cameras look like this:

The good news is that if you’re not chasing snow leopards in the wild, you won’t need all of those fancy settings.
What you need is a camera with a good lens that’s can take high-quality video. Not 4K necessarily, but enough quality to be able to work with if you want to add any extras.
You can find refurbished HD digital video cameras like this one for under $200.

Then, mount that camera onto a tripod. Nothing is worse than shaky video.
You could always place your camera on a table or shelf, but tripods are very affordable and give you 100% control of your filming.
Full-size tripods can go for less than $20, so there’s really no excuse not to have one.

Step 2. Get a Microphone
You can either get a camera with a mic-in jack to plug in an external microphone (something you can also do when filming with your smartphone), or you can buy a USB microphone and record the sound directly to your computer.

It depends on the type of conditions you’re filming in, but you usually don’t want to capture sound from directly from the camera.
Separating the recording between two devices adds the challenge of having to sync up sound and image later.
You can overcome this by creating a clap sound that spikes up your audio visualizer for each syncing, then you line that up with the audio from the video.

I can’t stress the importance of having great sound in your videos. Sound is one of our fundamental senses and it should be a part of your marketing strategy.
Here are a few ways to leverage the power of sound:
Simply put, poorly recorded audio can turn people off and get in the way of you getting your message across.
Step 3. Create Your Lighting Setup
Lighting videos is an art all unto itself. But it’s surprisingly easy to get a great effect since there are normally only three primary lights in a video setup.
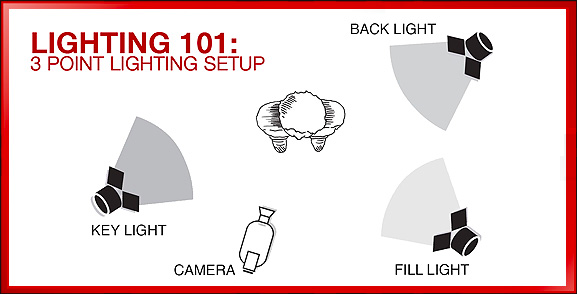
The important thing is to separate yourself or your subject from the background. You can do this with the focus and depth of field, of course. But it really looks professional when there is a difference in lighting as well.
You don’t even need a professional lighting setup.
You can create a fairly decent lighting setup from lamps that you might have around the house.
You can also buy LED board lights that diffuse really well without getting hot — one of the drawbacks of using incandescent bulbs. You can buy versions that you can mount on your camera if you aren’t shooting in a controlled environment.

As a general rule, it’s better to be brighter. The image is clearer since the camera captures more light and therefore more detail.
Step 4. Get a Teleprompter
It’s great to be able to speak off the cuff effortlessly. There are some vloggers with a natural style that works really well. Take the beauty vlogger Freddy My Love. Her effortless and natural style has been honed from years of practice.

Chances are, you will need help to deliver content in a clear and structured way.
You could memorize talking points and do a couple of takes. Then you can splice together the best parts.
That’s a longer process, though, than using a teleprompter.
A teleprompter makes it easier to hit all of the important points without memorizing or awkwardly transitioning between them. You could even write a script to follow verbatim.
But it’s more than a time saver. It drastically improves the way that you interact with your viewers.
Having notes or something written off screen causes you to break eye contact when you’re addressing your audience directly.
According to a study by Cornell University, humans will naturally increase eye contact with people that we admire or like.
Conversely, we tend to break eye contact when talking about embarrassing or uncomfortable subjects.
Viewers will subscribe to vloggers they respect. You can look directly into the eyes of your viewers while still reading your script or bullet points.
A teleprompter might seem complicated, but it’s actually pretty simple.
Teleprompting uses a slanted piece of glass to reflect the words so you can read them.
As long as there is darkness between the glass and the camera lens, the camera won’t pick up the light reflecting from the text on the glass. The camera will only see you.
You, however, will be able to clearly read the text as it scrolls. It looks like this:

You can buy a teleprompting setup and use your iPad or tablet with a teleprompting app.
There are also more advanced models that hook up to pedals for your feet that control how quickly the text scrolls.
If all that sounds like way too much, you can always try to build one yourself with a CD case and your smartphone to see if you like it.
Step 5. Do Your Makeup
This might sound a bit controversial – and I’m OK with that because I want you to have all of the options available to becoming successful – but people like watching videos with people who are put together.
(This explains why so many movie stars can be bad at acting.)
You don’t need to be Brad Pitt, and you definitely shouldn’t go overboard, but make an effort.
You’ve got an HD camera and a lighting setup. People have never seen you as clearly as right now.
For example, when you light yourself there will almost certainly be shiny parts of your skin. That’s your natural skin oil.
The most common makeup is a powder that absorbs oil so that your skin appears smooth without reflecting too much light.

Try testing your lighting setup and seeing where your skin is a bit too shiny.
Just to be clear, this goes for men as much as women.
Then, apply a powder if needed. Your video (and you) will look a whole lot more professional.
Step 6. Edit — A Lot
Making videos is like any other skill. You will get better at it the more you do it.
Video editing makes your life a lot easier by making it easier to cut between the best takes to more rapidly built your content.
Video editing software is easy to find — and use. iMovie comes on all macs and is available as an app on iOS.
The drag-and-drop interface makes it a snap to use.

If you are ever wondering how to do something, like shorten a transition or overlay an image, there are tons of tutorials on YouTube.
The bottom line is that you should be creating a lot of content. The majority of it you might not even use. But you get better and better each time you try something new.
And you should be careful to avoid oversharing. Instead, you should focus on a more qualitative approach.
Even if you think you did something great the first time through, force yourself to try it again.
You never know when you’re going to stumble onto something great.
OK, you’ve got the keys to actually making your videos to execute your strategy, now comes the hard part.
How to Get People to See Your Vlogs
When you make a video, you are in control of everything.
You decide how much you can invest time and money into creating your video. You decide who you work with and what you want the outcome to be.
Then, you decide when you put it online.
You don’t decide when other people watch it.
You can only try to grab their attention.
Getting people to watch your video can be difficult, but there are many steps that you can take to maximize your potential audience and get more people to click play.
Step 1. Create an Awesome Thumbnail
The first thing that many people will see is the thumbnail on the player before they start the video.
In fact, this is the piece of communication that reaches all the people that come across your video but don’t play it.
That digital real estate is your little promo box and can drive engagement. Take the time to make it great.
Here are two examples from Gary Vaynerchuk. He varies the style of the thumbnail from a photo collage with the title in a fun YouTube-style:

To a more elegant and serious tone when his subject matter is more inspirational:

There’s one thing you will always see in the thumbnail though: the title.
It’s crucial real estate that you can entirely personalize to get people to click.
You will have to abide by the brand values and guidelines, but you should create something custom to make sure you are putting your best foot forward.
To add a thumbnail to your video, click on the video in your video manager.
Then, in the middle of the screen next to the player, you will see a few images that come from your video that you can select as your thumbnail.
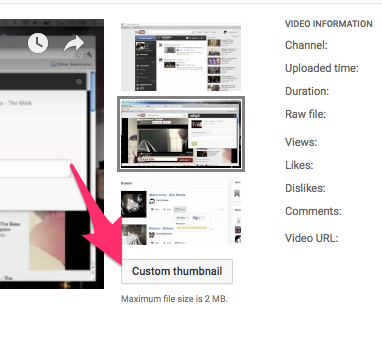
Click on upload image to add your own custom image. The best size is 1280 x 720 pixels. A 16:9 ratio works best since that’s the format of the layout.
But you have to keep your thumbnail under 2 MB.
Step 2. Optimize Your Video for Search
I’m not just talking about Google search here.
YouTube is the world’s second largest search engine by itself. All of those searches are powering an insane amount of views.
To optimize for search, you need to work on your descriptions. YouTube can’t crawl through your videos like Googlebot crawls through your website.
You need to lend a helping hand to get YouTube SEO right. Here are a couple of things you can do:
- Write a description of at least 250 words that outlines the subjects of the video
- Get your keywords in the description in the first few sentences, and use it at least 3 or 4 times in the body of the description
- Start the title of your video with your keywords
- Add tags. Tags help you show up in the related videos column when people are watching other videos.
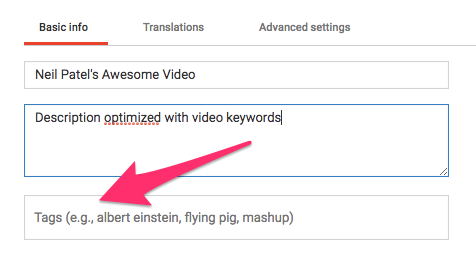
There are also a few of the advanced settings that are helpful to turn on.
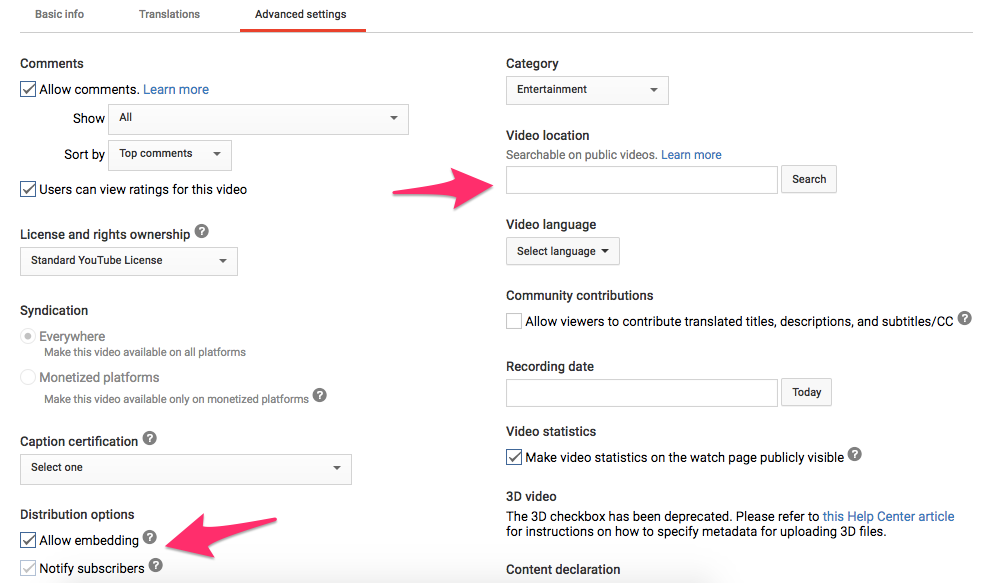
If your video is focused on a local area, you should add a localization to the video.
Then, you want to drive as many views as possible so you should make sure that the two options are enabled: allow embedding and notify subscribers.
This way people can share your video on their websites, and you can benefit from their traffic to drive views.
And wouldn’t it be silly if your subscribers didn’t know you had a new video? It’s checked on by default but just double check.
Step 3. Use End Screens to Promote Other Videos
Anyone who has watched your video to its completion is probably very interested in what you have to say. That is the best time of all to catch them.
YouTube developed end screens to keep people’s attention at the end of your video.
20 seconds before the end of your video, and/or for a bit afterward, you can present related or featured videos to your viewers.
To do that, go to your YouTube account and click on the video manager in the menu on the left:
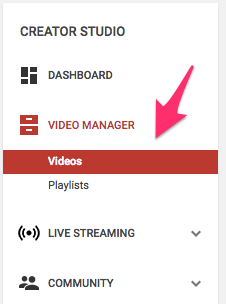
You’ll see a list of your videos. Click on one of them.
You’ll see all the options to edit your video, like enhancing it or adding audio. Select Editor, then Add an end screen.
The end screen adds extra time to the end of your video where you can do two key things: promote your other videos and get people to subscribe to your channel.
Click on the Add element button.
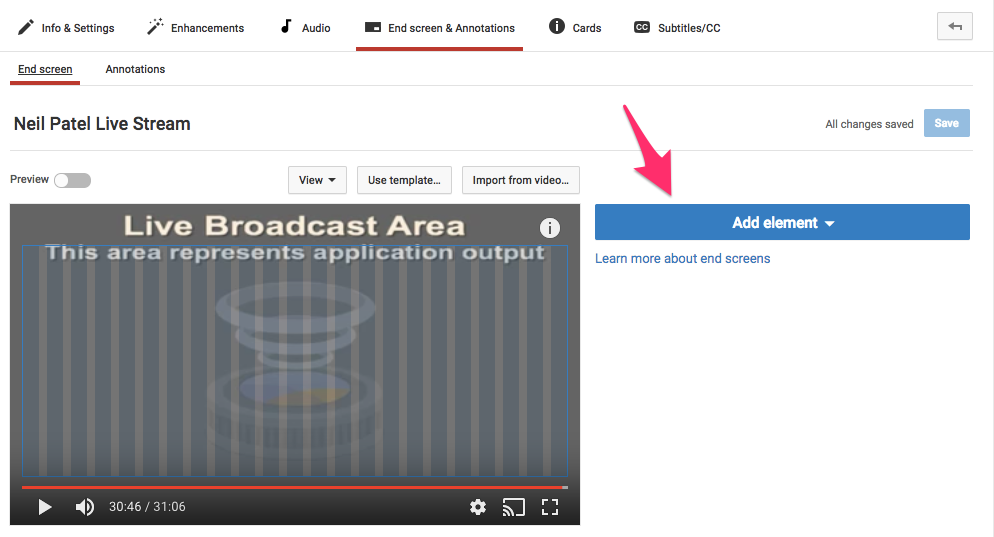
You’ll see a dropdown menu with a few of different options. All of them are great for driving traffic.
YouTube provides three options for promoting your other videos and playlists that are pretty great.
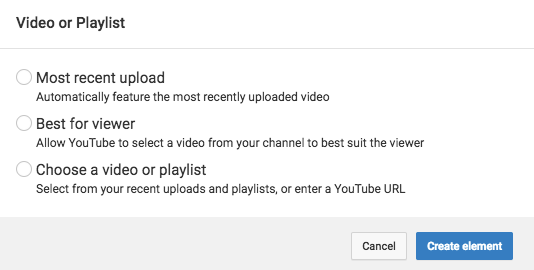
You can choose to feature your most recently uploaded videos, or you can choose a specific video that you want to promote.
Or you can let YouTube do the work and automatically recommend videos from your channel that would be the most relevant for each viewer.
You could even link out to other people’s videos if you want.
When you add a video, it will display the thumbnail plus the title and the duration of the video:
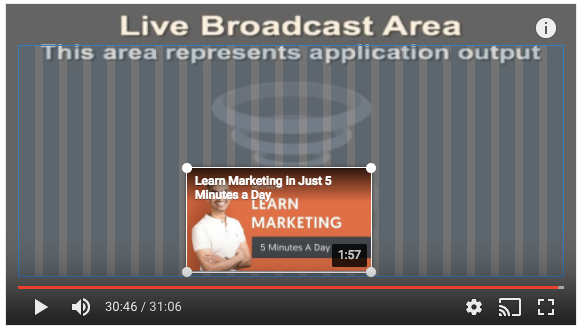
You can reposition and resize the video.
You can add up to four elements to expose people to as many of your videos as possible.
Step 4. Get People to Subscribe to Your YouTube Channel
If you want to create a successful vlog, you need to increase your subscribers.
Views come and go.
Subscribers are more than people that happened to see your video.
They are people who were so happy with that video that they want to see more. They are anticipating that you will give them something great again.
What’s more, media outlets and brands looking to partner with vloggers will use subscribers as their key metric when evaluating opportunities.
The most important is adding the subscribe action. When you do you will see your channel’s avatar in a round circle.

You can position this button wherever you want on the screen.
You can also use the end screen we discussed above to increase subscribers.
Don’t forget to add a link to subscribe to your website, email signature, and Instagram bio. It’s not just enough to add the YouTube link. You should tell people something clear like “Subscribe to see more videos.”
Step 6. Go Live
Live video is the new wild west in digital marketing. It represents a lot of opportunities. It’s much easier to be featured on the Live home page than the regular YouTube homepage.

I’ve written all about how you go live on YouTube and why it’s important.
Live also gives you the opportunity to interact directly with people while they watch you.
You can instantaneously respond to people’s questions that come up in the chat. This creates a real-time relationship.
Conclusion
Video blogging is becoming more and more important for content marketing.
And there’s no time like right now to get started in video marketing.
Organize your thoughts, sit down, and create a concept for a video series.
Like all content marketing, your video needs to give the viewer something of value, whether that be informative or educational or entertainment.
Then, make that video with the highest quality that your time and budget allows.
If it’s helpful, read some books about cinematography. I recommend Gustavo Mercado’s The Filmmaker’s Eye. You can skim through to get the basics about things like shot composition.
Finally, whatever you do, don’t forget to get your video in front of people.
You could make the best video the world has ever seen, but that won’t make you a successful vlogger.
What are your experiences with vlogging?
The post How to Become a Successful Vlogger appeared first on Neil Patel.
Best Content Management Systems

Disclosure: This content is reader-supported, which means if you click on some of our links that we may earn a commission.
A content management system—CMS for short—gives you the ability to publish content on the Internet.
These systems make it possible for everyday users to build websites and post content without having to write code or learn programming languages. Without a CMS, you’d have to write web pages using JavaScript, CSS, and HTML.
There are tons of different content management systems available on the market today. So naming just one as the definitive “best overall” option is impractical.
With that said, there are definitely CMS platforms that are better than others, depending on your specific use cases and unique scenarios. This guide will help you choose the best content management system for your website.
Here are my top picks:
The Top 6 Options For Content Management Systems
How to Choose the Best Content Management System For You
There are specific elements that you need to consider as you’re shopping around and evaluating various CMS platforms. Use the following factors as a buying guide to help narrow down your options and choose the best option for your site:
Usability
The primary factor that you need to consider is the usability of a CMS. What will you be using it for? Who specifically will be using it?
Marketers and writers might be creating the content, but those people may not have the skills to manage it online, format it, and write lines of code. If this sounds like your scenario, make sure the CMS is easy enough for non-technical users to manage.
Look for solutions with a WYSIWYG (what you see is what you get) editor, drag-and-drop building tools, simple publishing features, and the ability to embed third-party content or add rich media.
The type of website you’re creating will also fall into this category. For example, blogs, ecommerce sites, and portfolio sites won’t have the same needs.
Security
Security should always be a top concern when you’re looking at CMS software.
Some platforms will have built-in safeguards and security features to fight off malicious attacks and hackers. Other tools rely on third-party plugins and extensions for security. Generally speaking, popular and open-source CMS platforms are more vulnerable to attacks. You’ll have to install your own security plugins to adequately keep your site safe.
But these platforms typically have an extensive marketplace with a plethora of plugins—so it shouldn’t be too difficult, even though it requires an extra step.
SEO
The best content management systems will come standard with features and tools to boost your SEO efforts.
Examples include XML site maps, meta descriptions, custom permalink structures, alt text, title tags, etc. In addition to these out-of-the-box SEO features, you should consider using CMS software that will let you add third-party plugins or extensions to better serve and enhance your SEO strategy.
Support
Find out what type of technical support is provided by the CMS platform you’re using.
What happens if you have a question, run into a problem, or need help? Will you be stuck to figure it out on your own? Or can you seek assistance from a support agent?
If you’re using an open-source CMS, you probably won’t have the luxury of dedicated support. You’ll have to rely on tutorials, self-help articles, and forums. But if you’re using a site builder or SaaS CMS, you can usually expect 24/7 support.
Custom Capabilities
Some CMS software will restrict what you can do with your website.
For many people, this is a non-issue. But for those of you looking for complete customization with no restrictions, you’ll have to go with an open-source CMS system.
These platforms let you customize everything using the HTML code of your site. So it’s a great choice for developers and tech-savvy users. With that said, even non-technical users can benefit from customization by leveraging third-party plugins or extensions.
If you can’t find a custom function from a feature marketplace, you’ll need to have a developer build one for you. Make sure your CMS is compatible with this level of customization if you plan to go this route.
The Different Types of Content Management Systems
CMS platforms come in all different shapes and sizes. Before we dive into the reviews for my top picks, I want to quickly explain the different options you’ll come across as you’re shopping around. Understanding the differences between these systems will make it much easier to find the best CMS for your website.
Open Source CMS
An open-source content management system can be for any purpose. Anyone can use these without a license. These platforms can be fully customized without the need to request special permission.
An open-source CMS will be cheaper than other platforms that require subscriptions. Developers and users who want full custom capabilities without restrictions will benefit from using an open-source CMS.
It’s usually fairly easy to optimize your content for search engines with open source CMS platforms. Adding plugins and other extensions to extend the functionality is fairly simple as well.
Website Builders
Site builders are great for beginners. They make it possible for non-technical users to build a website without writing code or dealing with the backend requirements.
These will usually have drag-and-drop or WYSIWYG editors.
Website builders are easy to use and allow you to publish content quickly on the web. But they are a bit restrictive in terms of what you can customize. You’ll eventually run into limitations with site builders.
For many people, that’s fine. If you don’t need to create anything complex, a website builder should be more than suitable for your needs.
Ecommerce Platforms
As the name implies, ecommerce CMS platforms are built specifically for online stores.
These platforms come out of the box with everything you need to manage your ecommerce content. You can still run an online store using an open-source CMS or website builder with ecommerce capabilities. However, if you’re starting a new ecommerce site from scratch and don’t want to do a ton of heavy-lifting, look for an ecommerce-specific CMS.
Proprietary CMS
A proprietary CMS will require a license to use.
In short, this means that someone else owns the rights that CMS. You’ll need their permission to use it. Even if you obtain a license, you probably won’t be able to duplicate the CMS. You might also encounter restrictions related to what you can customize and alter within that license. Some proprietary CMS platforms will offer developer licenses for these scenarios.
If you’re using a proprietary CMS to build your website and decide to move it somewhere else down the road, you could run into some serious problems. Some sites only work if they stay within the proprietary CMS that they were built with. So use caution if you go this route.
SaaS CMS
SaaS (software as a service) CMS are typically cloud-hosted subscription-based tools. Many of these tools come with CMS, tech support, and web hosting, all from a single provider.
The rates are usually offered on a per-site or per-user basis. Pricing is also based on storage levels, bandwidth, and support level. These systems can be offered as fully managed or partially managed solutions. The best option for you will depend on if you want to manage updates, security, backups, and other customizations on your own.
#1 – Wix Review — The Best CMS For Building New Websites
Wix is one of the easiest website builders available on the market today. Its simplicity makes it a popular choice for non-technical users who want to create a website from scratch.
I like Wix because it offers an intuitive drag-and-drop building tool. So you can add elements to your site and manage your content without writing a single line of code.

Aside from Wix being an excellent choice for beginners, here’s a quick overview of the other highlights that make this CMS stand out from the crowd:
- 500+ free templates
- Optimized for SEO and mobile
- Create password protected membership pages
- Contact management tools for subscriber lists
- Ecommerce capability with product pages, payment acceptance, and store management
- Bookings and calendar management
- Blog management tools with multiple writers and contributors
- Photography, video, and media management tools
- Free hosting and free SSL certificate
Overall, Wix’s content management system is extremely versatile. It’s trusted by restaurants, musicians, online stores, small businesses, bloggers, and sites in virtually every industry.
The platform is free to use with a Wix subdomain, but that’s not really practical for most users. Premium plans start at just $14 per month.
#2 – Shopify Review — The Best CMS For Ecommerce Sites
If you’re starting an online store and need an ecommerce-specific CMS, look no further than Shopify.
Businesses of all shapes and sizes have been using Shopify to sell online. Whether you’re building a new site from scratch or switching from your existing CMS, Shopify can accommodate your needs.

Let’s take a closer look and see why Shopify’s CMS platform ranks so high on my list:
- Manage products and sell from your site, social media, and online marketplaces
- Built-in marketing tools
- Simple dashboard to manage products, orders, payments, and shipping
- 4,100+ apps to add features and functionality to your site
- Free SSL certificate
- Unlimited products
- 24/7 support
Shopify even has a marketplace of experts for hire. So if you need assistance with SEO or getting your store setup, you can find a qualified expert directly within the platform.
Another reason to consider Shopify as your CMS platform is because it’s built to scale. Plans start at $29 per month, and you can try it free for 14 days.
#3 – WordPress Review — The World’s Most Popular CMS
WordPress powers 38% of the Internet, making it the most popular content management system on the planet.
The platform supports everything from small personal blogs to some of the biggest news websites in the world.

As a free and open-source CMS, WordPress is virtually limitless. You’ll have total control over every aspect of your site, with no restrictions on customizations. This makes WordPress a popular choice for developers and tech-savvy users.
But even non-technical users can take advantage of WordPress. It has an extensive library of 57,000+ plugins, which makes it easy to add functionality to your site.
Other top features include:
- Fully customizable designs
- Mobile responsive content
- SEO friendly
- Powerful media management tools
- High performance and easy to access
The downside of using a free and open-source CMS is that you don’t have dedicated support. But WordPress has an extensive network of developers, content creators, and site owners who are active on community forums.
You’ll also have to get your web hosting plan and domain registration on your own from third-parties.
#4 – Drupal Review — The Best WordPress Alternative CMS
Drupal is another free and open-source content management system.
If you need multiple page templates and content types, Drupal is a viable alternative to WordPress. It’s also more equipped to handle advanced user permissions.

Drupal is a popular choice for developers, marketers, and agencies alike. It’s used to manage content across a wide range of industries, including healthcare, ecommerce, retail, FinTech, travel, media, government, and more.
Some of the top features and noteworthy highlights include:
- Content authoring
- Content as a service
- Marketing automation
- Robust security
- High performance, scalability, and accessibility
- Advanced personalizations
So if you’re looking for open-source functionality but don’t like WordPress, I’d go with Drupal for content management.
#5 – Squarespace Review — Best CMS For Creative Professionals
Squarespace is an all-in-one website builder. But unlike other similar CMS platforms on the market, Squarespace has a unique differentiator—beautiful designs.
The award-winning templates offered by Squarespace are second to none. These can be fully customized to fit your site’s needs.

These modern designs make Squarespace a popular content management choice for creative professionals, musicians, artists, and portfolio sites. Let’s take a closer look at some of the other noteworthy highlights available with this CMS:
- Free domain for the first year
- Intuitive website builder
- Free logo making tool
- Ecommerce and blogging capabilities
- Third-party extensions for expanding functionality
- Built-in marketing tools
- SEO tools and mobile optimized
- 24/7 customer support
Squarespace plans start at $12 per month. If you’re looking for a simple way to manage your portfolio site, this will be a top content management system to consider.
#6 – TYPO3 Review — The Best Enterprise CMS
TYPO3 isn’t the most well-recognized name in the CMS space. But it’s not for everyone.
It’s another free and open-source platform (like WordPress and Drupal), but it’s branded as an “enterprise-class CMS.” Global leaders like Mercedes-Benz and Sony rely on TYPO3 for content management.

In addition to being used by large corporations, TYPO3 is actually a popular choice for European-based websites. Here are some of the reasons why this CMS platform made my list:
- Ability to support corporate environments
- Fully scalable multi-site management
- Multilingual installations
- Easy to set up on your existing infrastructure
- High speed and performance
The average user will likely lean towards WordPress or Drupal. But global organizations with complex content management needs should consider an alternative like TYPO3.
Summary
With so many CMS systems available on the market today, there are really only six that I can recommend with conviction.
Personally, I use WordPress. But there are plenty of other viable options to consider based on your personal needs.
Just refer to the buying guide and reviews outlined in this post to find the best content management system for you.
The post Best Content Management Systems appeared first on Neil Patel.
source https://neilpatel.com/blog/best-content-management-systems/
How to Get Your Products in Walmart Marketplace

As the most successful retailer in the world, it’s only natural for Walmart to have expanded into the e-commerce space. The Walmart Marketplace is among the fastest-growing e-commerce stores out there, so if you’re looking for an Amazon alternative, it’s a serious contender.
But how do you make the most of Walmart Marketplace? Well, let’s take a look, starting with how the platform operates.
What is Walmart Marketplace?
As an e-commerce platform, Walmart Marketplace lets third-party vendors sell their products to the Walmart customer base. Once you register as a seller and upload your listings, your items appear in the search results alongside Walmart’s products and other Marketplace vendors.
You’re probably wondering what Walmart gets out of this, but it’s actually pretty simple. It’s all about moving with the times.
Walmart launched the marketplace back in 2009 to attract online shoppers and grow its customer base. By welcoming third-party vendors, Walmart can deliver a broader, more diverse product range to its customers, so there’s less need for them to shop elsewhere.
Why Should I Sell on Walmart Marketplace?
The most obvious reason why you should join the Marketplace is the potential customer reach. Since millions of people shop on Walmart.com, there’s already a huge customer base for you to draw from. If you haven’t quite figured out your target customers yet, Walmart handles this for you.
However, that’s not the only plus for vendors. Here are some other key advantages to becoming a Walmart Marketplace Seller:
- Walmart consistently generates a high volume of sales.
- There’s a major push towards attracting millennials with improved delivery options, increased brand diversity, and better customer service. If you target millennials, this is the platform for you.
- There’s so much autonomy. You set your prices and fulfill orders, and you build your own brand.
- If you’re a Shopify vendor, it’s easy to integrate your listings with the Walmart Marketplace platform.
Who Should Not Sell on Walmart Marketplace?
There are lots of reasons to sign up for the platform. Still, it’s not for everyone, and it all comes down to Walmart’s price guarantee.
Your product listings appear alongside Walmart’s items, meaning you may be competing with lower-priced merchandise. What’s more, you can’t sell on Walmart Marketplace if:
- You sell the products on other e-commerce platforms at lower prices.
- Customers can buy the same product for less on another site.
My advice? Ensure you can meet Walmart’s price demands before you sign up. Don’t forget to factor in shipping fees and other costs.
What Products Are Allowed on Walmart Marketplace?
There are over 35 product categories to choose from, including toys, games, and electronics, so there’s a good chance you’ll find a fit for you. Some items, like perfumes and seasonal goods, require special permission before you can sell them—contact seller support to arrange this.
Here are some items you can’t sell on the Marketplace.
- Alcohol
- Event tickets
- Gambling products
- Tobacco
- Any food requiring refrigeration, i.e., not shelf-stable
It’s always best to contact seller support if you’re unsure about an item you plan on listing.

How Much Does Walmart Marketplace Cost?
It’s completely free to sign up for a basic Seller Account on the Marketplace, but here’s a breakdown of what you need to know.
- You don’t pay anything to list products for sale on Walmart Marketplace.
- Once you sell something, you pay a Referral Fee on the item.
- You don’t pay monthly or annual subscriptions.
The Referral Fee is a percentage of the gross sale price and varies based on what item you sell and what category it’s in. Referral fees start at 6% and go up to around 20%.
Think of the Referral Fee as commission. You pay Walmart a commission for introducing you to potential customers and facilitating a sale.
How Much Can I Make on Walmart Marketplace?
That’s the biggest question, isn’t it—how much money can I make this way? It all comes down to:
- Managing your store effectively
- Optimizing your prices
First, you need to know how much other vendors charge for items like yours. In other words, do some market research.
- Check out competitor stores.
- Research how much your items sell for around the Marketplace and elsewhere.
If you list an item at the same price as another vendor, Walmart automatically promotes the product that was listed first. For example, if you and vendor B both sell hairdryers at $40, but vendor B listed their hairdryer the week before you, theirs appears in the item listings before yours.
Want yours listed first? Drop your prices if you can, and watch out for competitors changing their prices.
That said, there’s no point in selling items for rock bottom prices if you won’t make a profit. So, you should determine your profit margin. Factor in costs like:
- Referral Fee
- Shipping costs
- Returns fees
- Your purchase costs
- Any overhead costs you have, e.g., electricity, labor costs, and other merchant costs if applicable
Once you’ve identified your margins, it’s time to set prices. We can’t tell you how much you should charge, but you should be aiming for the lowest possible price. If you can’t “compete” with Walmart’s low pricing structure, it might not be the platform for you.
There’s good news, though. As of Q2 in the 2021 fiscal year, Walmart online sales jumped by a record 97%, meaning there’s a whole lot of profit potential on this platform if you use it properly.
Let’s look at how to do just that.

How Do I Sell on Walmart Marketplace?
Onboarding onto Walmart Marketplace is relatively straightforward, but it’s even easier if you know what steps to work through.
1. Get a Walmart Marketplace Account
First, you need a Walmart Marketplace Account. Here’s what you need to get started:
- A US business address and tax ID
- An integration strategy for uploading and managing your product catalog
- A company website
- An established selling history
Essentially, you need to show Walmart that you’re a serious seller. You’re someone who knows how to process and fulfill orders, and you prioritize customer care.
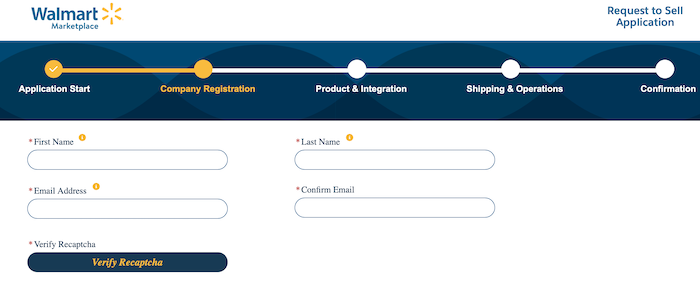
The application takes around 10-15 minutes to complete, but the approval process can take a few weeks, if not months.
2. Register Your Business on Walmart Marketplace
Approved to sell? Now, it’s time to create your Partner Profile, which offers customers an overview of your entire business and all your policies.
First, click the link in the email you received from Walmart Marketplace. It takes you to an account registration page.
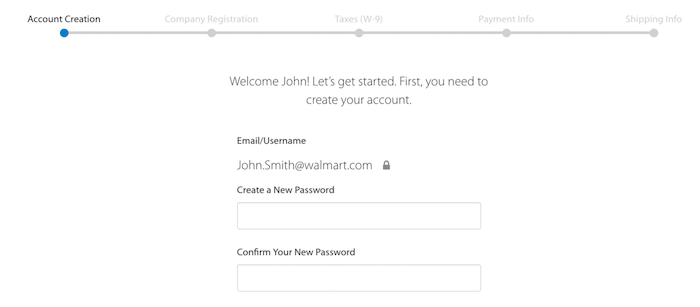
Once you’ve chosen a password and confirmed your business name and address, you fill out a W-9 so that Walmart can verify your identity. Here’s what the form looks like:
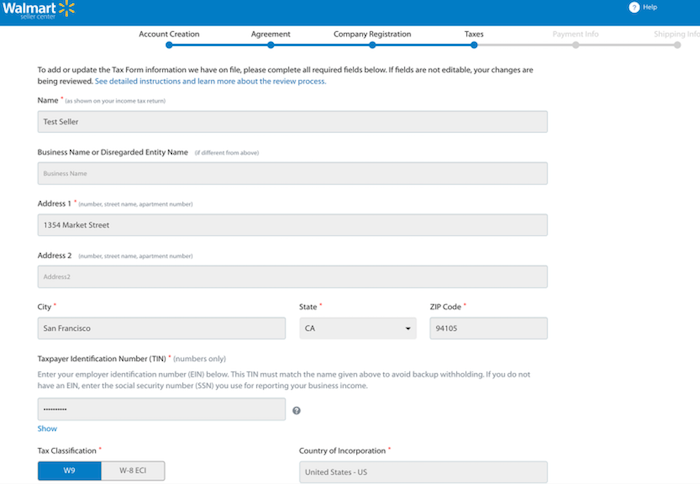
After you’re finished with the tax paperwork, select how you want to receive payment. You can choose from Payoneer or Hyperwallet. It’s a good idea to set up an account with one of these providers before you start the application.
Finally, you choose your shipping model, including which regions you deliver to and which delivery options you plan to make available.

Next, it’s time to add some details. Include your:
- Privacy Policy
- Shipping Policy
- Customer Service and Returns Policy
- Key contact information
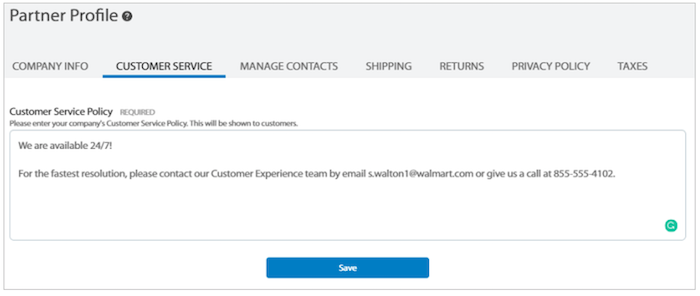
It shouldn’t take long to work through the Partner Profile, and there’s no need to wait for approval before moving on to the next stage.
3. Create Walmart Marketplace Listings
Once you’ve completed your Partner Profile, it’s time to post some items.
- Have your image source URLs ready before you start.
- Pick meta keywords to include in your listings.
- Make sure you’ve chosen an upload method. For many people, the “Bulk Upload” method is preferable because all you’re doing is entering product details into a spreadsheet. You don’t need fancy technical skills.
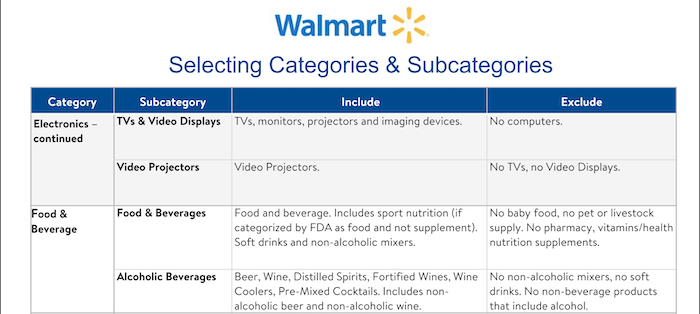
The first step is picking the product category. Remember, there are multiple categories available, so be sure to choose the closest match. Here’s an example of what the categories look like.
Then comes the tricky part: How do you make your listings stand out? Well, it’s all about optimization.
- Choose the correct category.
- Ensure you upload at least four product images.
- Optimize your title with keywords – use my free tool, Ubersuggest, for keyword ideas.
- Include customer reviews if you have them.
- Choose a competitive price.
- Offer Expedited Delivery, if possible. Customers generally want their items quickly.
Why is it so crucial for listings to stand out? Because the best listings win Walmart’s coveted “Buy Box.”
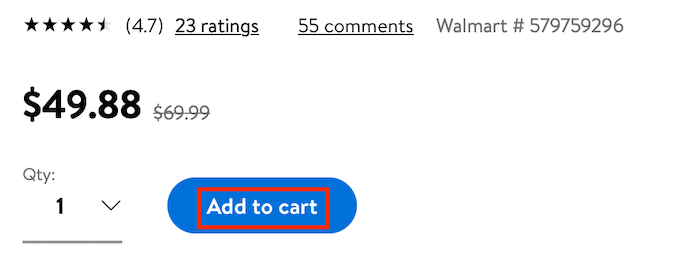
Remember when we said that Walmart shows customers the earliest-posted and cheapest item first? Well, customers don’t just “see” this item first. It’s the default product automatically added to someone’s cart when they click “Add to Cart.”
“Add to Cart” is the “Buy Box,” and as you can imagine, it’s highly coveted real estate on the Marketplace!
4. Fulfill Walmart Marketplace Orders
You need to follow some pretty strict fulfillment rules to maintain your spot on the platform.
- Always acknowledge a customer order within four hours of receipt, even if you’re not shipping it right away. This is key to excellent customer care.
- Customers can usually return any item they buy within 30 days. You can reduce this to 15 days for products like electronics, but it’s okay to give customers longer to return items, too.
- You don’t need to accept all returns, but your exceptions must be reasonable, e.g., if the merchandise is soiled or removed from original packaging.
- If you’re at fault, e.g., you send someone the wrong item, you pay the return fee. Otherwise, the buyer pays.
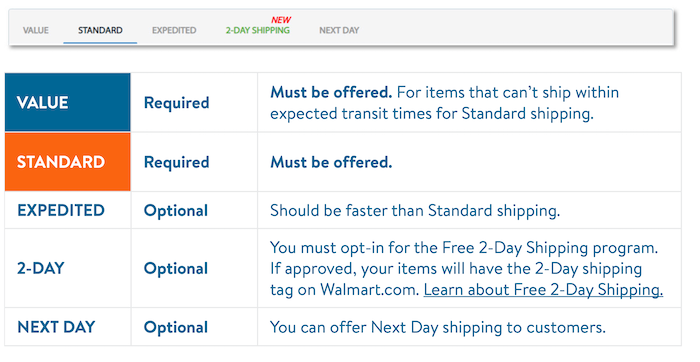
You must always offer at least two shipping options:
- Free Value Shipping
- Standard Shipping
You can also offer Expedited or Next Day Delivery, but these orders must arrive quicker than the cheaper shipping options—or you might need to reimburse shipping.
Avoid late orders wherever possible. Unhappy customers reflect poorly on your overall rating.
- Set realistic order cutoff times for different shipping options.
- Add a Shipping Policy to your profile, so customers know what to expect.
5. Get Paid by Walmart Marketplace
The payment rules are a little complicated, but we can break them down like this:
- Most people get paid every 14 days.
- The payments received depend on Walmart’s internal payment cycle.
- If your account is less than 90 days old, it takes a little longer to receive payment. Each item you sell takes at least 28 days to settle, not 14, during this time. Think of it as a probationary period.
- Payments received after midnight on Friday PST settle in the following payment cycle. In other words, this is the cycle cut-off.
- Walmart posts payments on Tuesdays.
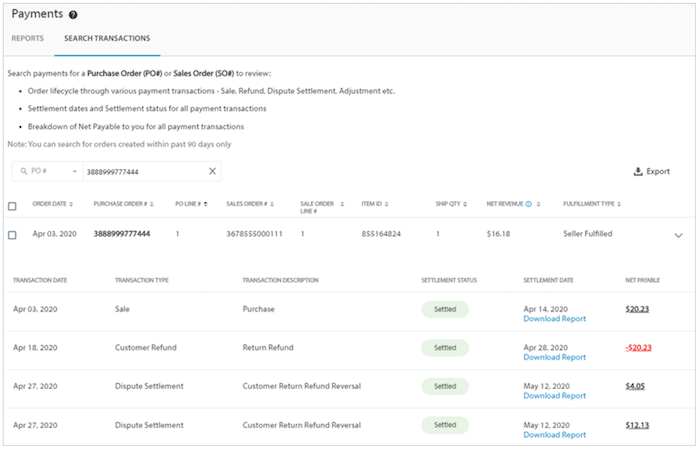
Refunds are deducted from your payments as they’re processed. You can view your transaction history by checking the “Payments” section in the Seller Center.
6. Keep Your Walmart Marketplace Account Compliant
Walmart cares about vendor quality, so here are some tips to bear in mind.
- Don’t list prohibited products.
- Fulfill orders on time.
- Keep your inventory up-to-date to avoid disappointed customers.
- Ensure your products match the descriptions, and don’t send out defective items.
The bottom line? Maintain high customer service standards, keep your listings accurate, and don’t take on more orders than you can handle.
Conclusion
Now we’ve explored the inner workings of the Walmart Marketplace, there’s only one thing left to do—apply to join the platform!
Just remember to optimize your listings with the right keywords and best prices before you get started. For some extra help with your marketing and analytics, check out my consulting services.
Remember, you need to impress the Marketplace before you sign up, so it makes sense to do some groundwork first.
Have you tried the Walmart Marketplace? How is it working for you?
The post How to Get Your Products in Walmart Marketplace appeared first on Neil Patel.
The 4 Best Technical SEO Companies of 2020

No matter how great the content on your website is, your hard work could amount to nothing without proper technical SEO.
Technical SEO gives your site structure, makes it super easy for search engine bots to crawl and index, and helps Google understand what each page is about.
URL structuring, robots.txt, redirect codes, canonical tags, .htaccess files, load time, and many others. It all matters.
Do all those things sound unfamiliar to you? No?
Well, you don’t need to.
Tons of companies already know this stuff and it’s really easy to work with them.
That’s where this guide comes in.
Our team at Neil Patel Digital researched, reviewed, and listed the top technical SEO companies on four criteria:
- Outstanding customer reviews.
- Awards, impressive clientele, and a long history of delivering stellar technical SEO work.
- Thought-leadership—consistently publishing of insightful articles and trends on the topic.
- A strong reputation amongst other SEO professionals.
From these criteria, we found technical SEO companies you can trust and what they’re good for:
The 4 Top Technical SEO Companies in The World
- Neil Patel Digital – Best for Technical Content Structuring
- Webris – Best for Technical SEO Audits
- Salt.agency – Best for Enterprise Technical SEO
- Orainti – Best for Ecommerce Brands
Without further ado, let’s dive into what makes us trust and bet our reputation on these companies.
1. Neil Patel Digital – Best For Technical Content Structuring
It’s been touted over and again that content is king. While there’s truth in this, what most people never take into consideration is content structuring.
Neil Patel Digital is the go-to SEO company for excellent content structuring.
Well, don’t take my word for it. Let me show you why.
From our years of extensive search engine optimization experience, we found that for content marketing to work and power long-term SEO strategy, it must have the right structure.
This is a key piece of our comprehensive SEO program.
And what have we to show for doing this, you ask?
The result of doing this speaks for itself:

Over 3 million visitors per month on this blog. All built from scratch.
Content was a huge part of this but the site wouldn’t be nearly as large without the right structure and technical SEO.
You can get access to this vast technical SEO expertise by working with the Neil Patel Digital team.
Today, we’ve developed a content marketing program with content structuring (in the form of content clusters) to help clients get technical SEO right from day one.
2. Webris – Best for Technical SEO Audits
Almost all great endeavors begin with taking in-depth audits of what’s already existing.
Technical SEO is no exception.
You won’t achieve much in your effort to optimize your site for search engine bots’ crawling and indexing without first doing a proper audit of your site’s structure.
And Webris is the company we recommend for technical SEO audits.
If you a do quick Google search for “technical SEO audit,” you’ll find this excellent content piece by Webris:

Ranking on Google’s top spot for this search term is another way of saying that earned its stripes on this list.
No company can earn that by accident.
This proves that Webris walks the talk when it comes to technical SEO audits and is a reliable option if you’re just getting started.
Founded by Ryan Stewart, the core strengths of Webris is technical SEO audits and conversion-focused UX. This company boasts of an incredibly talented team of advanced technical SEO consultants.
Major brands like Shopify and Accenture trust Webris and have worked with them.
3. Salt.agency – Best for Enterprise Technical SEO
Salt.agency prides itself on “Technical Excellence” and that’s for a good reason. This company breathes technical SEO before anything else:

Massive enterprise sites can have all sort of crazy technical problems.
If you’re running one of these sites, you need a team that’s worked with that type of complexity before.
In this case, Salt.agency is the best option.
With offices in Boston, Leeds, and London, Salt.agency’s clients include Cloudflare, Hartley Botanic, Brex, Travel Supermarket, and many others.
4. Orainti – Best for Ecommerce Brands
Orainti specializes in providing technical and strategic SEO services for brands in competitive industries.
This company approaches digital marketing and search engine optimization with a technical mindset, which justifies its inclusion in this highly-vetted list.
And they work mostly with ecommerce brands selling internationally.
International ecommerce businesses have tons of unique challenges like dealing with multilingual sites, getting product and category pages ranked properly, and avoiding duplicate content.
Orainti comes highly recommended for this.
Aleyda Solis is the Founder of Orainti. She is a veteran SEO practitioner, speaker, and author who has earned recognition and awards for her technical SEO expertise by organizations such as Forbes and European Search Awards.
Orainti boasts an impressive portfolio of top brands, including Zillow, Under Armour, Sage, Eventbrite, and others.
5 Characteristics That Make a Great Technical SEO Company
What separates the good technical SEO shops from the great ones? What would you specifically look for when choosing someone to work with?
Here’s what I look for.
1. A Complete Implementation Process that Includes Technical SEO
Technical SEO brings structure to your site. It helps search engine bots crawl, index, and rank your website correctly, which is essential for driving traffic.
Also, it helps to boost your site’s load time.
However, this doesn’t mean that once you have an excellent technical SEO, everything search engine optimization will fall in place automatically.
The best technical SEO companies have a complete SEO program including manual site review, technical SEO implementation, content strategy, and others.
If you’re really good at SEO already and just need a quick SEO audit to double check everything, you could get value at working with a specialist. But for everyone else, I recommend working with someone that understands the complete SEO strategy. It’s the only way to build a site with tons of traffic.
2. Thought leadership
It takes lots of experimentation to implement technical SEO strategies that move the needle. Companies that embark on this kind of excruciating work always like to document their experience and findings.
Working with SEO thought leaders increases the odds of a successful project.
After all, if someone can successfully teach technical SEO, they can also help your business directly.
Publishing cutting-edge content about technical SEO is a great sign that they’ll deliver amazing results.
3. An Impressive Client Portfolio
An excellent way to see if the expertise and processes used by a technical SEO company works is by looking at its client portfolio.
There is nuance here.
Having a ton of major brands is great. But that doesn’t mean that you can get help with your exact situation.
Ideally, the technical SEO company has worked with similar companies like your own.
4. Real Life Results
The nice thing about technical SEO is that it’s extremely practical. Technical problems come up that tanks traffic. Then technical SEO experts fix those problems.
It’s cut and dry.
Any great technical SEO company should have plenty of case studies where they turned around a site after it got hit. The more obscure the technical problem, the more likely they’ll be able to find weird problems on your own site.
Sometimes, these case studies are published on their site. But a lot of companies don’t like sharing the best stories. So ask their team as you talk to them. They should be able to give you plenty of examples during a call.
5. A Diversified Team
Covering every last technical SEO requirement is way too big of a task for a single person. You’ll need a fully-staffed team to do it all. Especially on major sites.
Go through the company’s team pages and LinkedIn employees, then look for lots of depth and expertise across the entire team.
What to Expect from a Great Technical SEO Company
If you’re like most people who only realize the need for technical SEO late on, you’ll probably be wondering what you should expect from one.
The most significant things to expect are what follows.
1. A discovery session
After you reach out to a technical SEO company, they’ll want to get on a call to understand what you’re looking for.
It’s the only way to understand the goals that you have for your site.
If a technical SEO company wants to jump straight into an audit without even getting on the phone, it’s a sign they’re running an “audit mill” and aren’t going to spend much time on your project.
Find a company that wants to go really deep and understand the full picture.
2. A one-time audit proposal
Most technically SEO companies will perform a one-time audit for a flat fee.
Since this is a standard part of their practice, they can usually jump into this right away.
Assuming their fee works with your budget, you could have someone get started within a week. That’s how easy it is to get going.
Before starting the audit, ask them for everything that they’ll check. It should include everything like canonical problems, indexing issues, duplicate content, other Google Search Console errors, everything.
If the list doesn’t feel extremely comprehensive, get a few quotes from other companies.
3. Completing the audit
Once you’ve agreed to move forward with an audit, the company will get started.
These usually take a few weeks to complete, depending on the size of your site.
Of course, you’ll need to give them access to your Google Analytics, Google Search Console, WordPress account, and possibly your web host.
During the audit, there shouldn’t be much work for you or your team. The company performing the audit may have questions but they can do the vast majority of the work on their own.
4. Implementation proposal
Most technical SEO audits only include the discovery of site issues. The project doesn’t usually include the work that’s required to fix any problems.
This is because most problems don’t have easy fixes.
For example, if your site has terrible site speed that’s impacting your rankings, you’ll need to do a ton of front-end work in order to fix it. That will also involve your marketing team and possibly other agencies.
So once the audit is complete, expect to see a proposal that includes implementing any solutions.
Something to watch for here: a great technical SEO company will know the limits of it’s expertise. When they find problems outside their capabilities, they’ll tell you and advise you to work with someone else on fixing them. Site rebuilds and content marketing are good examples of this.
If a technical SEO agency tells you that it can fix every single problem, double check and make sure they truly have real expertise in those areas.
Should I take Technical SEO Seriously?
Yes!
Technical SEO is like the frame of your house. Only with good bones can your content and marketing drive traffic to your site.
But, as things add up, and you have hundreds or thousands of pages on your site, something is going to break.
Search engines have a harder time crawling your site, content isn’t indexed, and your site speed slows way down.
Even if you start with a great foundation, you need a healthy rebuild every few years.
If you haven’t done a deep technical SEO audit recently, now’s the time.
The post The 4 Best Technical SEO Companies of 2020 appeared first on Neil Patel.
How to Use Quizzes in Your Marketing Strategy

Using quizzes in your marketing strategy is one of the most underrated marketing moves.
Seriously.
They are incredibly effective at generation leads, engaging your audience, and much more.
But, it isn’t enough for me to just convince you to implement quizzes in your marketing strategy, so I’m going to show you exactly how to create an effective quiz, how to distribute it, and how to follow it up with marketing automation.
At the end, we’ll cover several brands successfully using quizzes in their marketing strategy so you can walk away with a little more insight.
Part I: Creating Your Quiz
There’s more to a quiz than you might actually think. Did you know that six out of ten people only read a headline? That means we’re going to have to make a pretty good first impression, so let’s talk about the title first.
Title Selection & Quiz Types
The very first step to creating a quiz would be coming up with the title for it. Once you’ve got that down, you’re going to want to figure out what type of quiz you want to make.
Here are a few of the most common quiz titles;
- The “Actually” Title: Believe it or not, adding the word “actually” can turn a simple question into a challenge. Compare “How much do you know about the Golden State Warriors” against “How much do you actually know about the Golden State Warriors” and you’ll see what we mean. No one likes to back down from a challenge, right?
- “The Which (Blank) Are You?” Title: This one’s a classic. Due to our innate inquisitive nature, sometimes we just have to know which Marvel superhero we are before we die. It’s just one of those things we have to cross off our bucket list.
- The “Celebrity Personality” Title: This is your typical personality quiz with the substitution of celebrities to give it that added pizazz. Because of the use of celebrities, they’re more likely to get someone’s attention sheerly through being starstruck.
Choosing The Quiz Type
The quiz titles above will give you a few ideas of quiz types, but here’s a few more to consider:
- The Personality Quiz – We like to hear good things about ourselves, so because of the “self-serving bias,” personality quizzes work so well. This type of quiz categorizes people into personalities that compliment them based on their answers. If you’re a brand that focuses on product sales, you could use a personality quiz to place individuals into categories with personalized product recommendations based on the answers they gave.
- The Knowledge Test: The knowledge test simply challenges anyone’s knowledge on a given subject. You could ask your audience how much they know about your brand, the products it offers, or any of today’s trending topics.
Crafting Quiz Questions
Now that you’ve got a general idea of what kind of quiz you want to create along with a title to go with it, it’s time to bring it to life by filling it up with questions!
Here are some things to keep in mind when formulating your questions:
- Infuse Personality into Your Quiz: Breathe some life into your quiz by injecting your personality into it. Approach your audience as if you were talking to them in person. Make your audience feel comfortable so that they’ll be more likely to opt-in later.
- Use Images for Your Questions: There’s nothing wrong with having text-only questions, but don’t be afraid to use images either. Using pictures keeps things interesting and relevant, it also makes your quiz feel more like a trivia game.
- Keep It Short: People don’t have the longest attention spans, so keep things simple and sweet. Aim between 6 to 10 questions for your quiz, in general, this will only take your audience about two to three minutes to complete.
Designing A Lead Capture: Do’s and Don’t’s
After coming up with the questions for your quiz, it’s time to create a lead capture form. The purpose of lead capture is to gather contact information so that you can grow an email list.
You can then follow these leads up through marketing automation, which we’ll get into later. For now, here are some helpful do’s and don’t’s you should follow when creating your lead capture:
Do: Incentivize Your Lead Capture Form
Give your audience a reason to provide you with their contact information. Offer incentives like a free eBook or an entry to a free giveaway. Standard incentives include infrequent updates about your brand or a weekly newsletter. Find what works best to encourage your audience to join your mailing list.
Don’t: Ask For Information You Won’t Use
What’s the point in asking your audience for their phone number if you aren’t going to call them? Make sure you only ask for information that your brand will use; the most basic being a first and last name, and an email address.
Otherwise, you risk annoying your audience and having them bounce from your quiz.
Do: Be Honest About Your Marketing Strategy
It won’t always be clear to your audience that after you get their contact information, you’ll be contacting them. It’s a good rule of thumb to let your audience know that you’ll be getting in touch with them soon, so don’t be all hush-hush about your marketing strategy.
Be honest with your audience. Give them a quick heads up about what’s to come, like this:
Creating Shareable Results
Now onto the results! This is the moment your audience has been waiting for. You want to make sure your results are something they’re going to like and share with others, so creating share-worthy results will be your priority.
Here are a couple of pointers that will help you create results worth sharing:
- Be Honest and Positive: Positive emotions are more likely to promote sharing, so create results that compliment your audience into sharing what they got. At the same time, be honest with your results. Don’t tell your audience that they’re something they aren’t.
- Use Share-Worthy Images: Just like how we used images for your questions, we’re going to want to make sure we use images for your results. This time around, you want to use some pretty interesting pictures; ones that are worth sharing. This is what’s going to attract attention when people share their results on social media.
- Create A Call-To-Action: Don’t let your interaction with the audience end at the results. Provide a call-to-action for your audience. It can be something as simple as a link to your website, or maybe even personalized links to product recommendations.

Part II: Distributing Your Quiz
Now it’s time to put your quiz through the ultimate test by promoting it on social media. Your major outlets for social networks would be Facebook and Twitter, but if you wanted to take it a bit further, you can also use paid advertising on Facebook to give your quiz that extra boost.
Share Your Quiz on Facebook and Twitter
When sharing your quiz on Facebook or Twitter, be sure you check off each of these to get the most out of promoting your quiz:
- Be sure to use an attractive image to represent your quiz.
- Make sure you have a captivating headline for your quiz.
- Share both the image and the caption with a shortened link to track results.

Don’t Be Afraid to Use Paid Advertising on Facebook
The process of promoting your quiz through Facebook via paid advertising can be a fairly lengthy operation, so to save you guys some time, we’ve truncated the whole process into a more time-friendly summary.
- Selecting Your Target Audience: You have your choices of selecting a target audience by location, demographics, behaviors, and connections. You can even break these categories down even further. Let’s take location for example. We can narrow down the location to country, state/province, city, and zip code. Why would we want to do this? Maybe your brand wants to target an audience within its immediate vicinity. We don’t know. It’s up to you how you want to set the parameters for your target audience. So give it a try.
- Creating A Custom Audience: Creating a custom audience consists of working with a list you’ve uploaded ahead of time. Facebook then generates an audience based on that list of previous customers you’ve already worked with.
Part III: Marketing Automation Follow-Ups
Here’s the fun part: following up on the leads you’ve collected. With the help of marketing automation, this may not take as much effort on your end as you might’ve thought.
We’re going to follow-up on your leads the very moment people opt-in, and in the course of two weeks, we’re going to show you how to nurture these leads until you can finally convert them into paying customers.
Here’s a four-step sequence that your marketing automation email follow-ups should live and die by:
Thank Your Audience for Taking Your Quiz First
Immediately after someone opts-in, send him or her an email that telling them “Thank you for taking our quiz!” This will remind your audience that they’ve opted-in, and it’ll also help assert your brand. It’ll give people a head’s up that you’ll be getting in touch with them soon.
Encourage Your Audience to Retake Your Quiz
After a couple of days, we’re going to pick up where your audience left off: their quiz results. Inform your audience about the other results they could have gotten. This may prompt your audience to retake your quiz, and maybe to even share their new results.
This is the perfect transition from your “thank you” email to sending out different content.
Build Trust with Case Studies or Testimonials
After a week, now would be a good time to build trust between you and your leads. Introduce testimonials or customer case studies to familiarize your audience with your brand and what other people think about it. This not only makes your brand look good, but it also lets your audience get more comfortable with who your brand is and what it stands for.
Convert Your Leads into Paying Customers
After two weeks, it’s time to convert those leads. Your audience should be familiar with your brand by now. Use incentives, like a webinar signup or coupons and discounts to encourage your leads to buy into your brand.
The rest is up to you and your expertise in converting leads into customers. These marketing automation follow-ups did most of the work for you, so it’s your turn to close the deal.
Part IV: Examples of Quiz-Use in Every Industry
It’s time to take a quick look at several examples of brands from different industries and how they implemented quizzes in their marketing strategy. Seeing these examples should give you a solid foundation when it comes to considering the use of quizzes in your own marketing strategy.
Retail: Z Gallerie
Z Gallerie is known for its commitment to providing furnishings, art, and accessories to both professional and amateur interior designers alike. They created the quiz “What is your Z Gallerie Style Personality?” to provide a personalized experience for every potential and current customer.

Z Gallerie used a personality quiz as a way of bringing results that offered personalized product recommendations as a part of their marketing strategy. This method brought in a massive amount of leads per day which they followed-up with marketing automation.
It allowed Z Gallerie to continually recommend products tailored specifically to each person based on their individual quiz results. Now that’s online shopping done right.
Software: Cloud Sherpas
Cloud Sherpas specialized in cloud advisory and technology services for the world’s leading brands. (They’ve since been acquired by Accenture.)
Cloud Sherpas used their quiz to gauge each individual’s level of maturity, which helped determine the more qualified leads for their marketing strategy. They also promoted their blog on Facebook with the quiz attached.
Cloud Sherpas’ quiz brings in 3-4 qualified leads a day. Nothing like quality over quantity, am I right?
Marketing: The Foundation
The Foundation focuses on building businesses with entrepreneurs through the idea of building backward. It’s an incredibly interesting concept, and with it, they created the quiz “Do You Have An Entrepreneurial Mind?” based on an existing eBook they had which covered the basic types of business owners.
The Foundation used a quiz in its marketing strategy by pairing it with a Facebook ad campaign. This combination was able to cut their cost per lead from $6.00 to $3.80, and collected over 16,000 leads and millions in revenue. That’s quite the turnout if you ask us.
Nonprofit: Pin Cancer
Pin Cancer’s call-to-action is the rallying of the US wrestling community to fight against, you guessed it: cancer. Their noble efforts have prompted the aid of their quiz “Which USA World Team Member Are You?” as a means of driving social traffic and raising awareness on cancer.
On a site that normally sees 200 visits per day, Pin Cancer had the best day ever when their quiz went up, driving social traffic up to 6,000 in a single day and bringing in 3,800 new email subscribers. Talk about turning the tables on cancer!
@PinCancer @Jakeherbert84 true! Can’t match the style of a ninja!
— Reece Humphrey (@ReeceHump60kg) August 25, 2015
Conclusion
Who knew implementing quizzes into your online marketing strategy could be so effective? We’ve just covered a lot of material, but hopefully, you got a lot out of it.
Just to recap, we went over the entire quiz creation process, so you should be familiar with how to create your own quiz by now. Distributing your quiz will really put it to the test, but as soon as you generate those leads, you know exactly how to nurture them until conversion.
Don’t let quizzes fly under your radar any longer; try using them in your marketing strategy to see just how far your brand can get.
Have you used quizzes in your marketing strategy? What were the results?
The post How to Use Quizzes in Your Marketing Strategy appeared first on Neil Patel.
source https://neilpatel.com/blog/quizzes-for-your-marketing-strategy/
How to Buy a Domain Name

Disclosure: This content is reader-supported, which means if you click on some of our links that we may earn a commission.
Buying a domain name is one of the first steps to launching a website.
But finding the perfect domain for your site and registering that domain can feel like a tall task if you’ve never been through this process. Fortunately, domain registration isn’t that difficult—you just need to follow a few simple steps.
Throughout my career, I’ve bought a lot of domains—too many to count. Some of those experiences were significantly better than others.
This guide will explain my two favorite ways to buy a domain; one of those methods will even get you a free domain. I’ll also cover the differences between these options in greater detail and explain how to buy a premium domain. Let’s dive in.
How to Buy a Domain Name With Bluehost
Bluehost is a web hosting provider. In fact, they are one of the most reputable and reliable web hosts on the market today. More than two million sites across the globe are hosted by Bluehost.
But Bluehost also provides domain registration services. If you use Bluehost for web hosting, you’ll get a free domain for one year.
Since you need a hosting plan anyways, you can use Bluehost as a one-stop-shop to bundle hosting and domain registration into a single package. This is a great option for beginners starting a new website from scratch.
Step #1 – Navigate to Bluehost.com
The first step is easy. Just make your way over to the Bluehost website.
From here, scan the menu and select “Hosting” at the top of the screen.

I’ll say it again; click HOSTING. Do not click on the “Domains” menu option.
If you click on the latter, you won’t be bundling your hosting plan with domain registration, which defeats the purpose of using Bluehost (and you won’t get the domain for free).
Step #2 – Choose a Hosting Plan
The hosting menu will expand and present you with three different options:
- Shared Hosting
- Dedicated Hosting
- VPS Hosting
Shared hosting will be the best option for 99% of people starting a new website. So go ahead and select that from the expanded drop-down menu.

You’ll still be able to bundle your hosting plan and domain registration (and get a free domain) if you select dedicated or VPS, but most of you won’t need to worry about that right now; stick with shared hosting.
Bluehost offers four different shared web hosting plans to choose from—Basic, Plus, Choice Plus, and Pro:

If you’re launching a small personal site, the Basic entry-level plan starting at $3.95 per month should be fine for you. For those of you launching a site for your business, I’d go with the Choice Plus plan, at a minimum.
The extra features that come with this plan are worth the few extra bucks per month.
To continue, just click the “Select” button under the plan that fits your needs.
Step #3 – Register Your Domain
Once you choose a web hosting plan, Bluehost will automatically prompt you to set up your domain. You’ll be presented with two different options here:
- Create a new domain
- Use a domain you own
You’ll want to use the “Create a new domain” option to search for available domains.

Simply enter the domain you want to buy into the search bar and choose your domain extension (.com, .net, .blog, .biz, .info, .store, .co, .us, etc.).
In the vast majority of cases, you’re going to want a .com extension. The only reason why I’d consider an alternative domain extension is if the .com domain is taken. For example, if you try to create a domain using nike.com or apple.com, those will obviously be unavailable. But a different extension might be available for purchase.
So if you’re set on a name, you could always get an alternative extension in the meantime while you figure out how to buy the .com extension. I’ll explain how to buy domains that have already been registered in greater detail later in this guide (although you probably won’t be able to buy Nike or Apple).
Another reason to consider an alternative domain extension is the price. Lots of these extensions will be cheaper than a .com domain.
For a small blog, side project, or personal site, that’s fine if you want to save a few dollars. But businesses should always register a .com domain.
Step #4 – Finalize Your Contract
Once you’ve chosen an available domain name, simply create your Bluehost account and select your plan terms.

Definitely make sure you get “Domain Privacy + Protection” located in the “Package Extras” section. Otherwise, your name, email, phone number, and address will all become available on a public database. It’s well worth the extra $0.99 per month.
The other options, like SiteLock Security and Codeguard Basic, are up to you. I’d get them, but there are alternative third-party services out there that you can use for site backups and security. I think it’s just easier to get them now.
That’s it!
Once you enter your payment details, your hosting plan and new domain purchase will be finalized. Your domain name is free for the first year of your contract.
How to Buy a Domain Name With Namecheap
The market is flooded with domain registrars. But Namecheap is definitely my favorite. It’s super easy for anyone to buy a domain using this registrar, even if it’s your first time.
This method is a bit more straightforward than using Bluehost, only because you’re not bundling any other services—Namecheap is strictly for buying a domain.
The entire process can be completed in just three quick steps.
Step #1 – Visit Namecheap.com
Obviously, the first thing you need to do is make your way over the Namecheap website.
From here, you can search for your domain directly from the homepage.

Enter your desired domain name into the search bar, which can be found in the center of the screen.
Make sure that “Register” is toggled above that search bar. The “Transfer” option is made for people who have an existing domain and want to switch registrars—that’s not for you.
Click the search icon to continue.
Step #2 – Choose Your Extension
As a domain registrar, Namecheap offers an extensive list of domain extensions.
You’ll have the option to choose from things like .fun, .vip, .studio, .health, .xyz, .lol, .design, and hundreds of other extensions. But in most cases, choosing a .com extension will be your best bet.

Just click the “Add to cart” button next to the extensions you want and then checkout.
Step #3 – Confirm Your Order
When you’re buying a domain directly from a domain registrar, you can skip all of the extras. You won’t need an SSL certificate, professional email, or anything else. You’ll be able to get that from your web hosting provider.
Definitely make sure you have WhoisGuard enabled. This protects your personal information from being available to the public. Some domain registrars make you pay extra for this, but Namecheap offers it free forever.
Turn on “auto-renew” for your domain registration as well. Otherwise, you’ll have to renew it manually every year, which puts you at risk for the registration lapsing.

It’s that easy!
Once you confirm the order, you’ll be asked to create a Namecheap account. After you enter your payment details and finalize the purchase, the domain is yours.
Ways to Buy a Domain Name
Generally speaking, there are two main ways to buy a domain name. Both of which have been covered above—domain registrars and hosting providers.
There are pros and cons to each method, and the process for each one is very different.
I’ll quickly explain the differences between these options so you can figure out which one is the best choice for your website.
Buying a Domain From a Standalone Domain Registrar
In most cases, going directly to a domain registrar like Namecheap will be your best option. As the name implies, these platforms specialize in domain registration.
Buying domains directly from a standalone registrar will be faster than alternative methods. That’s because you’re not bundling other services, so the process is more direct.
Domain registrars also make it easier to buy domains in bulk. So if you’re in the market for more than a single domain, definitely go with a registrar.
If you want alternative extensions, domain registrars will offer significantly more options. While I typically don’t recommend anything other than a .com domain, some of you might want to browse through hundreds of alternative extensions.
Transferring domain names with a registrar is also easier than using a service that doesn’t specialize in domain registration. So if you want to transfer your domain or think you might want to transfer it in the future, use a domain registrar.
It’s usually cheaper to buy domains directly from a registrar. For starters, the domain itself will likely be less expensive. But the best registrars, like Namecheap, include WhoisGuard protection for free with the purchase of a domain. You probably won’t get that from a hosting company.
The downside of getting your domain from a registrar is that there’s an extra step in the process. You’ll still have to get web hosting elsewhere.
Buying a Domain From a Web Hosting Company
For the most part, domain registration and web hosting should be kept separately. Bluehost is the exception to this rule. So if you want to bundle your domain name with a hosting plan, Bluehost is really the only option to consider.
There are a couple of main reasons why you’d go this route.
For beginners who are new to the world of web hosting and domain registration, getting everything under one roof is just easier. It’s less steps, and you can manage your hosting plan and domain name from a single account.
Furthermore, Bluehost gives you a free domain name for one year. You’ll never get a deal like that from a domain registrar.
But getting a domain from a hosting provider isn’t ideal if you want to buy domains in bulk. It’s fine for a single domain, but beyond that, it gets messy. You also won’t have as many options for alternative extensions (if you want something unique).
Most web hosting providers will also charge you extra for domain privacy + protection, whereas you can get this for free from a domain registrar.
How to Buy a Premium Domain
Premium domains are a great way to stand out online. They are great for branding and marketing purposes as well.
What is a premium domain?
A premium domain is typically short, memorable, and easy to spell. High-quality domains have a high search volume and are closely associated with an industry, service, or topic. They also have TLDs (top-level domains) like .com, .org, or .net.
Premium domains are in high demand. So they’ll typically cost a bit more to register. The process of buying a premium domain can be different as well since it’s not always clear if the domain is actually for sale. Here’s what I mean.
Let’s say you try to register a premium domain from a domain registrar or hosting company. Just because it says “unavailable,” that doesn’t necessarily mean that it can’t be acquired. These are the steps for buying a premium domain:
Step #1 – Determine if the Domain Seems Attainable
If a domain is unavailable from a registrar, try going directly to that website and see what you find. If there’s an active website or business using that domain, it might be tougher to acquire.
But if you don’t see an active site, there’s a good chance that domain will be for sale.
Here’s an example for management.com:

Clearly, not much is happening on this site. So if you wanted this premium domain, there is a pretty good indication here that it’s for sale.
In some cases, you’ll even see text like “buy this domain” or information that says “this domain might be for sale.” All of these are good signs that the domain is attainable.
Step #2 – Find Out Who Owns the Domain
There are two ways to complete this step:
- Figure it out on your own
- Hire a domain broker to do it for you
Doing it on your own can be tricky. You could run a quick WHOIS lookup, but most people won’t have their personal information listed. Using Google to your advantage can be helpful. Some domains might be linked to another website or social media profile. You could potentially find the owner that way.
Personally, I’d recommend using a broker. Sedo is one of my favorite domain marketplaces and brokerage sites.

Brokers can almost always find out who owns the domain because they have such a massive network. They’ll determine if the domain is actually for sale and how much the seller is asking for. Your broker can even handle the negotiations on your behalf.
The downside of using a broker is that you’ll have to pay a brokerage fee. But in most cases, you’ll only have to pay if the sale actually goes through.
Other great places to find a premium domain online include:
If a domain is for sale, you’ll be able to get the ball rolling with Sedo or one of the other options listed above.
Step #3 – Negotiate and Buy
Often times, the listing price of a premium domain can be negotiable. If you think it’s a fair price and fits well within your budget, you can speed up the buying process by offering the asking price in full.
If a domain is in high-demand, this also increases your chances of securing it before someone else makes a better offer.
But in some cases, domains can be outrageously priced. You need to ask yourself if it’s actually worth the cost. Sometimes you might be better off just looking for another domain. Unless a certain domain is crucial to the success of your business, it can be tough to justify a five or six-figure listing price.
Don’t be afraid to walk away during the negotiation process. If it’s not meant to be, you can move on or try again at a later time. This is also another reason why it’s helpful to have a broker.
Step #4 – Transfer the Domain
Once the domain has been purchased, the final step is transferring it to your domain registrar. Again, I recommend Namecheap.com for this because it’s so easy.
Make sure you turn on the auto-renewal after the transfer. Otherwise, you’ll have to worry about manually renewing your domain each year. If you forget and the name lapses, your premium domain could be up for grabs on the open market.
The process is officially complete when you see the domain sitting inside of your domain registrar account. Now you can finally rest easy knowing that you’ve secured your premium domain.
How to Buy a Domain Name That’s Not For Sale
Not every premium domain will be available on a brokerage site or domain marketplace. But if you really want to pursue a specific domain, you still might have a chance.
Similar to the steps we took in the last section, you’ll need to figure out who owns the domain. If a domain isn’t for sale, this step should be a bit easier, and you can probably do it on your own.
Most domains that aren’t for sale will be linked to an active website. That site should have some sort of contact information on it. You can reach out directly to get in contact with the business owner or decision-maker associated with the domain.
Start with a general inquiry saying that you’re interested in buying the domain; don’t throw an offer out there just yet (or you could end up overpaying).
See what type of response you get and if the site owner is willing to sell. Unlike a premium domain that’s listed on a domain marketplace, you might have to dig a bit deeper into your pockets to buy a domain that’s not currently for sale.
If it’s absolutely imperative that you secure this particular domain, consider making the owner an offer that they can’t refuse.
Just be aware that this won’t always work. It’s like trying to buy a house that’s not for sale. You can knock on the front door and make a cash offer, but the homeowner might decide to stay put.
If they’re willing to sell, use a broker to make sure the purchase goes smoothly. Then immediately transfer that domain to your registrar after you obtain ownership.
Summary
Buying a domain name doesn’t need to be that complicated.
Even beginners and first-time buyers can complete this process in just a few minutes by following the step-by-step instructions explained in this guide.
Buying a premium domain might take a bit longer. But again, you can still make it happen by following the process I’ve outlined above. Good luck and happy buying!
The post How to Buy a Domain Name appeared first on Neil Patel.
How to Use Instagram Filters in Paid Social Media Campaigns

One billion – that’s how many people use Instagram each month.
With such a huge, highly engaged audience, you can bet the competition between brands is tough. This is why small details can make all the difference, and Instagram filters could play a part in making your social media campaigns more successful.
What are Instagram Filters?
Everywhere you look, marketing advice says you need high-quality images to succeed on platforms like Instagram. But what if you’re not a professional photographer?
This is where Instagram filters can be a game-changer for your marketing and particularly your paid social media campaigns—they can make your images look as sleek as if they’d been professionally shot.
Here’s an example of an unfiltered image vs. its filtered twin:


Not only do Instagram filters make things look cleaner, but they also allow you to edit your image with one click. Where most editors make you alter contrast, saturation, and so forth individually, Instagram lets you pick a pre-set filter that suits your image—though you can tweak them if you’d like.
While these filters have been around since 2011, they’ve taken off in recent years. With the added capabilities of augmented reality (AR) technology—which adds imaginary images to those of the real world—they can significantly impact your social media campaigns.
Why Should You Use Instagram Filters in Your Paid Posts?
Social media platforms are competitive, and standing out from the crowd isn’t easy. If you’re going to get the best cost per click with your paid social media campaigns, then your brand needs to grab attention and drive engagement.
When you run an Instagram ad, you don’t have much real estate to work with, so you’ve got to find ways to draw your audience in with the limited space you have.
If you can combine innovative use of filters with creative images and excellent text, then you could achieve exceptional results— as Opel did with their “Opel Adam” campaign. In just two weeks, the campaign achieved a 2.5x increase in registrations and significantly lowered Opel’s cost per registration.
It’s possible to achieve the same results for your business, but you’ve got to make the most of the tools available to you.
If only 18% of Instagram posts use a filter, this means you’ve got an opportunity to make your content stand out over the other 82%. Research shows that AR filters have an average dwell time of 75 seconds, which is four times that of even video content—so using it can make a huge difference.
Social media platforms crave engagement, and if your advertisements give them that, you may find you reach more people for less—and Instagram filters are one of the best tools to help you achieve this.
How to Use Instagram Filters for Your Paid Campaigns
Turning your posts into paid campaigns through the Instagram app couldn’t be easier. All you need is a business or creator account, and then you can get set up with your paid ads.
- Click the profile icon in the bottom right-hand corner.
- Select promotions.
- Choose a post to promote. Instagram will prompt you to use your top post, but you can select any of your previous posts to promote.
- Select where to send people— your profile, website, or direct messages.
- Define your audience. The easiest option is to choose “automatic,” which targets people similar to your followers, but you can create your own.
- Choose your budget, setting your daily cost and how long you want the campaign to run for.
- Review and publish.
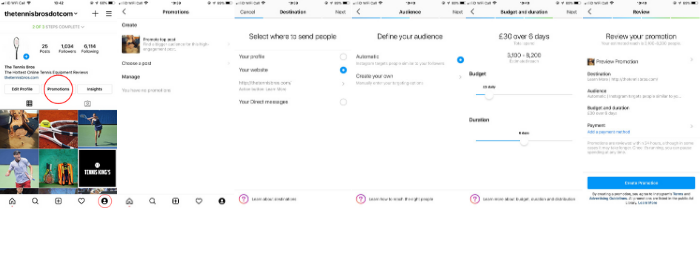
To create a promotion through the app, you need to have already created your post or story. Luckily, Instagram makes it exceedingly easy to snap an image on the go, add a great filter, and promote it within seconds.
Tips for Picking the Right Instagram Filter for Your Campaign
The right Instagram filter might be a quick way to give your images the professional touch, but the wrong filter can have the opposite effect. When you’re choosing your filter, keep these three points in mind:
- Your images reflect your brand
- Consistency works well on social media
- Don’t go filter crazy
Your images help define your brand, so the filters you choose matter. Your filters should reflect the mood of the product or service you’re promoting, and you need to stay consistent with this.
A great example of this is JetBlue’s Instagram account. You can easily spot how consistency has allowed them to develop their own simple yet effective style by using similar image styles, colors, and more.

While the right filter can make things look amazing, “over filtering” can have the opposite effect. You don’t want to alter things so much that they look surreal. Instagram filters are optimized to please, so it’s often worth sticking to the tried and tested rather than over-editing.
If you’re looking for inspiration, Canva studied the most popular filters, and Clarendon, Gingham, and Juno came out on top.
Instagram Filters for Posts
Adding filters to your Instagram posts couldn’t be easier. In five simple steps, you can post amazing images that grab your audience’s attention.
- Click the + button at the center of your home screen.
- Select the image you want to use from your library, or select “photo” or “video” to create a new one. Click next.
- Choose your filter from the list at the bottom of the screen. Remember, you can add more by clicking manage at the end of the reel.
- Add your caption, tag people in your posts, post your location, and choose other social platforms you would like to post to.
- Hit share.

Instagram Filters for Stories
Instagram stories allow you to post photos and videos that vanish after 24 hours. One-third of the most viewed Instagram stories are created by businesses, so they are an excellent way to make your posts go further.
The process of posting stories with filters is just as simple as with posts, but you’ll notice a lot more options when it comes to AR filters.
For a live video or image:
- Select your profile icon.
- Hit the + button in the top left-hand corner.
- Select “story” from the pop-up menu.
- Use your camera to take live video or images, or select an existing one from your library by clicking on the image in the bottom left-hand corner.
- Choose between your front-facing and rear-facing camera if you’re taking a live image.
- Select your filter from the reel at the bottom.
- Tap the center button to take a picture or hold the button to take a video.
- Use the editing buttons in the top right-hand corner to add extra filters, overlay text, or download to your library.
- Hit “send to” and select where to share your story.

Bonus Instagram Filter Tip
If you’re scrolling through Instagram and see a filter you like, you can save it to use on your own stories.
- Go to the profile of the person with the filter you like.
- Click the smiley face emoji to see all their filters.
- You can save it by clicking the down arrow or try it on.
- When you’re trying on the filter, click the drop-down menu.
- From here, you can save the effect or send it immediately as a story.
- The next time you send a story, the filter will be ready for you to use.
Instagram Filters for Faces
When you created your first story pin, you likely noticed there are a lot of things you can do to your face with AR.
AR allows you to add computer-generated effects over the live image you see on your camera. For example, if you want to see what you look like wearing sunglasses, there’s an AR filter for that. The sunglasses appear on your face and follow you as you move.
There are endless Instagram filters with AR, which gives you more options to engage your audience. However, as with any Instagram filters, it’s essential to find the ones that suit your brand.
Some companies have had great success with AR filters on Instagram, such as this one by Ray-ban. But if you’re going to use these filters, then you’ve got to make sure you stay on-brand.

To create a story with AR filters, simply follow these steps:
- Select your profile icon.
- Hit the + button in the top left-hand corner.
- Select “story” from the pop-up menu.
- Choose between front- and rear-facing camera.
- Slide between the filters at the bottom and watch as your face is brought to life with AR.
- For more effects, slide to the end of the reel and select “browse effects.”
- Choose a filter.
- Click the middle button to take a photo, hold to take a video.
- Click send and then select where to share.

Other Instagram Features to Help Your Paid Campaign
One of the reasons Instagram is so popular with advertisers is because it gives you lots of tools to give your paid campaign extra oomph. The beautiful thing about it is it’s so easy for anyone to add filters, gifs, text, and music to their images.
While a recent study found that images without text overlay generally perform better than those with text, marketing is all about finding the message that engages your audience, so it’s worth experimenting to find the formula that works for you.
These Instagram features give you added options when it comes to reaching and engaging your target audience.
Adding Gifs
Gifs provide a great middle-ground between static images and video. They were talked about as a big marketing trend, and while AR has taken over somewhat, they’re still a handy tool for your paid Instagram campaigns.
A gif is a quick and easy way to add something extra to your story, and once again, Instagram makes it exceptionally easy to do:
- Select your profile icon.
- Hit the + button in the top left-hand corner.
- Select “story” from the pop-up menu.
- Choose between front and rear-facing cameras or open your library via the icon in the bottom left-hand corner.
- Take a picture, or choose an image from your library.
- Choose the square smiley face at the top of the screen.
- Select gifs, or use the search bar to find a specific gif.
- Make your gif bigger or smaller by pinching in or out with two fingers and drag it into position.
- Select “send” to and choose who you want to see your story.
Adding Text
Instagram might be a very visual platform, but that doesn’t mean there isn’t use for text. The right use of text can help give your posts and stories context, grabbing people’s attention and linking the image to your brand.
Text is a vital part of Instagram because this is where you make use of one of the most important features: hashtags.
Hashtags not only help people find your posts, but they also boost engagement and allow you to zero in on what’s popular in your industry. The statistics show that Instagram posts with even just one hashtag can see an increase in engagement of 12.6%. So with only a little extra text, you can give your campaigns a better chance of success.
You can also use text overlay on your stories. You’re in control of your text’s font, color, and look, which means you have another way of giving your images a professional look.
To add text overlay to your stories, simply:
- Select your profile icon.
- Hit the + button in the top left-hand corner.
- Select “story” from the pop-up menu.
- Select your image or video.
- Click the “Aa” in the top right-hand corner.
- Type your text.
- Choose your font, color, and effects, using the tools at the top of the screen.
- Hit “done.”
- Select “send to” and choose your audience.
Adding Music
Music has always played an important part in advertising. Music helps make advertisements more memorable, evokes emotion, builds the story, and accentuates the brand, so it can be an essential tool.
While some people will use Instagram with the sound off, Instagram makes it so easy to add features such as music that you don’t lose anything by using them.
Again, make sure whatever you choose fits your brand and is going to engage your audience.
Here’s how you can add music to your Instagram stories:
- Select your profile icon.
- Hit the + button in the top left-hand corner.
- Select “story” from the pop-up menu.
- Choose between front and rear-facing cameras or open your library via the icon in the bottom left-hand corner.
- Take a picture or choose an image from your library.
- Choose the square smiley face at the top of the screen.
- Click the music icon.
- Choose your song.
- Edit which part of the song you want to showcase, clip duration, and how you want to credit the song.
- Click “done.”
- Move the music sticker, making it bigger or smaller to suit your image.
- Hit “send to” and select your audience.
Instagram Filter Features Within Other Photography Apps
You might be thinking, “I want my Instagram posts to stand out, so why would I use the most common filters such as Clarendon?” While many brands find success with Instagram’s filters, you have other options if you choose to go that route.
To help you with this, there are lots of photography apps that have curated Instagram filters you can pay for or give you the ability to create your own, including:
- VSCO
- Afterlight
- A Color Story
- Tezza
- Spark AR
You may have to invest some time in finding or creating the perfect Instagram filter, but once it’s saved to your Instagram account, you can add it to all your posts and stories in seconds.
Conclusion
The right Instagram filter can immediately improve your images and give your brand an identity. When you’re running paid media campaigns, you want to give your images and videos every chance of standing out from the crowd, and filters can help you achieve this.
Instagram makes it incredibly easy to add this extra element to your posts. Turn your images into posts that people want to engage with and share, then watch how they may improve your paid social media campaigns.
What’s the go-to Instagram filter for your brand?
The post How to Use Instagram Filters in Paid Social Media Campaigns appeared first on Neil Patel.


