How to Start a Podcast in 14 Days
Between the sound equipment, hosting options, learning to edit, and everything else that goes into starting a podcast, the very concept can be overwhelming. But, I’ll let you in on a little secret: It isn’t that difficult to start a podcast.
In fact, you can get one up and running in about two weeks. In this post, I’ll outline exactly how to do that.
The order of my steps might look a little wonky to you. That’s because if you’re going to start a podcast in two weeks, actions you may typically hold off on need to occur earlier because they take longer to complete.
By no means should any of these tasks be completed in a day. The day simply indicates when you should kick off each step.
While this timeline is here to give you an idea of how to prioritize your work, you needn’t follow it to the letter. If you’re working with a team, some of these steps can happen simultaneously.
For instance, you can have your creative department working on your artwork while editorial hashes out the content calendar and you reach out to potential guests.
Why Start a Podcast?
According to Edison Research, the number of monthly podcast listeners in the U.S. grew by 17 million people from 2018 to 2019. And the number of podcast listeners is expected to increase by 20 million each year, passing 160 million by 2023.
Suppose you’re looking for a new avenue to build revenue, raise awareness, or improve conversions. In that case, podcasting may just be the way to do it—particularly if you’re trying to reach a younger audience. In 2020, according to Statista, almost 50% of podcast listeners were between the ages of 12 and 25, and 40% were between 25 and 54.
Start a Podcast Day 1: Do Your Research on Radio and Podcasting
Horror writer Stephen King has written more than 50—and sold about 350 million—books. His advice to new writers? Read. Read everything you can get your hands on because reading other people’s work and understanding how all kinds of novels are written informs your own writing.
The same is true of podcasting. Listen to all kinds of podcasts from a variety of genres. Listen to radio shows, too, both old and new. They are, after all, the ancestors of the modern podcast.
Take notes when you hear something you like—a format, an interview technique, an introduction, anything. When it’s time to construct your podcast, you can pull out your notes and incorporate those elements into your show.
Start a Podcast Day 2: Research and Purchase the Right Podcasting Equipment
At the very least, you’ll need a decent microphone, some recording and editing software, and a quiet place to record your podcast.
While you can use a computer microphone, an external microphone, preferably one with a pop filter, will pick up the sound of your voice better without too much background noise. You should also consider getting an isolation shield if your microphone setup allows one.
And that quiet place to record your podcast? Choose a small space if you can, ideally one with a door that can close and a fair amount of insulation in the walls.
If you can set up a room with soundproofing panels, all the better. Not only will all this cut down on background noise, but it will also reduce echo in the room.
If all that isn’t possible, something as simple as a clothesline with a blanket hanging off it surrounding your recording space can make a world of difference. You can get a special acoustic blanket or just use one from your linen closet.
Finally, research and choose the best recording and editing software for your podcast. The most popular recording apps include
- Garageband: Works with Apple products, allows you to record and edit your podcast and create original music, free to use
- Audacity: Works on Windows, macOS, GNU/Linux, and more, allows you to record and edit audio, free to use
- Apple Logic Pro X: Works on Mac, interfaces with GarageBand, offers advanced tools, $200 one-time purchase
- Adobe Audition: Works anywhere Adobe products work, lets you edit, record, and create sound effects, $20.99 per month (or part of the Creative Cloud at $52.99 per month, which includes Photoshop—though which you could work on images to go with your show)
But you could even use Skype, Zoom, or Otter.ai to do your recording, then upload your file to one of the programs above so you can edit.
Start a Podcast Day 2: Determine Your Podcast Content Goals
Every part of your content plan has a goal, right? So what would a podcast do for you? Would it:
- Raise awareness of your brand?
- Be a way to promote new products?
- Position you as an expert in your field?
Keep in mind that all content has the same ultimate goal: To solve a problem, or a pain point, for their audience.
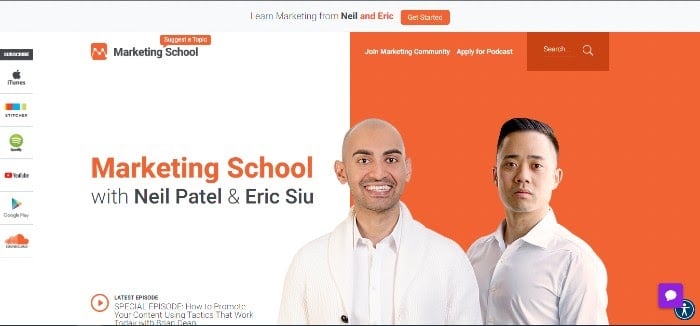
For example, my Marketing School podcast, which I co-host with Eric Siu, directly addresses the brands’ marketing pain points. Each week, we share and discuss best practices to help brands grow their businesses.
But some branded podcasts aren’t so direct in their approach. Some brands even create content purely for entertainment—but even this kind of content solves a problem: boredom.
For example, GE has two science fiction podcasts: The Message and its sequel, Life After. These weave in existing GE technology to decode alien messages and solve futuristic problems.

But there are plenty of ways to solve a problem for your audience while accomplishing your content goals.
GE’s goal is to raise awareness of its tech and expand its audience.
Our goal at Marketing School is to raise awareness of our content marketing services and increase conversions.
No matter your goal, remember this: A podcast can generate more than a 4% increase in brand recall, and 61% of listeners exposed to podcast ads for major brands were more likely to buy those products.
So, what’s the problem you’re trying to solve for your audience? How will you solve it?
Start a Podcast Day 3: Identify Your Podcast Audience
If you already have a strong social media presence, you may have your target audience and audience personas ready to go. And you can use your podcast to reach that audience on a different channel, particularly if they’re moving away from traditional social media.
But consider using podcasts to expand your audience. A podcast, after all, should fit into your holistic content marketing strategy. It can be yet another tool to grow awareness of your brand.
In that case, identify the audience you want to make aware of your brand—and make sure it’s one you can reach through podcasting in the first place.
Start a Podcast Day 4: Choose Your Podcast Format
I’ve talked a little bit about the format already. For example, my podcast is either a monologue or dialogue format, whereEric and I—together or separately—discuss a content or social media marketing topic and share our insights.
Monologue or dialogue formats are great for educational and how-to podcasts.
GE’s podcast follows a theater format, reminiscent of the radio dramas of old. It’s a great entertainment format. GE found a creative way to include their products, but not all brand-related podcasts directly discuss their products.
Some of the other more popular podcast formats include:
Interview Podcasts
The interview podcast is just that; a question-and-answer format where the host interviews guests on a topic related to the podcast’s content goals.
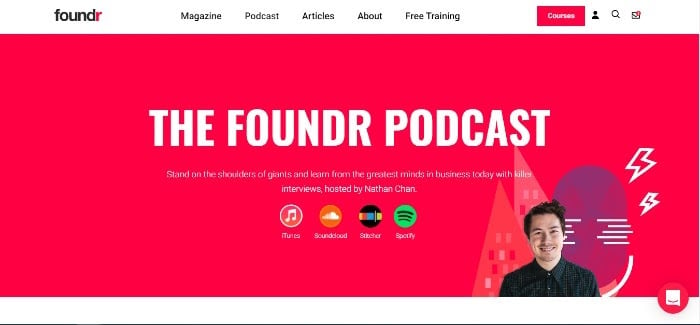
Founder and CEO of Foundr magazine, Nathan Chan, interviews entrepreneurs and startup executives in his podcast, Foundr Podcast, to help educate other entrepreneurs on everything from marketing to raising capital to growing their business.
Informal Discussion Podcasts
For an informal discussion, two or three people, whether they be hosts or one host and guests, choose a topic and discuss it freely without a script. A host may have a few bullet points to keep the conversation on track, but there is no other script to speak of.
Slate Magazine’s Spoiler Specials brings movie critics together to discuss recent movies, with plenty of spoilers sprinkled in. While they don’t promote the brand, it positions them as SMEs in movies and entertainment.

Panel Podcasts
Insurance broker Allianz hosts a panel discussion podcast called Insurance Tomorrow, where panelists discuss current events and how they affect the insurance industry.
In this type of podcast, a host kicks off the discussion and keeps a list of questions or bullet points to keep the conversation on track.

Journalistic Podcasts
A journalistic podcast can take a few forms. It can merely relay the news of the day, or it can tell longer-form stories, much like you would hear on a news magazine show.
For a branded podcast, the longer-form version is probably best. And it doesn’t necessarily have to relate to your product.
For three years and 58 episodes, Basecamp’s podcast, The Distance, used a journalistic approach to tell the stories of small businesses that had been in business for 25 years or more. The idea was to inspire other small business owners.

Start a Podcast Day 5: Begin Choosing Your Concept
Once you know your audience and your content goals, you can start brainstorming the podcast’s concept and topics.
Your concept should be unique. Take a look at other podcasts for inspiration, but make sure you’re not duplicating a podcast that already exists.
Your concept should relate to your brand and products in some way. The GE podcast, for example, is loosely related to tech.
Finally, your concept should appeal to your audience and solve a problem for them.
Choosing a concept will take market and audience research. You may even want to survey super users of your product to get an idea of the kinds of topics they would be interested in.
Start a Podcast Day 6: Start Researching a Name
There are a few ways to name your podcast. You can use your podcast’s content, your name if you have a decent following, or your company’s name if it’s well known.
For example, Blue Apron’s podcast relates to its content: Why We Eat What We Eat.
Meanwhile, celebrity Anna Faris’s podcast uses her name: Anna Faris is Unqualified.

Whatever you choose to do, make sure your title is clear, catchy, and memorable—and not already taken. Of course, it should also include keywords that help you appear in search.
You should also look up both your chosen name and variations on it, combined with “podcast,” “TV show,” “book,” “movie,” and anything else you can think of that may force you down in SERPS. Look for these not just on Google but on social media sites as well.
Start a Podcast Day 7: Begin Design of Your Podcast’s Thumbnail Artwork
Apple and other podcast hosting platforms require artwork for your podcast, so there’s something to display in search.
For this step, we’re focusing on what will appear in podcast apps themselves—what you saw above are more akin to the large cover photos (more on those later). What we’re looking at now appear more like Instagram pictures in shape:

Apple remains the big name in podcasting— after all, “podcast” is short for “iPod broadcast!” So, you want to pay attention to Apple’s recommendations for creating good cover art:
- Keep it simple and easy to recognize, with relevant images.
- Have your podcast title visible with a clear, large font.
- Keep it to a max of 3000 x 3000 pixels.
- Avoid logos that are in use by others.
- Don’t put artwork at the bottom of the image—it could end up hidden in apps.
- Consider dark mode when creating your art.
Where do you get this art?
In a perfect world, you’d have an incredible artistic team at your disposal—use them if you do. But, not everyone is that lucky, and you may need to find someone to do this work for you. Consider:
- Looking at the show notes of podcasts to see who they credit for logo creation. Could you contact them as well?
- Checking out freelance sites like Fiverr for freelancers.
- Creating your own via apps like Canva—just double-check any copyright rules before nailing down the final product.
Start a Podcast Day 8: Create Your Content Calendar
Now it’s time to determine how often you’re going to post new episodes and what those episodes will be about. Brainstorm topics and keywords for your episodes, and write down a list of guests you might want to have on the show.
Create a content calendar that includes enough time to schedule your guests (if you have any) or write your script (if that fits your format), and record, edit, and post your podcast.
Start a Podcast Day 9: Write Your Podcast Script and Find Your Music
Developing a full script can take anywhere from a day to a few weeks, depending on the format, amount of research needed, and how many review levels it has to go through. But here are the basics.
The Podcast Script
The type of script you write—if you write one at all—depends on the format you chose for your podcast. Most podcast scripts include the following:
- Theme music
- An intro that mentions the show’s name and concept, describes the episode’s topic (including keywords) and introduces any guests.
- An outro, or conclusion, that wraps up the show and includes a call to action. Your call to action should tell your audience to rate, review, subscribe, join you on social media, and, most importantly, spread the word.
If you want a more informal feel to your podcast, you can simply write an outline or some bullet points of what you want to talk about and then riff on your topic from there. Or, you could write a full script, but be ready to go off track and banter with your cohost.
If you’ve chosen a story-telling format, like GE’s podcast, or even a how-to format, you will need to develop a fully fleshed-out script.
For a tutorial on scriptwriting, check out NPR’s guide for students. It’s full of helpful tips to get you started.
Podcast Music and Sound Effects
Most podcasts have some kind of music before the intro to their show. If you want something unique to your podcast that is consistent with your branding, this is something you’ll want to commission.
Like with artwork, you can bring on a local musician or friend, a freelancer from a site like Fiverr or via a local job board, or, ideally, use someone in your office. No matter who you use, be sure to give them credit on every set of show notes—it’s just good practice.
If you don’t want to commission someone, you can look into royalty-free music sites, such as bensound.com. These generally allow you can browse music in a variety of genres.
There are also free and subscription services for sound effects, such as Zapsplat, if you need sound effects for your podcast. Like with music, some of the recording options we talked about a while back also have these available.
Start a Podcast Days 10 and 11: Record Your Podcast
It’s finally time to record. There are some best practices you should follow, though. Even if you’re comfortable speaking in front of a crowd, setting up a sound system and using a microphone is different for podcasts.
Using Your Podcasting Microphone Correctly
The good news is that most of your recording equipment—especially if you bought from some superior brands—will likely have videos you can watch to help you set things up and use them appropriately.
You can generally find these on the company’s website or YouTube. On YouTube, you may also be able to find podcasters using them, and their tips maybe even more helpful than the company’s because they’ve done practical troubleshooting already.
Here are a few best practices:
- Be sure your microphone is stable: If you’re using a mic stand of any sort, make sure it’s not easy to knock over.
- Get your distance right: Being too far will make you sound like you’re speaking from a distance, while being too close will make you either sound too loud or catch too many things, like breaths. Two to three inches is usually best, but you’ll want to try different things with your microphone. A pop filter may allow you to be a bit closer to your mic.
- Angle your microphone appropriately: There are a couple of ways to do this, and what works best for you is up to you. You could have the mic angled directly at your mouth, which may provide you with the highest among of clarity and “fullness” of your voice. However, you could also turn your mic slightly away, which could mitigate any issues caused by high frequencies.
- Check your mic level: “Gain” and “input level” mean the same thing, and your microphone setup may use either term to describe the control for how much signal is recorded. Speak into the microphone in the tone of voice you plan to use and adjust until you’re in the -10dB range. If you’re using headphones adjust the knob until you hear buzzing, then turning it down a bit if you’re using GarageBand or Audacity.
- Do a test recording: Use the full range of the voice you plan to use for your podcast. If you know you’ll get excited or upset, talk about those things in the way you would on your show—as well as things you’d be speaking about in your normal voice—so you can hear yourself and change levels and mic angle and distance as needed.
Best Practices For Recording Your Podcast
Now that you’ve tested everything out with your microphone and other recording equipment, it’s time to get down to business. Make sure your recording studio is closed off to others and that people know not to enter while you’re working, then get started!
Like with microphone use, though, there are some best practices while you record:
- Warm-up your voice first: Do some vocal exercises, so your voice is at its best the whole time you record.
- Recheck your levels: You can sometimes do this before you even begin recording, sometimes after. Make sure everything still looks right and adjust if needed.
- Start with silence: Leave about five to ten seconds of actual silence at the beginning of the episode. Watch your levels to make sure it’s not picking up your breathing or any other noise that won’t usually be there. This lets your app read the actual level of background noise so you can edit appropriately later.
- Watch for filler words—but don’t panic about them: “Filler words” are the things we say without realizing it, like “um,” “like,” and “okay?” when they’re not adding anything. We all do this, so don’t feel embarrassed by them. Be aware of your filler words and try to avoid them, but remember you can often edit many of them out later. As you go through more episodes, chances are you’ll become better at not using them.
- Find a way to note mistakes for easy editing: This is especially important if you’re editing the show yourself. If something happens that you don’t want your audience to hear—a big stumble over words, a sneeze, a barking dog, a passing train, something that just came out wrong, etc.—find a way to make them visible in your editing process. This could be a long silence or snapping your fingers at the microphone three times, as that will show a great change in volume. You could also note the time the issue happened. If you have someone else editing, you can also just say “cut that out” directly in the recording.
- What if a noise issue is unavoidable? Let your audience know. For instance, if you can hear your neighbor mowing the lawn, but you have to record right now, just mention it and move on. Or if you’re recovering from a sore throat but can’t miss an episode? Just tell them. People are usually pretty understanding.
- Keep excess noises away from your mic: Taking a sip of water? Turn away. Notes on paper? Keep them far away from your mic. Blowing your nose? Well, maybe make the editing note above.
Start a Podcast Days 12 and 13: Get to Editing
Allow at least a day for editing your podcast and then another day for final approval. This is when you add in your music and sounds, edit mistakes, or take out entire parts that you don’t feel add any value to the podcast.
Like recording, there are some best practices for editing. If you’ve got a pro on board, you probably don’t need to worry about this. But if you’re doing it yourself, you should take some time to learn about these. Thankfully, YouTube comes in very handy for things like this.
While the best practices will vary slightly based on the editing software you’re using, here are the basic steps you should take while editing—and be sure to wear headphones while you do it. While this advice is intended for Audacity users, it applies to most editors:
- Listen to the material before you do anything else. Note the times of things you want to change.
- Use the noise reduction tool to get rid of any background noise—this is why we recorded that silence at the beginning. (We also did this so you have a background noise level you can insert elsewhere, so don’t delete this silence until you’re done.)
- Get rid of what you don’t want content-wise.
- Remove other noises you don’t want. This includes filler words—though be careful not to overdo this because you don’t want to sound unnatural. If cutting a filler word or other short piece of audio makes you sound like your words are jumping on top of each other, that’s where pasting in some of that silence from the beginning comes in.
- Normalize at about -2.0.
- Amplify anything that’s too quiet.
- Compress and equalize.
- Add in your music, sound effects, and—unless your hosting site does this automatically—any advertisements.
For very detailed advice about editing, check out this article from Podcast Rocket.
Start a Podcast Day 14: Post and Promote Your Podcast
Okay, this one is a bit out of order—we’re talking about in-the-trenches promotion, not pre-show promotion. When you’re starting a podcast for your brand, you should let your audience know before your first episode. Hype them up.
Here’s a fun fact: If you post your podcast to the three major platforms—Apple Podcasts, Spotify, and Google Podcasts—you’re already in front of more than 95% of all podcast listeners!
One common misconception about podcasting is that these platforms host your podcast. Not so. You first need to sign up for a hosting site, such as Buzzsprout. Some hosts automatically submit your podcast to several platforms, while you may need to do it manually for others. You do this with your RSS feed, which you can find in your account on your hosting site.
Your RSS feed will need the right tags, your artwork, and at least one episode to be accepted. Once you have all that submitted, you’re up and running!
Now it’s time to promote your new podcast. Utilize your social media and own website for this, but be aware of other avenues as well. For instance, if you have a guest on the show, make sure they’re going to advertise their involvement. You could consider purchasing ads on social media or other sites, too. And if you have a brick-and-mortar store? Put up signs with QR codes to your podcast’s website, post on your main site, social media, or use Linktree.
Beyond Two Weeks: Track Your Podcast
Your podcast host, Apple, Google, and Spotify all provide analytics, so you can track how your podcast is doing. Additionally, Chartable compiles several apps’ data, so they could also be helpful. Use that information to inform when you should post, how well you’re promoting it, and what your next episode should be about.
Be sure to Google your podcast several times over the following weeks to see if you’ve been picked up by platforms you didn’t know about so you can add these options to your “where to listen.”
You should also keep an eye on reviews. Many podcast apps don’t have reviews, but Apple does. Reviews aren’t the end-all, be-all, but they can help you move up charts, better advertise your show (if the reviews are good), and see where you need to improve. Just bear in mind not all reviews are valid—they could be from rivals or from people who just like to complain—so use your judgment about how to go forward after reading them.
If You Can’t Start a Podcast From Scratch, Partner With Someone Who Can
Even enterprise brands need a little help podcasting sometimes. If you don’t have the time or resources to start your podcast, try partnering with a brand or business that can.
Sephora, for example, partnered with GirlBoss Radio to create a branded podcast called #LipStories. The podcast features interviews with remarkable women from around the world.

Conclusion
Podcasts can help your brand reach an entirely new audience, and starting one doesn’t have to be as stressful as it may seem on the surface. If you follow these steps and make your podcast SEO friendly, you may be well on your way to increasing your sales.
And you may even have some fun along the way.
What kind of podcast are you thinking about? How can it help your brand?
The post How to Start a Podcast in 14 Days appeared first on Neil Patel.
Best VPN Services
The pandemic has changed work permanently. Before COVID-19, only 9.8 million (out of 140 civilian workers in the U.S.) worked remotely.
Today, almost 70 million people are working remotely.
Are you working remotely?
If you are, there’s a good chance that you’ll need a virtual private network (VPN).
Small businesses with employees that need to work remotely are also going to need a VPN as well.
Today, we’re going to take a look at VPNs — what they are, why you need them, and how to find the VPN that’s right for you.
What’s a VPN, and Why Do You Need One?
A VPN is a private network that’s run through a public network — imagine that a remote worker sitting in Starbucks had an extra-long Ethernet cable. They plug one end into their computer, and the other end directly into their company’s servers at work.
That’s basically what a VPN does; it creates a secure and encrypted tunnel from your computer to a server on the internet.
This is great because it means no one can access the data you’re sharing with your computer and company server. You have privacy and data security.
We’re going to look at seven of the top VPN Services, explaining the pros and cons of each service.
Our 7 Picks For Best VPN Services:
- NordVPN Teams — Best new service from industry leader
- ExpressVPN — Consumer favorite, best-in-class
- Perimeter 81 — Best for small business teams
- VyprVPN — Best VPN for speed
- SurfShark — Best for the price
- Mullvad — Best for anonymity
- TunnelBear — Best for beginners
How to Choose the Best VPN Service for You
When you’re looking for a VPN, the first thing you’ll want to do is identify your needs.
What do you want your VPN to do for you?
Beyond privacy and data security, are there other features you need from your VPN?
In general, most people focus their attention on four specific criteria.
Criteria #1: Speed and Reliability
If you’re planning on using your VPN for things that require a lot of data or activity, you’ll want to choose a service that’s optimized for speed and reliability.
For those who share large files routinely or stream video consistently, you’ll want to select a VPN that provides unlimited connections, unlimited bandwidth, and high download and upload speeds.
When it comes to speed and reliability, there are factors you control and factors your service provider controls.
Factors within your control include:
- Improving Wi-Fi stability
- Using a wired connection (which is always faster)
- Upgrading your internet connection speeds or your VPN
- Choosing a VPN service with more servers or servers closer to your desired location.
Factors outside your control include:
- Number of servers
- Server load
- Server location/distance (longer distance = slower speeds)
- International bandwidth restrictions (i.e., VPNs in Australia are slow due to underwater fiber optic cables carrying a set amount of data at any one time)
- VPN protocols
- Complicated peering relationships between networks (also reduces speed)
You’ll want to test your VPN speed so you can verify the claims your provider is making. You’ll need two things to do that — an accurate testing method and a baseline for your tests.
Here are some of the more reliable speed tests you can use to verify your VPN speeds.
Next, run a speed test on the same connection, with and without your VPN. If you’re on Wi-Fi, stay on Wi-Fi for both tests. Run the tests twice to get an average speed. Run your tests using the same VPN server/location you plan on using with your service.
Criteria #2: Security and Privacy
VPNs should be secure by default; the VPN service you choose should have the basics of security and privacy protection down.
Here are the most important security and privacy requirements you’ll need to consider when choosing a VPN.
For security:
- Handshake encryption: This takes place at the beginning of the VPN session where you and the server you’re communicating with exchange private keys that encrypt or decrypt data and messages to acknowledge each other.
- Authentication: Reputable VPN services will use a hash algorithm to automatically verify the packets they receive, making sure that data from a middleman hasn’t been injected into your packet. They’ll also verify that your data hasn’t been tampered with or changed in any way.
- Ciphers: This is an algorithm, like AES, that encrypts and decrypts your data in a series of clearly defined steps. Using a key to encrypt your data makes it impossible for unwanted eyes to spy on your data unless they have the specific key that was used to encrypt the message. So the unencrypted message “VPNs made easy” would become “FVWWOluB9rHb5KUtyJYqlA==” using the AES algorithm.
- Encryption strength: 128-bit AES encryption is faster but less secure; 256-bit encryption is slower but more secure. Stronger encryption is obviously harder to break, so this is more of a priority if you’re focused on security.
For privacy:
- Activity logs: Many free VPN services track your activity — the websites and pages you visit, files downloaded, etc. These free VPNs sell or monetize your usage activity on their VPN without your permission or knowledge.
- Connection logs: Other VPN services track assigned IP addresses, connection start/end times, or bytes of data transferred. This typically doesn’t include your data, but it can be combined with other data (i.e., the IP address you used to log into your Slack account) to expose your identity.
If privacy is important to you, you’ll want to stick with log-free VPN services that don’t track your activity or metadata.
Criteria #3: Compatible Devices
If you have an iPhone, but you use Windows on your computer, you’ll want to verify that the VPN services are compatible with your devices.
While most VPN services are compatible with the standard platforms (Windows, Mac, Android, Linux, and iOS), some aren’t available on all platforms. The VPN that’s Windows ready may not be available on Android or iOS.
You’ll want to verify that your devices are all compatible before signing up.
Criteria #4: Connections
How many devices can connect to your VPN service simultaneously?
The availability of connections tends to vary from service to service. Some providers allow just one; others allow up to three, while others are unlimited. You’ll need to identify what you need ahead of time.
It’s not just connections that you have to worry about, though. You also have to take a look at the availability of countries and the availability of servers.
If you have specific availability needs, you’ll want to verify this with your VPN service provider ahead of time, then confirm this during your free trial or guarantee period.
Other important VPN considerations include:
- Payment plans: The cost you’ll pay for VPN services varies considerably, and it depends on the features you choose and the length of your subscription.
- Customer service: If you need on-demand customer support (in case something goes wrong), you’ll want a VPN service that provides live chat or phone support (which will impact the price). If that’s not as much of a concern, then a provider who offers email support may be a better option.
- Free trial or money-back guarantee: If you opt for a service that offers a free trial, you’ll want to choose a service that gives you enough time to try things out. Some VPN services’ free trial period is quite short, which may not be enough time to verify the service on your end. A money-back guarantee is ideal because you have a way out in case their service isn’t what you’ve expected.
- User friendly or tech-savvy: If you’re not comfortable with setting up and configuring your VPN, you’ll want to make sure you find a provider with a user-friendly interface. Some providers will configure your VPN for you virtually, so everything is done for you ahead of time.
Now that you have all the important considerations spelled out, it’s time to consider which type of VPN service is going to handle the job best.
The Different Types of VPN Services
It’s important to make a distinction between VPN technology and VPN services.
As we’ve already discussed, a virtual private network boils down to a secure, private connection between your device and endpoint. That is VPN technology.
VPN services, on the other hand, provide a suite of tools that allow companies to take advantage of VPN technology instead of having to set it up themselves.
Using VPN services, you can not only protect your internet connection and guard your privacy but gain access to extra customer service with configuration guides, automatic setup, and live chat support.
Generally speaking, VPN services break down into these four distinct types:
- Remote Access VPN – Provide a secure connection from a user to a remote server to gain entry to a private network.
- Intranet-based Site-to-Site VPN – Provide a secure connection for various users in different, fixed locations to connect to each other’s resources. For example: With a site-to-site VPN, multiple local area networks (LAN) can connect to a single wide-area network (WAN). Think of one company with numerous locations sharing resources.
- Extranet-based Site-to-Site VPN – Difficult to implement, these VPNs are common in large-scale business environments where you are looking for a secure connection between two separate intranets, but you do not want them having the ability to access each other directly. Think of two different companies working together.
- Cloud VPN – Also known as virtual private network-as-a-service (VPNaaS), is designed for organizations that rely on outsourced cloud data centers instead of in-house infrastructure. A traditional VPN doesn’t work if your organization stores all of your data in the cloud. A cloud VPN allows users to access a company’s resources — applications, data, and files through a website or via a native desktop or mobile app.
As a user looking to secure your privacy and access the internet, or secure business data for your remote workforce, you’re most likely looking for commercial VPN Services.
Let’s take a look at our picks for the top VPN providers.
1. NordVPN Teams — Best new service from industry leader
- Pricing: $7 – $9 per mo.
- Number of servers: 5,000+
- Money-back Guarantee: 30-day
- Support: 24/7 response within 3 hrs.
- Single sign-on: Yes
- Multi-device support: Yes apps on all devices
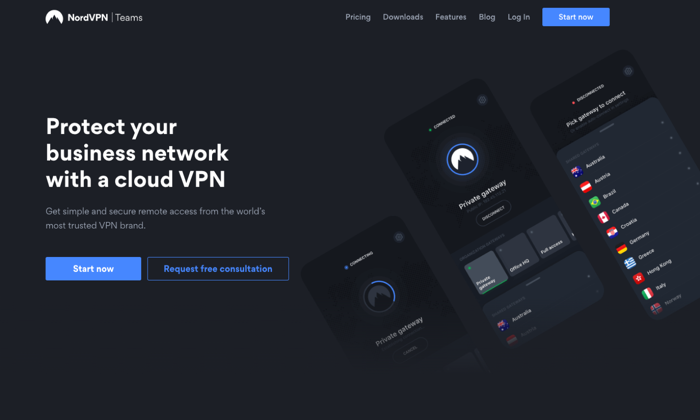
NordVPN Teams is a new VPN service from an industry leader. NordVPN is known for its consistent performance, a strong stance on privacy, and aggressive security features. The company is based in Panama, where there are no mandatory data retention laws and no legal obligation to collect your data. It’s also important because Panama doesn’t participate in the five eyes or fourteen eyes alliances.
They don’t track, collect, or share your private data — activity, usage, or metadata. They invited one of the big four auditing firms PriceWaterhouseCoopers AG, to run an industry-first audit of their no logging claims to verify that they’re telling the truth.
NordVPN is one of the few providers that offers double VPN, an advanced VPN security feature that routes your traffic through two VPN servers instead of one, encrypting your data twice. They provide two-factor authentication and single sign-on, which are standard features for top-tier VPN services. They also provide you with a kill switch, if your connection drops for even a second, the kill switch will cut off all the Internet traffic on your device, ensuring none of your information is exposed online.
For business customers, they provide you with a dedicated account manager that’s assigned to your account. Your Control Panel enables you to manage user accounts, control permissions, and create gateways. You can oversee user activity, monitor server load, add new users, and create custom teams from inside your control panel.
Pros
- A trusted brand name
- Thousands of servers around the world
- Single sign-on (SSO) functionality
- Strong on security
- Apps on all devices
- Fast speeds
- Cryptocurrencies and cash accepted
Cons
- Slow app and server connections
- Open VPN connection is not user-friendly
- No split tunneling
- Shared IP addresses
2. ExpressVPN — Consumer favorite, best-in-class
- Pricing: $8.32 per mo. (annual), $12.95 (monthly)
- Number of servers: 3,000+
- Money back Guarantee: 30-day
- Support: 24/7 live chat
- Multi-device support: Yes
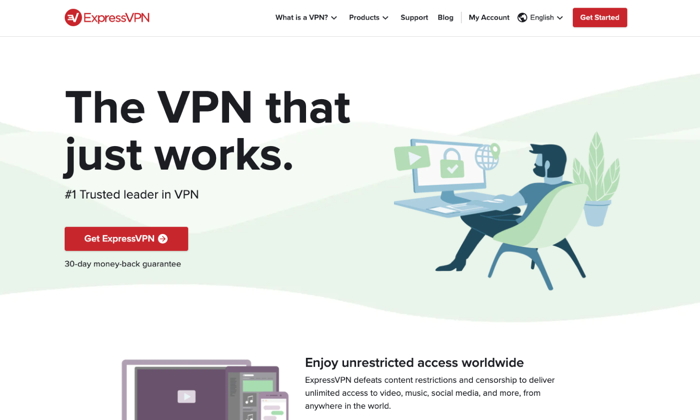
ExpressVPN doesn’t have a product strictly designed for businesses. They’re consumer-focused, which is great if you’re a sole proprietor or a remote, contract, or freelance worker on your own. Their apps are compatible with almost every device on the usual platforms; they also have apps for nontraditional platforms, including— Linux, Kindle Fire, Chromebook, and even Barnes and Noble’s Nook!
Since they’re consumer-focused, their apps are user-friendly, easy to set up, and simple to maintain. They provide you with all of the standard encryption and security features you’d expect from a top-rated VPN provider. And, they also provide you with some unique features like split-tunneling or using their own DNS servers.
Like NordVPN, they have a no-logging policy as their company is based in the British Virgin Islands. There’s no mandated government surveillance and no data retention laws.
Pros
- Consumer-focused
- User-friendly and easy-to-use
- Apps available on all devices and platforms
- Strong reputation
- Top-rated security and encryption
Cons
- No VPN services for businesses
- More expensive than their competitors
3. Perimeter 81 — Best for small business teams

- Pricing: $8/mo. (annual), $10/mo. (monthly
- Number of servers: 700+
- Money-back Guarantee: 30-day
- Support: 24/7 live chat
- Single sign-on: Yes
- # of Users: Minimum of 5 team member
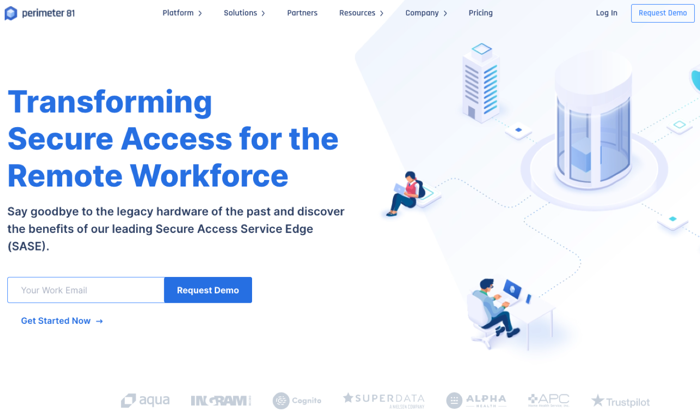
Perimeter 81 is an Israeli-based business VPN service that’s unique because of its Cloud VPN architecture. It’s great for users on multiple devices. You don’t need external legacy hardware or tools. It comes with the business features you’d need to run your remote organization safely in the cloud.
Perimeter 81 is ideal for remote businesses because it protects your business from unexpected mistakes. Their automatic Wi-Fi Security and DNS Filtering features instantly shield your data by automatically activating VPN protection when employees connect to unknown, untrusted networks. According to their website, “All outbound and inbound traffic is encrypted and routed through your dedicated private servers – concealing your company’s actual IP address with an IP mask.”
This protection shields your company from man-in-the-middle attacks and unsecure Wi-Fi networks. Their service keeps your business safe from data breaches, lawsuits due to negligence, and other claims. Employee training is important, but Perimeter protects your employees and your business when they’re working.
They also provide you with the data you need to monitor network activity. You can audit resource access, monitor bandwidth consumption, and detect network anomalies remotely and at any time. All of this is important because more organizations have a “bring your own device” (BYOD) policy in place.
The potential downside to Perimeter 81’s service is access points. As of today, they have 700 public servers in 36 countries. That might sound like a lot until you realize some of their competitors have double or triple that amount in twice as many countries.
Pros
- Single sign-on (SSO) functionality
- User friendly and easy-to-use
- Great for remote businesses
- Auto-integrated with all cloud providers
- Secure access to both managed and unmanaged devices
Cons
- Higher price point
- Fewer servers than their competitors
4. VyprVPN — Best VPN for speed
- Pricing: $2.50 per mo. (24 mo. plan), $3.75 per mo. (12 mo. plan), $12.95 per mo. (1 mo. plan).
- Number of servers: 700+
- Money-back Guarantee: 30-day
- Support: 24/7 response within 3 hrs
- Privacy: end-to-end
- Multi-device support: desktop and mobile
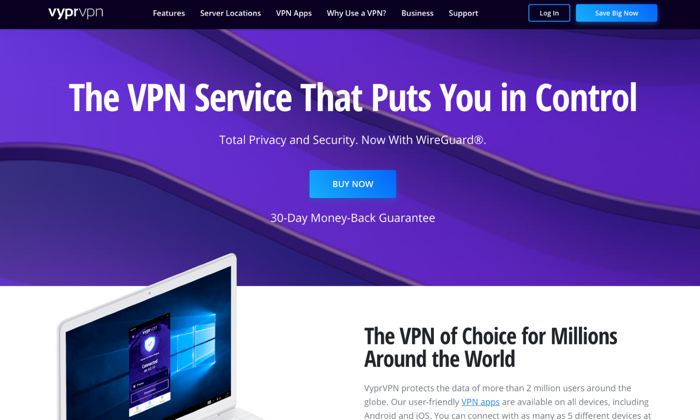
Owned by Golden Frog GmbH and incorporated in Switzerland, VyprVPN focuses on a few areas — speed, anti-censorship, and privacy. They call their service the “most powerful VPN.” They offer more than 200,000 IP addresses and 700+ servers, across 70 locations internationally.
Their platform resolves speed issues due to ISP bandwidth throttling. It’s common for users to state that their speeds are close to 100% of their original speeds. This is impressive when you realize that they rely on AES 256-bit encryption. They provide users with unlimited switching between servers and protocols without restrictions.
VyprVPN provides some of the same features listed from other providers — kill switch, public Wi-Fi protection, and DNS protection. But they also offer a proprietary technology called Chameleon. In this protocol, VyprVPN scrambles your metadata, so it’s not recognizable via deep packet inspection, but it’s still fast and lightweight. As a result, VyperVPN can bypass restrictions from governments, corporations, and ISPs while fighting censorship and maintaining speed.
VyprVPN also owns and operates their data centers to reduce any risk of a data breach. Other VPN providers route traffic to third-party servers, so they’re not as secure as a service that keeps things in-house. VyprDNS keeps your browsing history private. Their no-logs policy makes a breach unlikely.
Pros
- Unlimited high-speed bandwidth
- 70+ server locations
- Chameleon protocol
- 5 Simultaneous connections
- No activity or usage logs
- Fast customer support
- VyprDNS
- Self-owned servers
Cons
- Fewer servers than bigger competitors
- Poor speeds in specific regions (EU)
- Slower connection times in specific regions
5. Surfshark — Best for the price
- Pricing: $1.99 per mo. (24 mo.), $5.99 per mo. (12 mo.), $11.95 per mo.
- Number of servers: 1,700+
- Money-back Guarantee: 30-day
- Support: 24/7 live chat, email tickets
- Multi-device support: Desktop and mobile platforms
Surfshark is an award winning VPN service that offers incredible value for the price. According to VPNMentor.com, SurfShark is ranked 4th out of 357 VPN services. Their service provides users with 256-bit encryption, double VPN, an automatic kill switch, and a no-log policy.
They’re headquartered in the British Virgin Islands, so like other VPNs in our list, they’re free from the five, nine, fourteen eyes alliances. While they don’t collect usage or connection data, they do collect your email address, password, and basic billing information. If you’d like to avoid sharing this info, you can use cryptocurrencies like Bitcoin. They also collect unique advertising identifiers from third parties for marketing purposes and user analytics.
One detail that stands out with Surfshark is unlimited connections. The number of devices that can connect simultaneously, per license is unlimited. This is great if you’re an individual, but it’s also great if you’re running a business. There are no additional licenses or requirements once you’ve signed up. Just set your VPN up, pay for the service, and you’re all set.
Surfshark offers its Adblock VPN that blocks advertising and malware, counters phishing attempts, and boosts browsing speed. They offer premium features like private DNS on each server, camouflage mode to mask activity from your ISP, and Multihop – connecting via multiple countries at the same time to maximize footprint masking and ID protection.
Pros
- Best value for the price
- Unlimited connections/devices
- Built-in ad-blocker
- Whitelister
- Private DNS
- Double VPN
- No logging
- Engaged customer support
Cons
- Medium-sized network
- Moderately reduced speeds in specific regions
6. Mullvad — Best for anonymity
- Pricing: $5.50 per mo.
- Number of servers: 315+
- Money-back Guarantee: 30-day
- Support: Email
Mullvad believes privacy is a universal right.
Privacy isn’t the same as security. If you’re looking for a VPN service that will go to extreme lengths to protect your privacy, Sweden-based Mullvad is at the top of the list. They don’t require an email address or even a password from their customers. The company randomly generates a unique code for your username. You use this code to log in to the desktop apps or add credit to your account. They even allow customers to send cash in the mail to pay for your account!
They want to know as little about you as possible.
Mullvad will store your account number, your counts, paid time remaining, and the number of simultaneous connections that are used by your account. This data is kept in temporary memory, then purged once you log off. They log the total number of current connections for a given server, the bandwidth used per server, and the CPU load per core on each server. None of these items contain personally identifiable information.
Mullvad only offers connections in 38 countries, and they only have 315 servers. They don’t use virtual servers, so your VPN connections are running on physical hardware at the location specified. The speed varies based on your location. If you’re in Europe or North America, speeds are generally good. If you’re in Australia or Asia, the performance is generally much slower.
Pros
- Privacy-focused
- Simple and user-friendly
- WireGuard support
- More anonymity than most VPN services
- No affiliates or resellers
Cons
- Focused exclusively on privacy
- Slower speeds in certain locations
- No password protection
7. TunnelBear — Best for beginners
- Pricing: Free, $3.33 per mo., $5.75 per user, per mo. for teams
- Number of servers: 20
- Money-back Guarantee: 30-day
- Support: 24/7 email support tickets
- Multi-device support: Mac, Windows, iOS, and Android
TunnelBear‘s service is designed to be incredibly simple for newbies.
They’re based out of Canada, which is a member of the five eyes, nine eyes, and fourteen eyes alliances. This means data that goes through or is stored in Canada is subject to intelligence agreements —they may be legally forced to share your data. TunnelBear states that they have a no-logging policy, so everything seems okay until you read this in their privacy policy.
“TunnelBear makes good faith efforts to provide you with the ability to delete your Personal Data. However, there may be circumstances in which TunnelBear is unable to delete all your Personal Data. For example, we are unable to delete it where we are legally required to keep it, including where we need it to continue to offer you the service or if you are involved in litigation with us, we would be required to retain your personal data, which is limited to the fields we discuss above in 1.2, 1.3 and 1.4.”
This data includes your email address, twitter id, paid user designation, operational data, and personal and financial data. If this isn’t a concern for you or your organization, TunnelBear is a great option for individuals and businesses that want to get started with a VPN but aren’t as knowledgeable as they’d like.
TunnelBear includes the standard features you need to get started with a VPN — AES 256-bit encryption, tunneling (Android only), hashing, and more. Their service is reasonably priced and designed to help inexperienced people get started with a VPN.
TunnelBear is transparent about its service, sharing the results of its independent security audits each year on its website.
Pros
- Designed for inexperienced users
- Generally open and transparent about their service
- Low cost
- Built for individuals and teams
- Offers a free plan
Cons
- May share your data with governments
- No phone or customer support
Conclusion
Whether you’re a freelancer, an entrepreneur with a small team, or a growing business looking for options, a VPN will provide you with the security and peace of mind you need to keep your remote team connected and working safely.
Your needs are unique, and they’ll dictate which VPN service will work best for you and your business. Weigh the options against your needs for speed, security, privacy, compatible devices and number of connects. Millions of people are working remotely, and that number continues to grow every day. If you’re not already using a VPN service, now’s a good time to start.
The post Best VPN Services appeared first on Neil Patel.
Best Reseller Hosting

Disclosure: This content is reader-supported, which means if you click on some of our links that we may earn a commission.
Reseller hosting can be extremely lucrative. Whether it’s an add-on to your existing business, a side hustle, or the start of a standalone hosting company, there are plenty of ways to turn a profit in this space.
Every website needs a hosting service. White label resellers become that solution for their clients. By renting servers at wholesale rates from web hosting providers and reselling them to other sites, it’s easy to generate a substantial ROI.
But it all starts with finding the right reseller hosting company for your needs. Which one is the best? Find out below.
The Top 5 Options For Reseller Hosting
- SiteGround — The Best For Unlimited Sites
- HostPapa — The Best For Reseller Beginners
- InMotion — The Best Reseller VPS Plans
- A2 Hosting — The Best For Billing and Client Management
- Liquid Web — The Best Variety of Reseller Packages
How to Choose the Best Reseller Hosting For You
Certain criteria must be evaluated as you’re shopping around and comparing reseller hosting companies side-by-side. The factors identified below should be considered before finalizing a decision.
Hosting Type
By default, most reseller packages are offered on shared hosting servers. But different providers offer various hosting options, including VPS reseller hosting, cloud reseller hosting, and even dedicated server reseller hosting.
The hosting type you select will have a direct impact on performance. For example, shared hosting is considered to be entry-level. So, your clients won’t necessarily have the highest performing websites if you’re reselling shared hosting. Traffic spikes on one site could lead to crashes or slow loading times on another.
VPS or dedicated hosting would improve site performance for your clients. These are more expensive, but you can pass those costs along to each client.
Quality and performance will both be a direct reflection of your brand and services. Often, prioritizing quality is worth the added cost. Choosing the right type of hosting is a crucial decision.
Number of Clients
There’s a big difference between selling reseller hosting services to 20 clients versus 200+ clients. Be realistic, and ask yourself how many clients you plan to acquire and retain on a monthly or annual basis.
Some reseller plans are better for managing smaller client lists, while others are built to scale. There are even reseller hosting packages out there that can accommodate an unlimited number of websites.
Billing and Client Management
The best reseller hosting plans set you up for success and come with add-ons or built-in tools for managing your clients.
Look for features like web hosting manager complete solution (WHMCS). It’s an industry-leading web hosting and billing management tool. You can use it to automate billing, collect payments, set up provisioning, and more. Blesta is also a popular tool for billing and client management.
Some plans come with a free WHMCS or Blesta license, while others charge extra for access to these tools.
Technical Ability
Ease of use with reseller hosting is not universal across the board. Some platforms are definitely more user-friendly than others.
Some reseller hosting solutions are made for developers and other tech-savvy users. Others are designed to accommodate beginners or agencies looking to add-on to existing services.
Be honest about your technical ability and that of your team, and the learning curve associated with the tool. It should be reasonably easy to determine if the plans you’re evaluating fit within your level of comfort. The terminology and use cases described for each package can be very telling. If it feels like you’re reading a foreign language, it’s probably not the best option for you.
White Labeling
Hosting for clients can typically be offered in one of two ways—managed or white label.
Some resellers build and manage sites for clients behind the scenes without granting the client access to their site’s hosting control panel. Others simply re-brand the hosting services and give clients log-in access to manage the hosting service independently.
With a white label plan, the client never knows where you’re getting hosting from. You’ll have the ability to put your own branding and logos on this dashboard. Not every reseller plan comes with white label capabilities out of the box.
The Different Types of Reseller Hosting
There are different options when it comes to reseller hosting. They typically fall into one of the following four categories:
Shared Reseller Hosting
Shared hosting is when all websites share resources from the same server. Clients will be sharing server space with each other, as well as other sites that you’re not directly selling hosting to.
If no hosting type is specified on the package being evaluated, it’s usually safe to assume that the plan is shared.
Shared hosting is typically the cheapest, but the performance isn’t always great. Clients may experience slow loading times or even crashes if other sites on the same server use up resources.
VPS Reseller Hosting
VPS stands for virtual private server. Websites are still hosted on one central server, but they’ll have dedicated resources on their own virtual servers.
VPS hosting is an excellent option for white label resellers. It offers flexibility and improved performance without breaking the bank. This option will be more expensive than shared hosting, but it’s still a good value.
Dedicated Reseller Hosting
Dedicated reseller hosting involves renting an entire server from a hosting provider. In this case, resellers won’t have to worry about other websites being hosted or sharing resources with their clients.
This allows you to provide more RAM, CPU, bandwidth, and storage to your clients. It’s more expensive, but the performance will be top-notch.
Dedicated reseller hosting is generally better for resellers with a high volume of clients. If you’re only managing a dozen sites or so, this really isn’t necessary.
Cloud Reseller Hosting
Cloud hosting is a bit new compared to other types of web hosting. It’s not necessarily the most popular option for resellers, but some providers now offer this choice.
Think of cloud hosting like a hybrid version of a VPS. Rather than each site being split into a single virtual private server, each is hosted on multiple cloud servers.
Cloud hosting is a good option for resellers who want to give clients the ability to scale their resources on-demand. These packages typically offer “pay as you go” pricing, so clients pay based on usage.
#1 – SiteGround Review — The Best For Unlimited Sites
SiteGround is one of the most popular and reputable web hosting providers on the market today. Their reseller plans are no exception.
Resellers benefit from everything they need to start selling hosting and managing multiple sites out of the box. One unique standout of SiteGround is that it’s built to scale. All reseller packages support an unlimited number of websites.

Even the entry-level package supports unlimited sites. You won’t find a value like this from other hosting providers on the market today.
SiteGround is also flexible enough to accommodate resellers with different needs. For example, you can resell hosting to clients without giving them direct access to the control panel for each site. This is a popular choice for developers who build and manage sites for clients.
Alternatively, you can give clients full access to their control panel by assigning them as white label users. They won’t see any SiteGround logos or branding when they log in, so you can brand the hosting service as your own. White labeling is offered with the GoGeek and Cloud plans.
The cloud reseller hosting plans from SiteGround also allow you to set up custom packages and user access for your clients.
Other top features and benefits of using SiteGround’s reseller services include:
- Single dashboard to manage all sites
- Built to scale
- 30+ tools like FTP client, PHP version manager, app installer, etc.
- Free WordPress installations
- Automatic WordPress updates
- Daily backups
- On-demand backups
- Free SSLs
- Free CDN
- Free email
- Unlimited databases
- Caching to boost speed
- Ability to add collaborators
SiteGround also has exceptional support for resellers. If you need help or have a question, their hosting experts are available via live chat and ticket support.
Reseller plans start at just $5.99 per month.
#2 – HostPapa Review — The Best For Reseller Beginners
HostPapa is perfect for anyone new to reselling. The platform is straightforward to use, and advanced technical knowledge is not a requirement.
They handle everything on the backend, so you never have to worry about the server architecture being sold to clients. HostPapa takes care of server firewalls, brute force detection, site security, network monitoring, IP deny manager, SSL encryption, and so much more.

The exceptional support and resources designed specifically for resellers are highly beneficial to beginners. HostPapa offers free 30-minute training sessions, self-help guides, reseller tutorials, and award-winning customer service.
You’ll even have the option to provide your clients with their own control panel access through a brandable white-label portal. This includes branded white-label nameservers.
Here are some other top reasons to choose HostPapa for reseller hosting:
- One-click installation for 400+ apps
- Built-in automation to manage client subscriptions
- WHMCS billing system
- Free site transfers from other hosting providers
- Simple dashboard to manage all sites
- Unlimited sites
- Easy to scale and add resources
- 99.9% uptime guarantee
- 24/7/365 tech support
Reseller plans start at $29.99. All packages are backed by a 30-day money-back guarantee.
#3 – InMotion Review — The Best Reseller VPS Plans
InMotion is another industry leader in the world of web hosting. They offer six different white label reseller plans, including three VPS reseller packages.
For those of you who want to take your reseller services to the next level, a premium VPS plan from InMotion has everything you need.

Every plan comes with free SSD storage, free billing software, cPanel and WHM, free domain reseller, 24/7/365 support, and white label resources. InMotion is optimized for WordPress out of the box as well.
But if you select a reseller VPS plan, you’ll benefit from additional features like:
- Up to 50 free cPanel transfers
- Hosting optimized for e-commerce
- High availability with real-time redundancy
- Free server security, management, and maintenance
- Optional root access
- High performance with allocated resources for each site
- Scalable resources
The shared reseller packages start at $15.39 per month, whereas the VPS reseller plans start at $46.64 per month. There’s definitely a significant difference between these starting rates, but the VPS reseller hosting’s quality and performance are unmatched.
All InMotion white label reseller hosting plans are backed by a 90-day money-back guarantee.
#4 – A2 Hosting Review — The Best For Billing and Client Management
A2 Hosting is synonymous with speed. They are known for providing some of the fastest web hosting servers on the market today.
When you sign up for an A2 Hosting reseller package, you’ll have the option to upgrade to a turbo reseller plan, which gives you and your clients access to servers up to 20 times faster than most other options.
In addition to the top-notch performance, A2 offers a free WHMCS or Blesta license with its reseller packages.

WHMCS and Blesta are two of the best client management and billing solutions for resellers. So, you’ll have no problem managing your client lists at scale with A2 Hosting.
Other top features offered in A2’s reseller packages include:
- 24/7/365 guru support
- Free account migrations
- 99.9% uptime commitment
- Free SSL certificates
- cPanel and WHM
- White label capability
- Developer-friendly tools
The entry-level reseller servers from A2 Hosting start at $18.99 per month. Turbo reseller servers start at $29.99 per month, and I strongly recommend them. Your clients will definitely notice a difference in terms of speed and performance. The extra $11 is well worth it.
A2 also has a ton of guides and resources made specifically for resellers. You really can’t go wrong with any of these plans.
#5 – Liquid Web Review — The Best Variety of Reseller Packages
Whether you’re starting a new reseller hosting business or scaling an existing one, Liquid Web has everything you need to succeed.
They offer a wide range of reseller options, including dedicated reseller servers, VPS servers, and cloud servers.

All of these options perform significantly better than an entry-level shared reseller plan.
Liquid Web also has a unique billing structure for reseller customers. The program allows resellers to purchase any hosting solution at a discount. But the exact discount is based on monthly revenue. The more hosting solutions you sell, the higher your discount will be:
- $250-$500 per month — 5% discount
- $501-$1,000 per month — 7% discount
- $1,001-$2,000 per month — 9% discount
- $2,001-$5,000 per month — 12% discount
- $5,001-$10,000 per month — 17% discount
- $10,001-$15,000 per month — 19% discount
- $15,000+ per month — 20% discount
As you can see, there’s an opportunity to make a significant profit here with these discounts as your reseller program scales.
All of Liquid Web’s reseller packages come with a free WHMCS license. This makes it easy for you to customize plans for clients, generate invoices, and provide support to your clients within a single interface.
Liquid Web allows you to give your clients complete control of their plans so that they manage things like service provisioning, reboots, and load balancing on their own.
Pricing for Liquid Web’s reseller program starts at $99 per month.
Summary
Every website on the Internet must have a web hosting service, and there’s no shortage of potential prospects for resellers in the hosting space. But having success as a reseller starts with choosing the right program.
Which one is the best?
The top five options reviewed above is the best place to start your search. Whether you’re a beginner, an experienced reseller, or somewhere in between, you can find what you need with the recommendations listed in this guide.
The post Best Reseller Hosting appeared first on Neil Patel.
How to Create an SEO-Boosting XML Sitemap in 20 Minutes (or Less)

When it comes to SEO and marketing, I like quick and easy wins.
Even though I’m committed to the long journey of blogging (10+ years and counting), I’d much rather push a few buttons and pull a few levers to get more traffic.
Low effort. Big wins. That’s where I like to be.
And, thankfully, there are some SEO techniques that deliver high value for low effort.
I want to share with you one of those techniques — creating an XML sitemap.
Now before you run away after reading the term “XML sitemap,” let me give you some good news.
Even though an XML sitemap is on the “technical” side of SEO, it’s not hard to make one. And, really, it’s not that “technical” either.
In fact, in just a few minutes you could create a really good XML sitemap. You don’t have to know how to code. You just have to know how to click.
It’s free. It’s easy. It’s relatively simple, and it can improve your SEO.
Ready to give it a try?
What, Exactly, is an XML Sitemap?
What is an XML sitemap?
In simple terms, it’s a list of a website’s URLs.
That’s why it’s called a sitemap. It maps out how the website is structured and what pages the website includes.
(“XML” stands for “Extensible Markup Language,” a way of displaying information on websites.)
That’s what an XML sitemap is, but why should you even have one? What’s the purpose?
What’s the Purpose of an XML Sitemap?
Search engines use crawlers to organize and index information on the web.
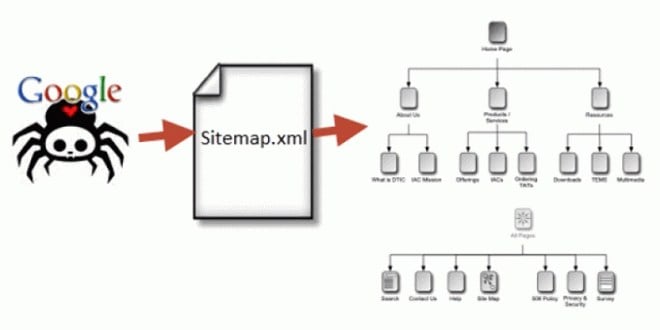
These crawlers can read all kinds of information. But an XML sitemap makes it easy for the crawler to see what’s on your website and index it.
Once it does this, your website has a stronger likelihood of improving its rank quickly.
Essentially, an XML sitemap serves as a table of contents for your website, allowing the crawler to get the essentials and index your site accordingly.
A well-structured sitemap can do even more, however.
Sitemaps tell search engines when a page was updated, the frequency of updates to the page, the relative importance of pages within a website, and how to find and index content that may be found deep within the site’s structure.
Here’s what the information looks like in a sitemap:
- Where the page is located on the website (its URL): <loc>http://www.example.com/mypage</loc>
- When the page was last changed: <lastmod>2013-10-10</lastmod>
- How often the page is changed: <changefreq>monthly</changefreq>
- What priority the page has in relationship to other pages on the site: <priority>1</priority>
These features are important, especially considering the amount of unauthorized syndication that takes place with content today.
If you aren’t using a sitemap, your website could be seen as containing duplicate content, which isn’t good for SEO.
More importantly, however, a sitemap is a fast way to get indexed by Google.
With a sitemap, you can tell Google, “Look, this is my site, and here are the pages I want you to index.”
Within minutes (usually), Google will crawl your site and index your content.
What Are the Benefits of an XML Sitemap?
If you’re wondering, “Hmm. Do I really need a sitemap? Should I go to all that trouble?” I want to persuade you to, yes, do it. It only takes a few minutes, and the benefits are enormous.
Consider these benefits of an XML sitemap:
- It tells Google to crawl and index your website.
- It tells Google what to crawl on your website.
- The XML sitemap tells Google what kind of information is on your website.
- The XML sitemap tells Google when your content was updated (which could result in more favorable or “fresh” rankings).
- It tells Google how often your content is updated and how important it is.
- The XML sitemap helps your website instantly gain indexation for dynamically-generated pages.
- It helps you overcome the limitations of a website with weak internal linking.
- It helps your site overcome the challenge of not yet having a strong external link profile.
- It helps huge sites gain better and more organized indexation.
- The XML sitemap helps Google crawl your website more effectively.
- It shows Google all the pages on your website, even if they are deep within the architecture and might not otherwise be crawled as quickly.
If you’re ready to get started on creating your own XML sitemap, we’ll follow a three-step process:
- Create your XML sitemap.
- Add your XML sitemap to your website.
- Submit your XML sitemap to Google.
(I’ll also show you how to submit your Sitemap to Bing and Yandex as well)
The remainder of this article will address each of those points, along with one final step, using Ubersuggest to find potential sitemap errors.
Create an XML Sitemap Using Screaming Frog (for any Website)
You can use Screaming Frog to create an XML sitemap for any website. It doesn’t matter what CMS you’re using, what size the website is, or your website’s age.
In fact, you don’t even need to own the website or have login access to it to create the sitemap.
Is there a cost associated with this? Screaming Frog, the tool we’ll use, provides free crawling for up to 500 pages. To crawl websites larger than 500 pages, you will need to purchase a Screaming Frog license.
About Screaming Frog
If you do not have Screaming Frog yet, you need to install it first. You can do so here.
Screaming Frog is a powerful desktop software program that helps with a whole range of SEO activities.
The basic version is free. The full version (with license purchase) costs £149.00 per year (around $180 USD or €170 euro).
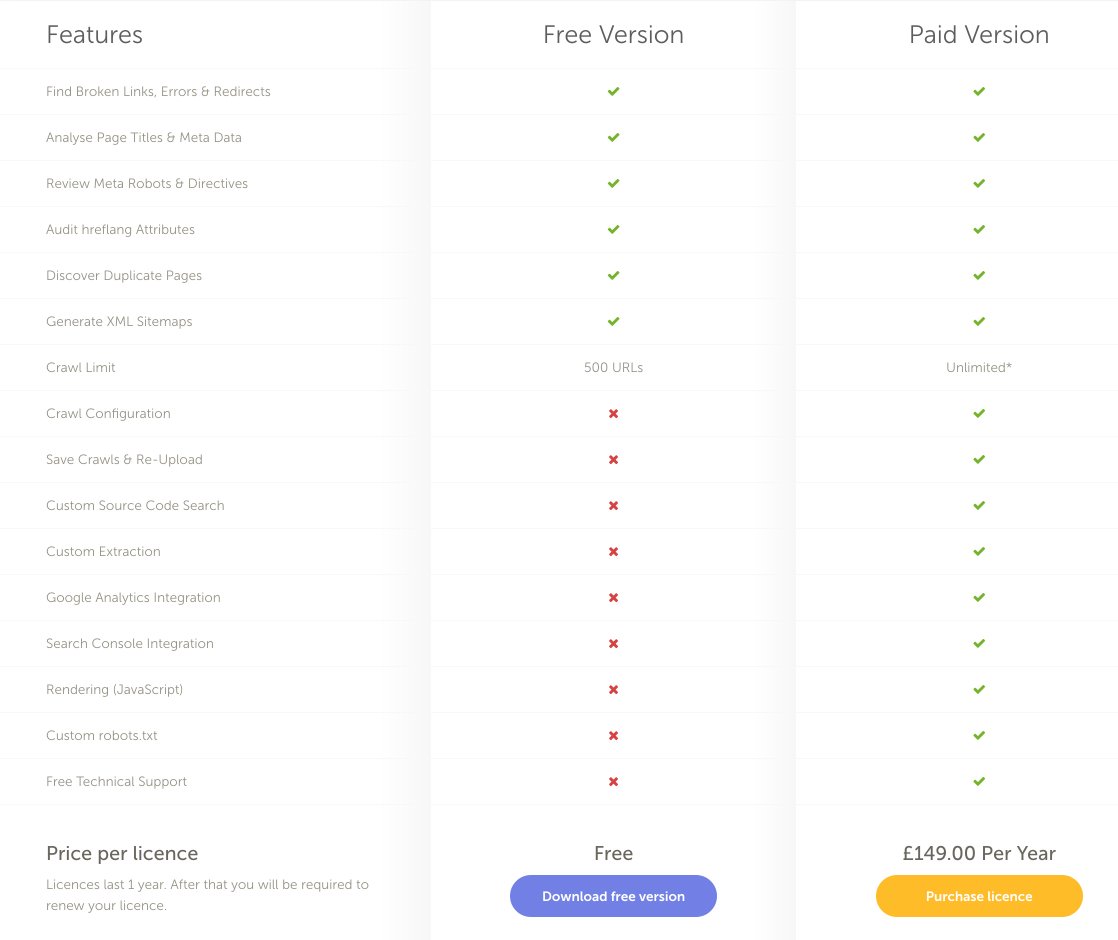
In this section, I’ll walk you through how to create an XML sitemap for any website using the free version of Screaming Frog.
First, open Screaming Frog.
Then, type your URL into the field at the top.

Click “Start.”

Depending on your website’s size, it will take from a few minutes to a few hours to crawl the site.

For a site like NeilPatel.com (6,600+ pages), it takes a while to crawl, but not too long. I’ve worked on some large e-commerce websites with millions of URLs. These take hours to crawl.
When the site has finished crawling, it will display “100” in the status bar.

Now, click “Sitemaps” in the menu bar.
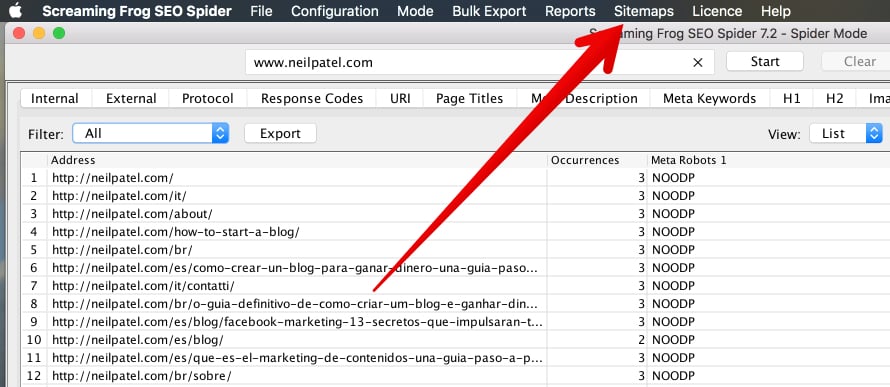
Click “Create XML Sitemap.”
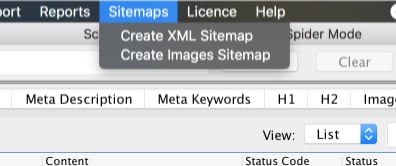
Next, you’ll need to choose which sections of your website you want to include in the XML sitemap.
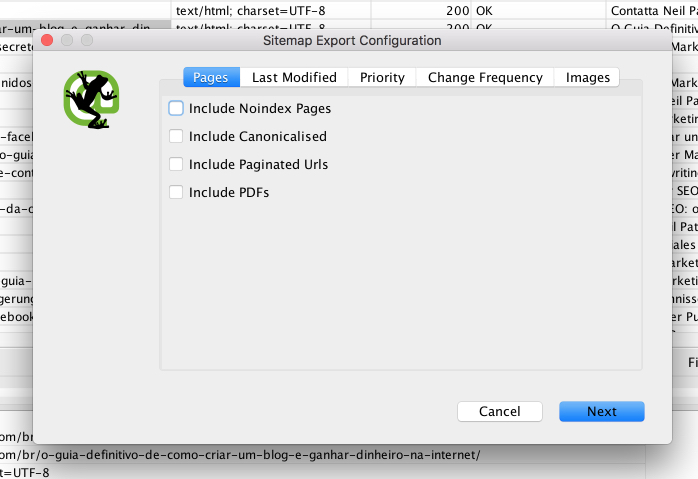
At first glance, this may seem confusing, especially if you’re not sure what “Noindex” or “canonicalised” means.
Here is a brief explanation of each one:
- Include Noindex Pages: Noindex pages contain HTML code in the header telling the search engines not to include the page in the search index. If your developer has set certain pages as “Noindex,” it is probably with good cause. When in doubt, do not check this box.
- Include Canonicalised: There may be more than one URL pointing to the same page of content. If you “include canonicalized,” you are telling the crawl tool to include variations of the URLs that point to the same page. If in doubt, leave this unchecked.
- Include Paginated URLs: A paginated URL is one that includes rel= attributes (rel=“prev” and “next”) to navigate through a series of content on a website. Unless you’re careful with it, pagination can be a bit dangerous for SEO. I recommend that you do not check this box.
- Include PDFs: You can choose whether or not you want PDFs included in your XML sitemap. Google indexes all kinds of content, PDFs included. I recommend that you do include PDFs in your XML sitemap, as long as the PDFs on your website are important and relevant to users who might be searching for your content.
Remember this basic idea. A sitemap is for SEO. If you want someone to find the page on your website, you want to include it in the sitemap.
For my purposes, I’m going to include PDFs.
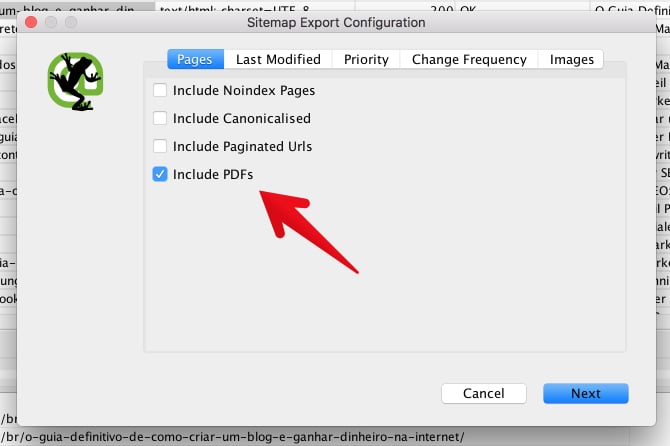
The tabs “Last Modified,” “Priority,” and “Change Frequency” deal with the date and time that website pages were modified and the <priority> settings.
Unless you have a knowledge of these settings, please leave them as they are by default.
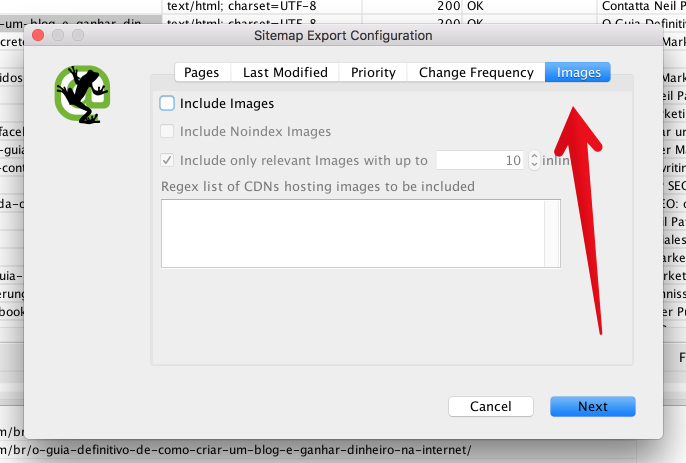
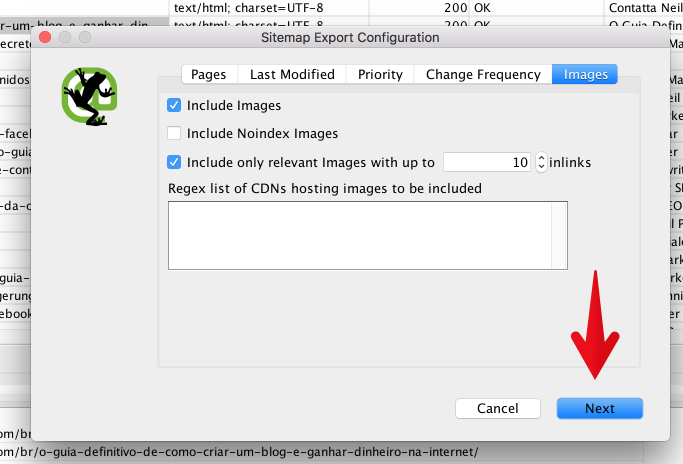
I think it’s a good idea to include images in a sitemap, so I’m going to add those to my sitemap.
Click the “Images” tab.
Then, click “Include Images.” The third box (“Include only relevant Images with up to 10 inlinks”) will automatically be checked.
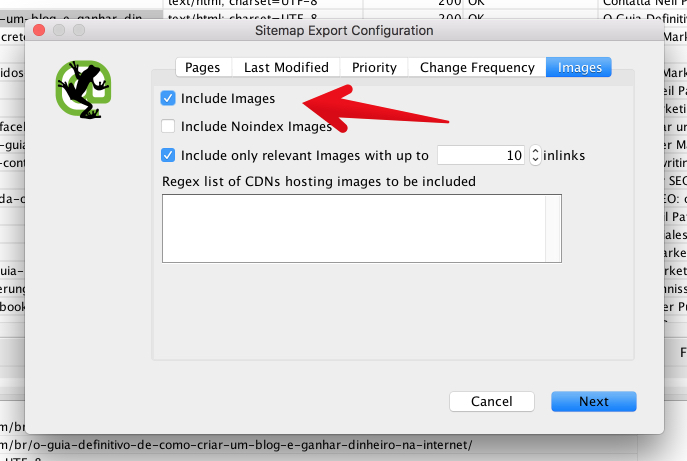
Then, click “Next.”
You’ll be prompted to save your XML sitemap on your computer. Find a good place to save it, and click “Save.”
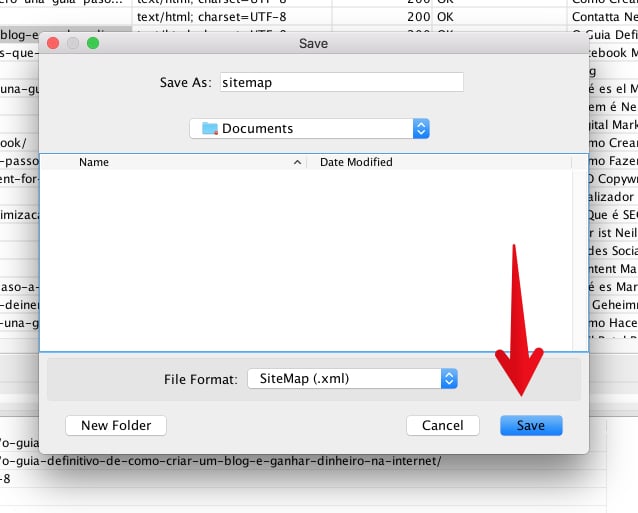
Congratulations! You’ve created an XML sitemap!
You’ll now need to upload this file to your website via FTP. You may already know how to do this.
If you don’t know how to upload the XML sitemap to your website, check with a developer to determine what process you should follow for your specific server and/or CMS.
But creating a sitemap is only the first step. A sitemap means nothing unless you submit it to the search engines.
Skip down to the section “Submit your XML sitemap to Google” to learn how to do it.
Create an XML Sitemap Using Yoast (WordPress Only)
Yoast is one of the most popular SEO plugins for WordPress. Yoast makes it easy to create and submit an XML sitemap.
I’ll explain how to do it step-by-step, but first, here’s what you need:
- You must be using a WordPress.org site.
- You must have the Yoast plugin installed. (It’s free.)
- Your website must be connected to Google Search Console.
Most websites already have those three things in place. If you’re ready, let’s jump in.
Login to Your WordPress Admin
Note: In the screenshots below, my WordPress admin might look a little bit different from yours. That shouldn’t keep you from being able to follow each step.
What we’re going to do first is make sure that the Yoast plugin is all ready to create a sitemap for you. To do so, we’ll need to turn on Yoast’s advanced settings.
Click on the Yoast Plugin
It has a “Y” icon, and says “SEO.” It should be located in the left sidebar.
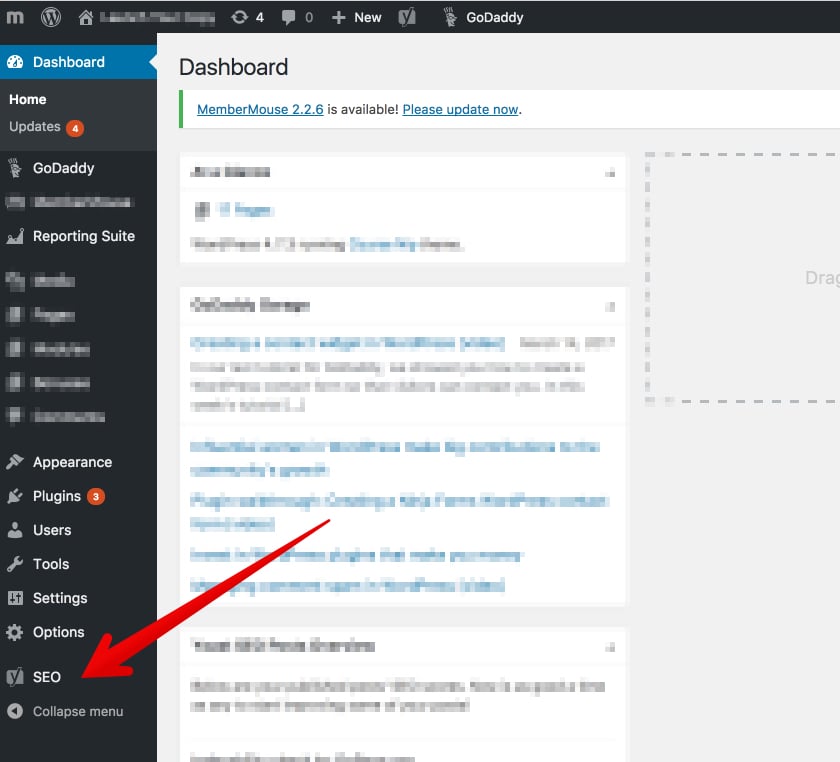
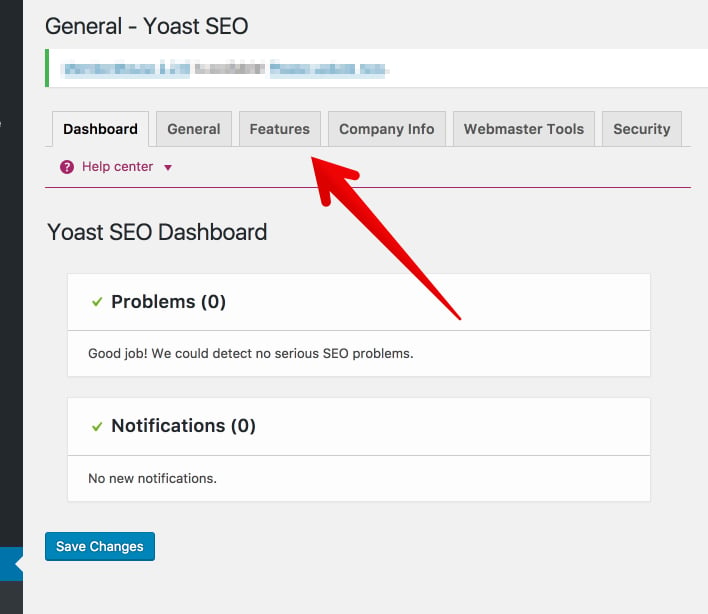
Click the “Dashboard” option.
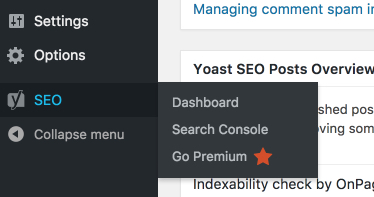
From the Dashboard, click “Features.”
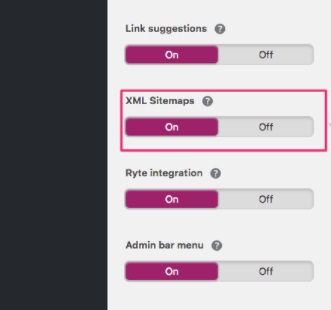
From the Features tab, look for “XML sitemaps” and make sure it is toggled to “On.”
Now, scroll to the bottom and click “Save Changes.”\
If you want to customize your sitemap, learn how here. For example, you might want to exclude pages that aren’t public.
In general, however, the sitemap Yoast generates tends to be pretty solid.
Now, it’s time to submit this to Google.
How to Submit Your XML Sitemap to Google
Now it’s time to do something valuable with your sitemap — submit it to Google.
To do this, you’ll need to have Google Search Console connected to your website. Check out this Google guide for instructions on doing so.
First, go to Google Search Console and select your website.
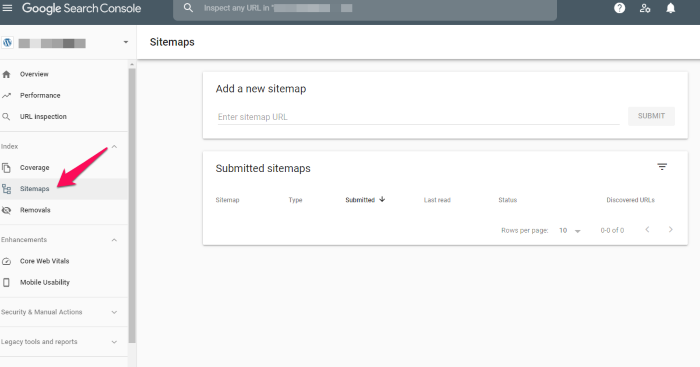
From the dashboard, click “Sitemaps.”
Click “Add a new Sitemap.”
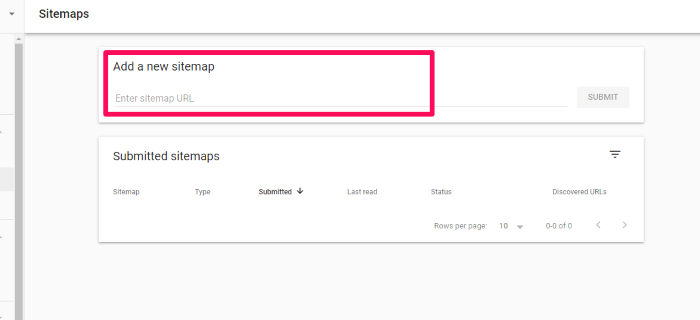
Enter the URL where you’ve saved your sitemap. It should end with “.xml” since it’s an XML file.
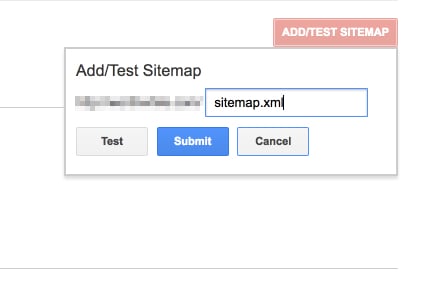
Click “Submit.”
Then use the Sitemaps report to make sure there are no errors. (I’ll also cover another method below.)
Once that’s completed, Google takes care of the rest. Your sitemap allows Google to quickly and seamlessly index your site, helping to boost your rankings.
How to Submit Your XML Sitemap to Bing & Yandex
Google is the largest search engine — but it isn’t the only one. To get the most mileage out of your XML sitemap, I suggest submitting it to Bing and Yandex. Here’s how:
Submit Sitemap to Bing
Bing is Microsoft’s answer to Google. It has a much smaller market share (just over 6%). However, more than 900 million unique users visit Bing a month. Submitting a sitemap to Bing is a breeze, so it’s worth the few minutes to reach their audience.
To submit your sitemap to Bing, login to your Dashboard in Webmaster tools. Find the Sitemaps widget and click “Submit a Sitemap.”
Enter the URL location of your file, and click “Submit.” That’s it!
Submit a Sitemap to Yandex
Yandex is Russia’s version of Google. In Russia, Yandex dominates more than 55% of the search market. It also provides email, streaming music, and online payment services. Like Bing, submitting a sitemap only takes a few minutes, so it’s worth the effort to reach a wider audience.
Here’s how to submit your sitemap to Yandex:
Head to to Sitemaps files page, and choose your site from the list.
Add the URL of your sitemap.
Click add.
It will take about two weeks for your sitemap to load. You’ll want to check back and make sure it is uploaded properly; if it says “OK,” then you are good to go. If you see “Redirect,” try uploading the file again.
If you see “error” or “not indexed”, you’ll need to troubleshoot. Use this guide from Yandex to figure out what is going on.
Use Ubersuggest to Check Your XML Sitemap Errors
If you follow the steps above, you shouldn’t have any sitemap errors. But just because you shouldn’t, doesn’t mean you won’t.
Here’s how you can use Ubersuggest to check for sitemap errors:
Step #1: Enter your domain name and click “Search.”

Step #2: Click site audit in the left sidebar.

Step #3: Review the results.

To find issues with your sitemap, review the data associated with the health check, critical errors, warnings, and recommendations.
For example, when you click on Critical Errors, here’s what you see for my website:
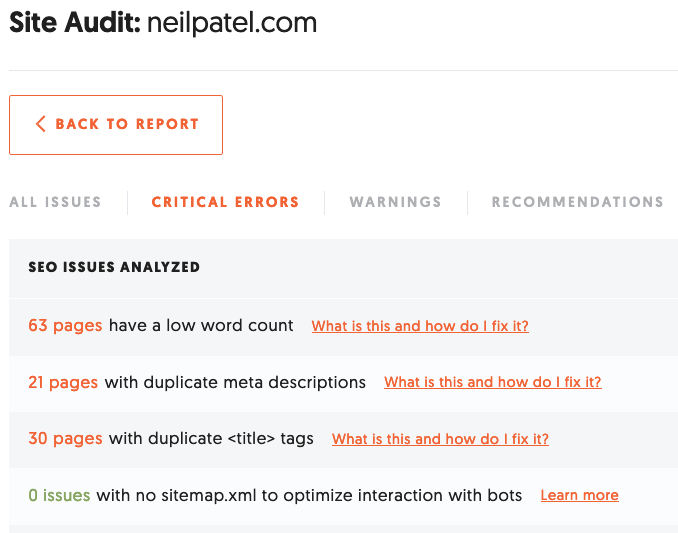
There are no issues with my sitemap, but if there were, here’s where you’d find more information. In addition to the issues itself, there’s a learn more button that takes you to:

You can then follow the prompts for more guidance on how to fix the error.
Use Ubersuggest to check the health of your sitemap regularly. Doing so once or twice a month will only take a few minutes out of your schedule, but it can go a long way in improving your website’s SEO.
Conclusion
A lot of small business owners and web entrepreneurs get afraid when they hear the term “XML sitemap.”
It sounds jargony and code-like. If you’re not an SEO nerd or a computer geek, how do you figure out how to create and submit an XML sitemap?
As it turns out, it’s not that hard.
Creating a sitemap using a program like Screaming Frog or Yoast takes ten minutes or less.
If you know nothing about sitemaps, and need to go through the whole process for the first time, no problem. Walking through the entire process from start to finish may take, at most, twenty minutes.
The SEO benefits, however, will be enormous.
If you’ve never created an XML sitemap for your website, my advice is simple: Get one made today.
Then, perform a technical SEO audit to see what other issues might be lurking on your site.
You can do it. I’ve got your back.
What’s your experience creating an XML sitemap? How has it helped your site’s SEO?
The post How to Create an SEO-Boosting XML Sitemap in 20 Minutes (or Less) appeared first on Neil Patel.
How to Monetize Your Website Without Destroying Your User Experience

If you have a website that publishes content, you know there’s one thing that’s super important… monetizing your traffic.
You’ve poured tons of time and effort into creating a great site, and there’s nothing better than turning all that hard work into cash.
But monetizing your site isn’t as easy as it might seem at first. To get the most out of it, you’ll need to utilize some solid strategies.
Strategies for Monetizing Traffic to Your Website
There are a lot of ways to monetize your website. I’ll explain a few of the most common ones below. But first, let’s talk about traffic:
The More Traffic You Have, the Easier It Will Be to Monetize Your Site.
Some of the common ways to monetize a website (like running ads) won’t necessarily be worth it until you have a certain amount of traffic.
There are still ways you can monetize a website that doesn’t get much traffic. For example, you could use the audience you already have to launch a business (like coaching or freelance writing) based around your site. You could also sell products to your existing audience.
However, with more site visitors, you’ll have more options.
How do you build traffic to your website? There are tons of strategies you can use. Write an ebook, hold a webinar, grow your email list, improve your SEO… basically anything to help people find you and get them interested in your content.
Monetizing Your Site
Once you’ve built up an audience for your website, here are just a few of the techniques you can use to monetize your traffic.
Paid Memberships or Paywalls
The simplest way to monetize your website is asking people to pay for your content.
Because there’s so much free stuff on the internet, people are hesitant to pay for content. However, if your brand is strong enough, your audience might be willing to pay. Many major news publishers offer only a few free articles and keep the rest of their websites behind a paywall. Here’s what that looks like at the Harvard Business Review:
For bloggers and marketers, a more common approach is a tiered membership system, where most of the content on the website is free, but some is members-only.
Affiliate Marketing
Affiliate marketing means using affiliate links to refer people to other websites. When people buy products from those sites, you’ll get a cut of the sale.
If you’re using affiliate links on your site, you should let people know that. Try to only recommend products you think your audience will like.
There are tons of companies out there with affiliate programs. Amazon has one of the most popular ones.
Sponsored Posts
A third way to monetize traffic is by doing sponsored posts for brands. Companies might contact you asking you to write a post promoting them, with a link to their site. This is sometimes called native advertising.
Here’s an example of a sponsored post from HR Magazine:

Display Ads
Finally, one of the most common ways to monetize your website is by using display ads.
Display ads are extremely popular and show up on almost every website in the header, sidebars, and other places. In fact, the Google Display Network reaches 90% of internet users around the world. By using display ads, you can “rent out” space on your site to advertisers.
Here’s an example of what display ads look like from Speedtest.net:
Display ads are an easy way to monetize traffic. But to get the most out of them, you have to optimize them.
To do this, you have to understand how display advertising works, and which types of ads work best. Ads can be annoying to users if you implement them wrong.
Read on to learn about how to earn more from display ads without destroying your user experience.
What Type of Ads Should I Use to Bring in Revenue?
First, let’s talk about the types of display ads that are out there. There are a lot of different formats for ads. The Interactive Advertising Bureau has guidelines for ad sizes and specifications.
Here are a few kinds of display ads you might see on publisher websites:
Static Ads vs. Animated Ads
Static ads are the simplest and most traditional kind of display ads. A static ad is a picture, and that’s it.
An animated display ad is usually made up of 2-3 static images, which display one after the other.
These types of ads are sometimes called banner ads, and they come in a variety of different formats. You may have heard terms like “leaderboard”, “skyscraper”, “square”, “full banner”, or “half-page”: these are all different sizes for display ads.
Google has a guide showing some of the most common ad sizes (in pixels) for both mobile and desktop.
Video Ads
Another type of display ad is a video ad.
You may think of a video ad as something that shows up on YouTube, but Google video ads also appear on publisher websites if they are Google video partners.
Video ads may be embedded within content or displayed on the side of the page.
Lightbox Ads
Lightbox ads respond when users engage with them. When people tap or hover over the ad, it expands or displays a video. Advertisers only pay when people engage with their ads.
Responsive Display Ads
Responsive display ads adjust their appearance to fit different ad spaces.
Advertisers can upload a bunch of assets (videos, images, logos, or headlines), and the ad network automatically chooses a combination of these to fit different ad slots.
Retargeted Ads
Ever looked at a website, and then seen ads for that same website a few hours later as you were browsing online?
You can thank retargeting (also known as remarketing) for that.
Retargeting lets advertisers show their ads to people who have already interacted with their website in some way, or who have signed up for their email list.
Native Ads
The term native ad means an ad that blends into the content surrounding it, making users more likely to click.
While you may think of a native ad as a sponsored post or advertorial, display ads may also be called native ads when they are optimized to match the surrounding content.
Here’s a screenshot (from The Independent) of what a native ad looks like. It looks like an article, but note the “sponsored” label at the bottom:

Which Type of Ads Should I Run?
As you can see, there are a lot of different types of ads to choose from. Which kinds should you run on your website?
As a publisher, it’s in your best interest to run ads in a way that will make them perform well. You want to get people clicking, so you can earn those advertising dollars.
But you also don’t want to ruin your user experience. Running too many invasive ads can have a bad impact on your site: it can slow down your page loading speed, potentially tank your SEO, and send your readers running for the hills.
So how can you know which ads will work best? Basically, you should be testing your ads, and you need to be using the right tools.
Read on for more tips on how to get the best possible ad experience for your website.
Tips for Optimizing Your Website’s Ad Experience
To effectively monetize traffic, you’ll want to improve the ad experience that users have on your website.
Here are a few different ways you can do that:
Optimize for Web and Mobile
Users are going to be accessing your site from different devices. The ad experience will be different on web and mobile.
Ideally, you’ll want to optimize the ad experience for visitors based on the device they’re using.
Optimize Ad Display
The way that ads are displayed on your site can affect profitability. This includes their size, their location on the page, the type of ad, and whether other ads are present.
Did you know that ads can actually dilute the effectiveness of other ads? If there are too many ads on a single page, each one may be less effective. Don’t assume that just adding more ads will lead to higher revenue.
Serve Users a Unique and Custom Ad Experience
Advertisers treat every visitor differently, serving them different ads depending on their preferences.
Yet most publishers treat every user the same.
Customizing your ad experience depending on the user could lead you to get better results. You can do this with the help of automated website monetization software (more on that below).
Importance of A/B Testing Your Ads for a Seamless User Experience
When optimizing your ad experience, A/B testing has its benefits, but it may actually decrease ad rates.
What is A/B Testing?
A/B testing is exactly what it sounds like: running a test where you compare two versions of something side by side (Version A against Version B), to see which one gets better results.
A/B testing will give you some hard evidence about which types of ads you should use. However, it’s not going to appease everyone. The limitations with A/B testing means that you’ll never be able to satisfy the B-side visitors
How Do I Run an A/B Test?
To run an A/B test, you should compare one variable that you can control as a publisher (for example, ad type or content position) with one that you can’t control (such as traffic source).
This will allow you to see which ad content performs better across traffic sources, devices, times of day, etc.
Which Ad Elements Should I Test?
As I mentioned above, there are a lot of variables you can test for when running your A/B tests. Some of these you can control, while others you can’t.
Ad Placement
One important variable to test for is ad placement. This has to do with where your ad is located on the page… is it at the top, at the bottom, in the sidebar, or within the content? Ad placement affects your ad’s visibility to users.
Image Size
Another variable is image size. Obviously, larger ads will be more visible on the page. However, this doesn’t necessarily mean they will perform better. Remember, it’s all about the user experience.
Traffic Source
Which source of traffic is generating the most ad clicks? Optimizing for the source can help you monetize your traffic better, by understanding which traffic is most valuable to you. Maybe it would be worth it to invest more in certain paid traffic sources, or maybe you need to go all-in on your SEO.
Ad Color
This one is pretty self-explanatory… what color are your ads? Should you be aiming to make them blend in, or stand out?
Color psychology can have an impact on conversion rate, so this is actually a more important factor than you might think.
Density
How densely packed are your ads on the page? We already discussed how ads can dilute each other, so ad density can be a key factor to look into.
Location Targeting
Are you making use of location targeting to show users ads that are relevant for their local region?
Ad Network
A final variable you can optimize for is ad network. Different ad networks may be paying you less or more for certain ads.
Tools for Testing Ads
There are a lot of different tools you can use for testing ads. I’ll quickly run through some of the most popular ones, and then I’ll let you know about my secret weapon that I use for monetizing traffic.
Google Optimize
If you want a simple tool for running A/B tests, you can use Google Optimize.
The upside is that Google Optimize is free. The downside is that you’ll have to do everything manually, which takes forever.
Basically, you can go into Google Optimize and connect it with your Google Analytics account. You’ll then need to enter the information for each experiment you want to run.
Optimizely
There are also some paid ad optimization platforms you can use. Optimizely is one example, which is fairly popular in the industry.
However, I’m not a big fan of Optimizely, because I don’t find it super intuitive or easy to use. The free plugin Ad Inserter is an alternative to Optimizely that many marketers like using.
Ezoic
Finally, I want to tell you about my secret weapon: a tool called Ezoic. Ezoic uses multivariate testing to allow the machines to personalize the ad placements/density automatically.
Ezoic is awesome, because it actually allows you to customize your ad experience to what your user wants. This can help you more effectively monetize traffic.
You can use Ezoic to run automated ad tests.
The software uses AI and machine learning to help you optimize your ads, so it makes decisions based on billions of pieces of data. These decisions are more effective than what you could do on your own.
Automating your testing saves tons of time: you can test thousands of variables in minutes. If you tried to do it manually, it could take months.
Ezoic has helped some websites get a 93% increase in total monthly revenue, and an 87% increase in average revenue per session. To me, those are pretty amazing results.
But not only is Ezoic great for revenue, it also helps you optimize your user experience for every single visitor. If your display ads are taking away from user experience, Ezoic will take the ad off the page.
Because of the improved user experience that Ezoic offers, users are likely to spend more time on your site. Companies have actually seen great results with this already.
Simplypsychology.org saw an 84% increased time-on-site after starting with the Ezoic platform.

And Askdavetaylor.com had a 49% increase in pageviews.

You don’t have to just use Ezoic with Adsense. You can use it with any existing ad platforms and get access to thousands of demand partners, helping you make more money faster.
Conclusion
If you’re a publisher, running display ads on your website is a great way to monetize traffic.
But there are tons of different types of ads, and lots of different variables to think about when running them. If you actually want to make money from display ads, you’ll want to make sure they’re optimized for the best possible performance.
Make sure you’re running the right tests, so you can get the most out of your ads.
What did you think about my tips for monetizing your traffic? Have you tried any of the tools I mentioned? Let us know in the comments.
The post How to Monetize Your Website Without Destroying Your User Experience appeared first on Neil Patel.
The Best Website Builders (In-Depth Review)
Disclosure: This content is reader-supported, which means if you click on some of our links that we may earn a commission.
Finding the right website builder is like choosing a life partner or career, only more important.
Whether you are setting up a small non-profit or are itching to take over the world with your handmade jewelry, the quality of your site will be a key factor in your success.
With a good website builder, someone with no technical experience can spin up an amazing site in no time.
Knowing what’s good is the first step, but the top options on the market have different strong points. The next step is figuring out which of the best website builders is the right fit for your needs.
I’ve been building websites for years. Let me walk you through the different types of website builders and how to choose between them.
After that, you can use my in-depth reviews of the top four options to make an informed decision.
The Top 4 Best Website Builders
- Wix — Best for general use
- Weebly — Best for beginners
- Shopify — Best for ecommerce
- WordPress — Best for content management
The Different Types of Website Builders
Why are you starting a website?
There are a multitude of reasons to want to start a website and they will affect the services and features you will need.
For instance, is your goal to set up shop as an eCommerce entrepreneur, dropshipping items from abroad?
Do you want to start a simple blog documenting your travel adventures?
Think deeply about what you want now, but also your roadmap for the future. Once you commit to a particular website builder, it can be difficult to change later on.
After getting a clear idea of your needs, you will then need to consider the different types of web builders available.
Keep in mind that many website builders fit multiple categories, serving each need to a different extent.
General-purpose website builders
There are thousands of reasons to create a website, and nowadays, it seems like every person and organization has one.
To service such great demand, some website builders have taken a holistic approach in terms of appeal and their tools.
For example, these sites typically have a lot of features that other types of website builders have, such as the ability to blog.
However, as they are multi-purpose in nature, you cannot expect these features to not be as in-depth and robust as more specialist platforms.
Some use cases for general website builders include:
- Information websites – If your goal is to simply host information online, these general website builders can be quite useful. For instance, you may have a kitchen renovation company and want to start reaching potential customers online.
- Personal branding – Managing your personal brand is becoming more important every day. It is particularly important for independent workers and entrepreneurs as well as for employees applying for jobs.
Here’s a good example of how an organization can use their website to push their brand identity.
General-purpose website builders are great for creating and maintaining an online presence. Keep all your readers, followers, and customers up-to-date.
Content management platforms
Content is what drives the web, and one of the oldest yet still most relevant forms of content is the blog post.
Considering blogging is such a crucial part of the web, some website builders have been designed with a content management system in mind.
In the case that you want to get your thoughts out there; ideally, in a serious and sustained way, a blog website builder may be the right option for you. Use cases include:
- Professional writing – This goes without saying, but if you want to be a writer, you actually have to write. Typically, you need a place where you can showcase your talent. Whether you are a business writer or journalist, maintaining a personal blog is important.
- Thought leadership – In many industries, it is useful for people of prominence to share their unique insights on a public platform. Setting up a blog with a strong content management system helps to get ideas out in a sustained way.
Here’s a not-entirely-random example of a content-centric website.
Essentially, blog website builders are a good choice if you plan on writing long term and it is one of the things you focus on.
eCommerce platforms
Another type of website builder are eCommerce platforms. These platforms allow you to build and manage online stores through the ability to list goods, fulfill orders, and take payments.
These website builders are useful for:
- Side hustles – Perhaps you are interested in selling some goods in addition to your day job and don’t have the time to dedicate to the operational side of things. These website builders are great to solve this problem, as they handle the backend of your business.
- Digitizing your store – Maybe you already have a brick and mortar store and are looking to make your stock available online. In this situation, this type of website builder will take all the technical complications out of setting up online.
An example of an eCommerce website.
How to Choose The Best Website Builder For You
Now it is time to take a closer look at some of the specific features to consider when evaluating a website builder.
Remember that although some website builders may fall into the same category, each may suit your needs differently.
For instance, you may be setting up an online shop and your primary consideration may be a low learning curve, whereas somebody else may be thinking about a platform that can allow them to scale easily.
Here are some features you should consider.
Ease of use
Things to consider:
- Intuitiveness – Some website builders are easy to use and have simple interfaces with drag and drop functionality. This is useful as you won’t have to Google changes you want to make with the tool.
- Learning curve – If you are not great with technology, it is unlikely you will want to spend hours learning how to set up a website. Some website builders are much easier than others.
- Setup time – Similarly, you may want to get your site up and running immediately, particularly if it is an event you want to promote.
- Ongoing management – Needing external help to manage your site defeats the purpose of a website builder. It must be easy to manage in terms of updates.
If you are new to setting up online or are time-constrained, how easy it is to get started will likely be your primary concern.
Scalability
Things to consider:
- Custom code – Website builders use standardized code, which are the building blocks of a website. These allow you to easily create a site with various features. In some cases, however, you may need your own custom features and the ability to write your own code.
- Migration – At some point, you may want to host your website yourself. However, not all website builders allow you to easily make this move. In some cases, you may have to redevelop your site from scratch.
- Integrations – You will probably create new goals as your website grows, such as running ads or embedding social feeds. Some website builders are more compatible with other platforms and are easier to integrate.
You should think strongly about scalability if you are already an established business looking to create an online presence. This is particularly true if you are already selling products at scale in the real world.
Startups in the fundraising process and are looking to scale fast or even change core features of their product should also take caution here.
Support
Things to consider:
- Support channels – You will need to consider the different ways you can get in touch with support teams such as live chat, email, and phone. In-depth FAQ’s (frequently asked questions) are also important.
- Responsiveness – If your site breaks at 5 PM eastern time, but their support only works European hours, then you are in trouble. Some teams may also respond much quicker than others.
- Engagement – Unfortunately, some support teams are useless. Maybe they are being paid very little so they do not care, or they are overworked. Either way, you need support that can actually solve your problems.
If you plan on running a site with a lot of visitors and it happens to go down, the last thing you want is an unresponsive support team. This is especially true if you plan on driving a lot of traffic at a given time.
A website builder with a strong support team is also useful if you are just getting started online, considering you may still get stuck, even with simple interfaces.
Price
Things to consider:
- Cost – Some website builders can be more costly, with some reaching upwards of $299 a month (for landing pages, for instance). Others are permanently free with the option to upgrade for a small monthly fee.
- Trial – Before you commit, it can be useful to take advantage of a trial offer to play around with the tools. You will likely find that some are a better fit than others.
- Hosting & domain – Most website builders will host your website on the web, which is typically included in the price. Some may also offer a domain as part of the package. Otherwise, you would have to purchase these yourself.
If you plan on making money from your website, either by selling products directly or to capture leads, then price should not be a key consideration for you. Make an investment in the best service for your needs.
However, if you just want to set up a small information site, then you could do with the cheapest options.
Generally, website builders that have feature depth are typically more expensive as they solve more specific problems.
Features
Things to consider:
- eCommerce shop – If you plan to sell things online, you need a website builder that allows you to do so. Consider sub-features such as payment processing and product catalogs.
- SEO – Some website builders have tools that allow you to rank better in Google searches.
- Marketing tools – You may also need other marketing tools, such as forms, pop-ups, and chat boxes.
- Community – In some cases, you may want to expand your website into a community where people can communicate and network (otherwise known as a forum).
- Analytic tools – Website builders may also offer analytic tools that help track traffic on your website or at least integrate with other tools that do.
- Niche features – Perhaps there are some special features you are looking for such as the ability to set up a crowdfunding campaign in addition to having a standard website.
The features of a website builder are the main thing to consider when deciding which route to follow. This is because they will have the most impact on your specific goals.
For instance, if you want to set up a landing page for a specific product, trying to optimize with a generic site builder will be a pain. It will probably lack the in-depth analytic tools that a dedicated landing page builder would have.
Also keep in mind that there are some features that you may not need now, but you could need in the future, such as if you plan on running paid ads to your blog posts.
Design
Things to consider:
- Themes and templates – Website builders allow you to start with a predesigned website that is customizable to various extents. Some themes serve different purposes in terms of branding and utility.
- Mobile-friendliness – You will need to ensure that your website builder automatically makes your website easy for mobile users, typically with responsive design.
- Customization – It is likely you will want to make some changes to your template. You will need to consider the various customization tools available.
Regardless of your goal, you should always be concerned with providing a great user experience to the people who are visiting your site. It simply makes logical sense – if your site is hard to navigate, people won’t get the most out of it.
The actual design and branding are important too. For instance, some designs are more corporate while others are more welcoming. There may be a design template that really suits your particular brand.
And if you are selling something, you need to ensure that the design is optimized to increase conversions.
Now that you have a good understanding of the types of website builders and the features to look out for, it is time to take a look at some of the best website builders on the market.
#1 – Wix — Best for general use
If there is one website builder that you have likely heard of, it is probably Wix. The effort that Wix puts into their marketing is phenomenal. Wix is so successful, in fact, that they have featured high profile celebrities like Jason Stratham in some of their campaigns.
Not only that, but Wix has results to show for it too, with over 160 million websites hosted by the company.
Wix is the best website builder if you don’t have a specific need in mind. Even in the opposite case, this is true, such as if you have broad needs and are aiming for different functionality.
Wix is truly the “jack of all trades” in the sense that it does everything well, but nothing is truly exceptional. However, it serves its purpose for the average person looking to set up a website.
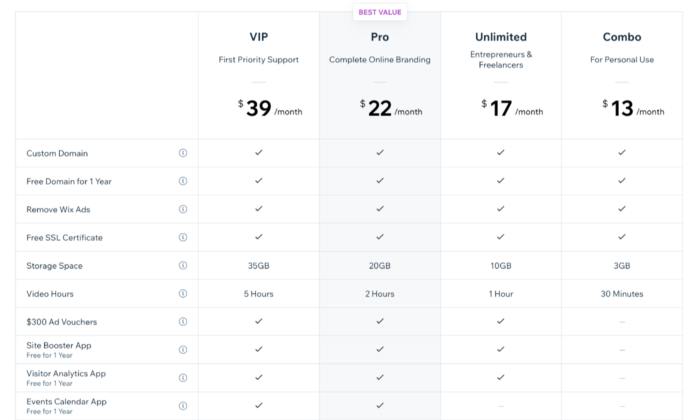
Pros of Wix
Here are the best things about Wix:
- Powerful app market – Wix has an enormous amount of add on features that you can access through their app market. Want to book meetings directly on your site? They have got you covered. Want a live chat pop up box? Simply click and install it on your site.
- Covers every need – Wix covers most of the needs of people looking to set up a website. This includes setting up an eCommerce store, blog, or even just a simple information website.
- Lots of templates – Wix has a wide variety of templates that you can choose from to get your website up and running quickly. Their templates are well designed and take the user experience into consideration.

Cons of Wix
Here are the weaker parts about Wix:
- The user interface can be difficult – Although Wix is aimed at the mass market, the user interface can be quite tricky especially if you want to customize your site. You will often find yourself having to Google how to complete certain tasks. .
- No migration – A huge downside with Wix is that you’re locked in, so you cannot take the code of your website somewhere else later on. This can cause problems if you quickly need to scale your business.
- Jack of all trades, master of none – Wix’s main strength is also its weakness. Although it has many features, it cannot compete with the quality of niche website builders.
Who should use Wix?
- Small businesses – If you are offering a service such as legal advice or marketing, Wix is a solid website builder that will handle all of your needs. If your focus is selling products online, avoid Wix.
- Freelancers and professionals – In a similar manner, Wix is great for professionals who want to showcase their personal brand. It will allow you to cover all the potential bases of highlighting your portfolio, such as taking meetings and even blogging.
#2 – Weebly — Best for beginners
Next, we have Weebly, which is a drag and drop website builder that prides itself on its ease of use. Weebly currently powers over 50 million websites and has been around since 2006, which is a huge achievement and testament to how effective the platform is.
So, what has caused Weebly to be consistently favored among users? It comes down to the simple user experience and short learning curve. Weebly does not bombard you with features or a complicated interface.
Instead, it does not scare you away and allows you to get straight to the point of setting up your website.
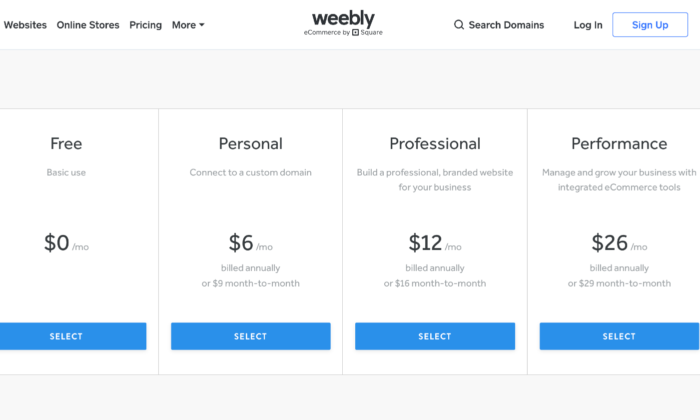
Pros of Weebly
Here are the best things about Weebly:
- Simple and easy to use – Weebly has a simple interface with drag and drop mechanics that just work. Everything feels natural and intuitive. It also helps that they have an onboarding mechanic with email and popup explanations when you get started.
- Migration – If you decide you want to host your own website, Weebly makes it easy for you to take your site off their platform.
- Affordable – Compared to other generalist website builders, Weebly has one of the most affordable pricing structures.
- Great customer support – Weebly has a powerful customer support team who are active every day of the week. They typically reply within 1 day by email or even quicker via their live chat or phone lines.
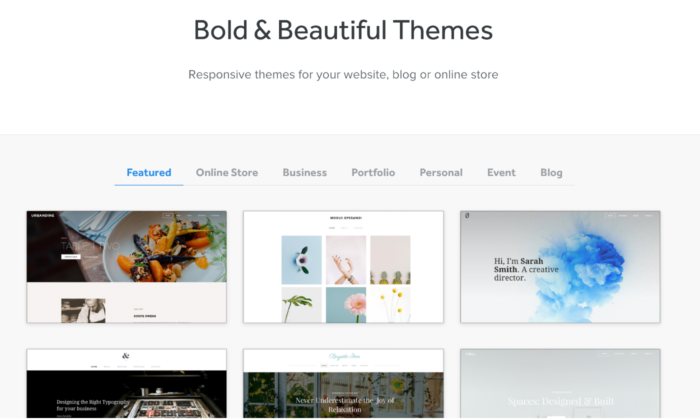
Cons
Here are the weaker parts about Weebly
- Lacks diversity of function – The tradeoff of using Weebly is that it is not as powerful as Wix. For example, there are fewer features. In addition, some features such as their content management system and analytic tools are much weaker than competitors.
- Limited customization – As Weebly uses a drop and drop interface and themes, the customization can be quite limited. Wix also has this problem, but they have more tools at their disposal to solve this issue.
- Scaling problems – Weebly is simply not a great platform if you have plans to grow your website in a significant way: it is just a simple website builder for day to day users.
Who should use Weebly?
- People who need simple websites – As a rule, you should use Weebly if you are not very tech-savvy and want to set up a simple website quickly. One category of users would be associations or clubs who want to set up an information site about their group.
#3 – Shopify — Best for ecommerce
If you plan on selling any type of product online – from jewelry to electric scooters – then your best bet will be to use a dedicated ecommerce platform and website builder.
Without a doubt, the number one in this category is Shopify. The platform powers over 1 million merchants in 175 different countries, and is the third-largest online retailer in the US, trailing behind only Amazon and eBay.
The Shopify software represents a complete end to end platform that allows you to set up, manage, and promote a store online. You can easily list your goods for sale, take payments, and fulfill orders – all under one roof.
Pros
Here are the best things about Shopify:
- eCommerce specialty – The main draw of Shopify is that it is a niche website builder focused on setting up an ecommerce store. This means that all their features and processes are geared toward that end, resulting in a powerful platform that can help maximize sales.
- Security – If you are going to be handling transactions, you need ways to keep your site safe and customer data secure. Shopify stores have strong cybersecurity measures in place which a self-hosted website would typically lack.
- Integrated sales channels – Shopify has strong integrations with other platforms, such as Facebook and Amazon. This allows you to streamline your sales by managing your catalog on each platform under one roof.
Cons
Here are the weaker aspects of Shopify:
- Niche focus on ecommerce – Because the focus is on eCommerce, Shopify lacks some of the features and finesse of other website builders. For instance, their content management system is very limited compared to WordPress.
- Transaction fees + monthly fees – With each sale you make on Shopify, there is a transaction fee that ranges from 2.4% – 2.6%. Combined with payment provider fees, this can eat into your margin.
Who should use Shopify?
- Brick and mortar stores – If you have an in-person store and are looking to sell your products online, Shopify will offer you a solid footing into the digital world.
- ecommerce startups – Entrepreneurs that are starting new brands or drop shipping will also benefit from the quick end to end set up that Shopify offers.
#4 – WordPress — Best for content management
One of the oldest and most reliable website builders is WordPress. The platform has come a long way since it launched in 2003 and is the most popular content management system on the web today.
In fact, WordPress powers a whopping 37.6% of all websites.
As WordPress was around during the earlier days of the web, its focus revolved around content, which was the most prominent form of website at the time.
It maintains that focus to this day, with WordPress having arguably the best content management system out of all the different website builders.
An important caveat is that WordPress is divided into platforms:
- WordPress.org – This is the open-source (free version) of WordPress that comes with greater flexibility, but is harder for non-technical users.
- WordPress.com – This is the paid version. You can get help with the installation of themes and management but is generally less customizable.
Pros
Here are the best things about WordPress:
- You have full control – Unlike other website builders, WordPress is fully customizable as the site is developed directly with code, as opposed to drag and drop interfaces. This means that you have much more flexibility in terms of design and function.
- Robust blogging and CMS – WordPress is built front the ground up with content in mind. It has some of the best tools for publishing and managing content including team management, advanced scheduling, and categorizations.
- Lots of plugins – There are over 52,000 plugins available for WordPress. You can measure and boost your SEO with plugins such as YoastSEO, or you could even add a new function such as a shopping cart.
Cons
Here are the weaker aspects of WordPress:
- You may need help – As your WordPress site is developed with code, you will likely need help to install and update your WordPress theme. This can come with a hefty cost, particularly if you want ongoing changes.
- Learning curve – If you want to manage and update your site yourself, it can take some time to learn how to do so. Managing and scheduling posts are relatively easy, but updating how your site looks or installing a plugin is much more difficult.
- Security issues – As your WordPress site is self-hosted, you are more vulnerable to cybersecurity issues. Some of the plugins for WordPress also can act as a risk as well.
Who should use it
- Bloggers – If writing is your main focus, then WordPress is a great choice. The platform is designed for bloggers, optimizing content management, and SEO. WordPress will allow you to scale and get the most out of your content.
- Content centric businesses – Likewise, if you are building a business that is content-heavy, such as a new website, WordPress will help you to manage the operational side of content production much easier.
Think about your goals
An important thing to keep in mind is that the website builders listed above can serve multiple functions, so this article has provided an overview for you, you will need to look into the details of each platform.
The best choice for you will come down to both your needs at the moment and where you plan on taking your website in the future.
After reading reviews like this one, make sure you take a step back and put your particular needs at the forefront of the decision before you commit.
The post The Best Website Builders (In-Depth Review) appeared first on Neil Patel.
The Best VoIP Phone Services (In-Depth Review)

Disclosure: This content is reader-supported, which means if you click on some of our links that we may earn a commission.
Do you want to skip the read and get right to my top pick? The best VOIP phone services for most people are Nextiva, Ringcentral, or Ooma.
The best VoIP phone services create exceptional customer experiences. And exceptional customer experiences work wonders for your bottom line.
Imagine this: a potential customer calls the sales number listed on your website. Six states away, a personal cell phone rings. Your sales person picks it up, answers a few questions, and closes the sale.
Within a matter of seconds, that potential customer turns into a paying customer rather than being transferred from employee to employee, wasting their time and testing their patience.
With the right VoIP service, you can streamline and automate the customer journey, resulting in more money for less work. Furthermore, these services are easy to set up, easy to use, and most of the leg work happens behind the scenes.
But choosing the right service feels like a daunting task. With countless options out there, how do you decide which one’s right for you?
If you’re not sure how to answer that question, you’re in the right place. In this article, I cover how to choose the right service for your needs, the different types of VoIP services, and my top recommendations.
Let’s dive in!
The top 6 options for VoIP phone service:
- Nextiva – best for remote teams
- RingCentral – best for fast-growth
- Ooma – best for small businesses
- Grasshopper – best for mobile teams
- Verizon – best for large businesses
- 8×8 – most affordable VoIP service
How to choose the best VoIP phone services for you
With so many VoIP service providers to choose from, finding the perfect solution for your business isn’t always easy.
To make things easier, I want to share the criteria I considered when making this list and some must-haves regardless of the company you choose.
Use these to help narrow things down as you go through the process.
Deployment options
Some VoIP phone services work with the hardware you already have, while others require proper installation. In some cases, you may need to buy an adapter or something else to enable the system.
But others are as simple as a mobile app you download on your phone.
So, carefully consider the amount of time and the level of support you have when making a decision. The simpler the system, the easier it is, and the less support you need to get things up and running.
The size of your business
Most VoIP phone service providers charge per user per month.
And while some offer discounts if you have a large team, those prices can quickly add up and get expensive.
So it’s essential to understand how many users you have and how to get the best deal with the features you need at a reasonable price point.
Phone call capabilities
It’s important to consider the phone call capabilities you need because each provider offers different capabilities at different price points.
Do you need automatic call rejection, call forwarding, or caller ID? What about voicemail, voicemail transcription, and hold music?
You may also want to consider other capabilities like:
- Call forwarding and routing
- Automatic attendants
- Phone number types
- Extensions
- Blocking and auto rejections
- Voicemail to text
- Call recording
- Call history
- Instant responding
- Custom greetings
Make a list of everything you need so you can choose the right provider and the right plan.
Other forms of communication
Most VoIP providers also offer other forms of communication like SMS messaging, document sharing, online faxing, and video conferencing.
However, they may not all be available on basic plans.
With that said, you may not need all of them, either. So, carefully consider the additional forms of communication you need your team to have.
Reliability
Your internet, VoIP provider’s uptime, and power source affect the quality of your phone calls.
With reliable, high-speed internet, you probably won’t have any issues. But what happens if the power goes out?
If you use your mobile device, you’re probably fine.
But desk phones aren’t. However, some come with battery backups that may last up to a few hours. So, make sure this is an option if you rent or buy hardware from your VoIP service provider.
Furthermore, some VoIP providers offer network monitoring that lets them switch to wireless backups if wired data links fail. And you should also expect nothing less than 99.99% uptime, as well.
The different types of VoIP phone service
Device-based
For this type of service, you need to buy an adapter from the service provider and connect it to an existing phone (or a phone they provide).
Software-based
These services are desktop programs. Skype and Google Talk are two good examples. You have to install the program and connect to the internet to use them.
However, most providers offer cloud-hosted and software-based systems.
Cloud-hosted
Cloud-hosted VoIP, or “virtual private-branch-exchange” (PBX), services are available as well. The only hardware you need is a networking router or switch and the provider handles the rest
This includes mobile VoIP services, too. These mobile apps run on Android and Apple devices through cellular internet or a local Wi-Fi network.
All of the options on this list are a combination of cloud-hosted and software-based, with most offering both types of systems.
#1 – Nextiva Review — The best VoIP phone service for remote teams
Remote teams face unique challenges. And they need a VoIP provider equipped with the tools and features required to conquer those challenges.
Nextiva is “made for business owners, not IT wizards” and built with remote teams of all sizes in mind. They offer solutions for small businesses, midsize businesses, and large enterprise companies alike.
Plus, their in-house customer service team is ready to help every step of the way.
Nextiva includes a wide variety of VoIP features, including:
- Android and iOS applications
- Unlimited text messaging
- Customizable hold music
- Multi-level auto attendant
- Unlimited calls in the US and Canada
- Free local OR toll-free number
- Video and audio meetings
- Internet faxing
Furthermore, you can make and receive business phone calls straight from your desktop, laptop, or mobile device. This service completely replaces an in-office phone system, empowering your remote team to stay connected.
Alternatively, you can use it in conjunction with your current phone system. So, it’s also a great fit for call centers and non-remote teams, as well.
Nextiva offers simple and affordable pricing. Their plans include:
- Essential — $18.95 per user per month
- Professional — $22.95 per user per month
- Enterprise — $32.95 per line per month
- Ultimate — $57.95 per line per month
Nextiva boasts an “ultra-high uptime of 99.999%,” with around-the-clock network monitoring and zero outages in 2019. With relatively reliable service, various essential features, and reasonable prices, their service is among the best.
#2 – RingCentral Review — The best VoIP phone service for fast-growth businesses
RingCentral is an excellent option for fast-growth businesses. They’re the world’s #1 business communications platform with plans and features for business communications as well as customer support.
Plus, RingCentral offers discounts depending on the size of your team. So, as your team grows (regardless of how fast), your phone service affordably scales to match your needs.

They promise 99.99% uptime, and they maintain countless global data centers. This means you get excellent coverage and phone quality wherever you are on the globe.
Furthermore, installation and setup are a breeze, thanks to RingCentral’s step-by-step installation and intuitive admin panel.
You can set up new users from the admin panel, monitor service quality, and view your analytics all in one centralized place. Plus, you can even access it on the go.
Their services include features like:
- Unlimited calls in the US and Canada
- Voicemail to text
- Team messaging
- Document sharing
- Unlimited text messaging
- Unlimited faxing and conferencing
- Call recording
- Developer platform
- Custom integrations
RingCentral’s most affordable plan starts at $19.99 per user per month, making them a top contender for affordability.
Their paid plans include:
- Essentials — $19.99 per user per month
- Standard — $24.99 per user per month
- Premium — $34.99 per user per month
- Ultimate — $49.99 per user per month
While their basic plans are suitable for smaller teams, their Premium and Ultimate plans allow teams to create custom-fit solutions, regardless of how fast they grow.
#3 – Ooma Review — The best VoIP phone service for small businesses
If you’re a small business looking for a reliable, no-contract VoIP phone service, Ooma is a great choice. They provide everything you need (i.e. hardware, software, and know-how) so you can start using their services in as little as 15 minutes.
Everything is ready to go straight out of the box. And you can keep your existing phone number or swap it out for a new one — for free.

Ooma offers 35 powerful features, including:
- A mobile app
- Virtual receptionist
- SMS messaging
- Call blocking
- Voicemail and caller ID
- Unlimited calls in North America
- One complimentary toll-free number
- One direct-dial number per user
Furthermore, Ooma has an excellent customer service team ready to help you get up and running, navigate snags, and create a seamless experience for your customers.
However, the service is missing more advanced features. But it’s incredibly affordable and accessible for small businesses with a tight budget.
Plus, you don’t have to worry about complicated contracts. Ooma’s pricing is simple and straightforward with two business plans, including:
- Ooma Office — $19.95 per user per month
- Ooma Office Pro — $24.95 per user per month
Ooma Office is suitable for most users. But you can upgrade to the Pro plan if you need a desktop application, call recording, or higher usage limits.
#4 – Grasshopper Review — The best VoIP phone service for mobile teams
If your team works in the field, works from home, or works from anywhere in the world, Grasshopper is a smart choice.
It’s a mobile (or desktop) app that adds a business line and an integrated phone system to your employee’s phones. So, they don’t need to carry around two phones or be present in the office to message customers and accept business calls.

Plus, you can access and manage your entire phone system with mobile and desktop apps anywhere with an internet connection.
The best part is that Grasshopper integrates seamlessly with the phones you already have.
There’s no need to buy any fancy equipment or go through the hassle of messy and time-consuming installations. It’s as easy as picking a number and a plan, downloading the app, and configuring your settings.
Plus, with Grasshopper, you get access to intuitive, yet powerful, features like:
- Business text messaging
- Call forwarding
- Voicemail transcription
- Phone extensions
- Online faxing
- Custom greetings
- Instant responses
- Ruby Receptionist
And while Grasshopper doesn’t automatically enable VoIP calling, you can quickly turn it on for free using the mobile app if you have poor cell service or prefer internet calling instead.
Their paid plans include:
- Solo — $26/month for one number and three extensions
- Partner — $44/month for three numbers and six extensions
- Small Business — $80/month for five numbers and unlimited extensions
Extensions can forward to any number you want. So, you can operate with three employees using Grasshopper’s solo plan.
This is a breath of fresh air instead of per-user pricing with the other services on this list.
#5 – Verizon Review — The best VoIP phone service for large businesses
Known for the stability of its network, Verizon provides VoIP business features for medium and large-scale businesses. However, it’s overkill for most small companies and very expensive compared to other options on this list.
Furthermore, it’s most suitable for businesses that need to be available for customer calls, route calls to the right teams/people, or respond quickly to customer requests.

Verizon’s VoIP phone service includes 45 features, including:
- Customized hold announcements/music
- A virtual receptionist
- Complete call history
- Administration web portal
- Make and receive calls on your phone
- Visual voicemail features
- Call transfers
- Do not disturb mode
- Inbound caller ID
- Selective call rejection
- Instant messaging
You can purchase or rent desk phones through Verizon or purchase a converter to continue using your current equipment.
Furthermore, you get free access to mobile and desktop apps to access or manage your phone system from anywhere in the world. However, Verizon’s services aren’t available everywhere, so you may not be able to use their services.
Verizon business phone plans start at $35 per user per month plus any additional fees, taxes, or equipment charges. However, their pricing is confusing when you start reading the fine print. And you have to commit to a two-year contract, as well.
So, keep that in mind as you’re making your final decisions.
#6 – 8×8 Review — The most affordable VoIP phone service
If you’re looking for a basic, affordable VoIP phone service, 8×8 is a smart choice.
Their 8×8 Express Business Phone System plan starts at $12 per user per month (with a free trial). This low pricing makes it the most affordable option on this list.
However, with that low price point comes limited features. The Express plan includes:
- Unlimited calling in the US and Canada
- Global and direct toll-free numbers
- Basic auto attendant
- Ring groups
- Call routing
- Business SMS
It’s a no frills plan, but the flipside is your teams can get started in minutes. Even the least tech-friendly person will be an 8×8 master within a week.
If you end up needing more advanced features and functionality, 8×8 offers two premium plans above Express. Here are all three for comparison:
- Express — $12/month per user
- X2 — $24/month per user
- X4 — $44/month per user
The premium plans let you make unlimited calls to more countries and come with additional features for managers and administrators.
The advantages of going with 8×8 are less clear at the premium levels than they are with the Express plan.
For those who don’t need anything fancy, 8×8 Express is going to perform really well at an unbeatable price.
Summary
My top recommendations are Nextiva, Ringcentral, and Ooma. They are affordable, reliable, and easy to set up.
However, if you’re looking for a large-scale solution, Verizon is your best bet.
Grasshopper is a simple, yet powerful, mobile app for small teams who are frequently out of the office.
If you’re on a tight budget, 8×8 is the cheapest VoIP phone service, starting at $12 per user per month. However, it’s features are limited.
Regardless of the route you go, don’t forget to consider your requirements, budget, and the criteria we talked about as you go through the process of choosing the best VoIP phone service for your business.
Have you used a VoIP service provider in the past? What was your experience like?
The post The Best VoIP Phone Services (In-Depth Review) appeared first on Neil Patel.
8 Advanced Amazon Ad Tips to Improve Your Sales
Amazon is the king of e-commerce.
It’s the largest online retailer in the world selling over 12 million items and is one of the most trusted e-commerce sites.
With 197 million people logging on to shop every single month, how can you direct some of that traffic to your Amazon store?
Amazon Ads.
A solid advertising strategy can help you increase sales as competition on the platform heats up, even if you don’t have a massive budget.
While most shops start with the basics, using advanced tactics will get you better results, faster.
We’re going to dive into the eight advanced Amazon ad tactics you can add to your repertoire to boost your ad spend ROI, brand awareness, and ultimately bring in more sales on autopilot.
1. Use Long-Tail Advanced Amazon Keywords to Find Users With Strong Purchase Intent
Keyword research is the secret sauce of any advanced Amazon ad strategy.
It’s going to get your products in front of right users who are ready to make a purchase, but you can’t go after any word or phrase. You need to make sure it’s a long-tail keyword.
Why?
Because buyers who search for something specific like “wooden chopping board with compartments” are far more likely to make a purchase than someone using a vague phrase like “chopping board.”
Another reason to niche down with your keyword research strategy is the lack of the competition. Generic phrases like “candle” are far more expensive and saturated.
As a new seller on the platform, you’ll have a hard time ranking for the term and getting buyers to click through.
By going after phrases with low competition and a high purchase intent, you can boost your brand awareness and sales and improve your Amazon SERP.
2. Use Sponsored Brands to Increase Brand Awareness
Are you not prioritizing brand awareness? You can bet your rivals on Amazon are.
In a study by Search Engine Land, ad spend allocated for building brand awareness jumped from 26% to 60% in less than 12 months.
So what’s the best way to increase your visibility and start building your top of the funnel advertising strategy?
Sponsored Brands.
The ads appear at the top of search results, and it’s one of the most useful tools for building your brand on Amazon.
Use Sponsored Brands to create brand recognition by using a custom headline, adding your logo, and sending traffic to your storefront and products listing page.
By investing in awareness, you’re helping buyers become aware of your products.
You’re showing users you have a solution to a problem in their lives. This strategy helps customers learn more about you and increase sales over time.
3. Analyze Your Product Level Profitability to Boost Your Profit Margin
Before you start experimenting with an advanced Amazon ads strategy, you need to identify which products would benefit the most from a PPC (pay-per-click advertising) boost by looking at product level profitability.
What does that mean?
Product profitability is the revenue you make from a product and the amount it costs you to make a sale.
For example, your enamel travel mugs might cost $5 to make, but it costs you $15 of ad spend to get a customer.
To find your product level profitability, analyze each product in your storefront, determine which ones have the highest profit margins, and focus your advertising spend on those items.
Once you have your list, run ad campaigns for those products.
Implementing this advanced Amazon tip will help you stop wasting dollars on low-profit or low-selling items and make more money.
4. Use the Advanced Amazon Ad Placement Report to Tweak Your Campaigns
Every successful seller on Amazon knows you can’t take a hands-off approach on the platform.
What’s successful this week won’t deliver the same results in a month from now.
You need to continually monitor, analyze, and adjust your ads to avoid losing visibility and giving your competitors an unintended advantage.
And Amazon’s placement reporting has evolved over the last couple of years.
Back in 2018, only three options were available to sellers: Other on Amazon, Remarketing off-Amazon, and Top Search on Amazon.
Today, it’s expanded to five options, which allow you to dig deep into your data and give you greater control over your campaign performance.
What is the Amazon Ad Placement Report?
The Ad Placement Report is one of the most powerful reports available to you and is a must for anyone looking for advanced Amazon selling tips.
It tells you exactly which ad placements help shoppers find your products and which campaigns need some tweaking.
For example, you might find that an ad placement in the middle of the page consumed less of your budget and had many impressions than a top-of-page one.
The report also helps you identify which keywords are performing the best. You can quickly see which search terms are giving you a greater ROI and which ones are giving you lackluster results.
5. Use Other Marketing Channels to Drive Traffic to Your Amazon Store
Don’t put all your advertising eggs in one basket.
While PPC campaigns on Amazon are a great way to build brand awareness and drive sales, you need to incorporate your other marketing channels to find buyers.
Plus, Amazon comes with built-in credibility and superior customer support. As a new brand, you can use this to your advantage by redirecting traffic to your store instead of to your website.
Using Facebook, Pinterest, Instagram, and Google Ads to feed traffic to your Amazon Product Listings strategically can generate a high ROI for your store.
Here’s what you can expect:
- Traffic from Day One
- Tapping into an extensive network where your ideal customer hangs out
- Using the shopping mentality on sites like Instagram and Pinterest to find users ready to buy
- Encouraging influencers to redirect traffic to your Amazon store by making an affiliate commission on sales
However, don’t dive into every single platform.
Do your due diligence and identify which marketing channel your target audience uses before you open your wallet.
6. Define Your Target Audience to Reduce Ad Spend and Increase Sales
Paid advertising and identifying your keywords are important for Amazon sellers.
Yet, they’re not the most critical part of your strategy.
There is something far more important you need to master: your target audience.
If you don’t know to whom you are selling, then you won’t know:
- Which keywords to target
- Which products your audience needs
- How to craft compelling ads that get clicks and conversions
Without a clear audience, none of these advanced Amazon tips will work.
Think of your target audience as the foundation of a house.
Without a solid structure, it won’t matter how many keywords you have inside. The minute a strong breeze rolls through, your house will crumble, and your keywords will become useless.
When you understand your demographics like the back of your hand, you know which words they’ll use to describe their problem.
You can figure out their online behavior and identify which social media platforms to target.
For example, if you’re targeting stay-at-home parents, running ads during the day makes more sense. However, if your customer is a full-time employee, they’ll most likely be on Amazon in the evening after work or during their lunch breaks.
When you understand these nuances and put yourself in your target audience’s shoes, it becomes ten times easier to create ad campaigns that convert.
7. Create an Enticing Advanced Amazon Landing Page That Converts
Anyone can build a landing page on Amazon, but how can you be sure it will convert?
Although there is no exact formula you can follow, there are some standard rules of thumb to increase your chances of building buyer trust and sales.
If your landing page is bland (no call-to-action, little-to-no text), you won’t capture people’s attention.
Here are a few things you can do to optimize your Amazon landing page:
- Above the Fold: This is the part of the page that is visible the moment someone clicks through. It’s one of the most important sections as you have a limited time to entice them to stay, scroll down, and learn more about your products.
- Use Scarcity Features: FOMO (the fear of missing out) is a powerful marketing tactic. It gives buyers a time limit to take advantage of a deal and can boost conversions by 33%. Add scarcity to your Amazon landing page by using a countdown timer before an offer expires.
- Always Include a Call-to-Action: Think of your CTA as the goal of your landing page. Without one, potential buyers won’t know what to do or where to click. Make sure you use a clear CTA like “Buy Now” to stop users from bouncing off your page and not converting.
- Optimize With Your Branding: Your page on Amazon is a space to show off your brand’s personality and stand out from all the other sellers. Don’t leave your page looking like everyone else’s. Add your logo to the header, link to your website, and make it easy for users to connect with your brand. It’s an easy way to make your store memorable and build on brand awareness.
- Use Images and Video: People consume different types of content to solve a problem. Some like to read, while others prefer videos. Include a mix of different types of content on your page to appeal to different customers.

- Take Advantage of Social Proof: People are like lemmings. We prefer to buy from brands with a track record. It’s why influencer marketing has exploded in the last ten years. Use product reviews and testimonials on your landing page to show potential buyers you’re not a scam and you’re selling a quality product.
- Keep Your Design and Copy Simple: If your landing page is too busy, people will click off. Attention spans are short, and you need to make sure you’re not overloading the buyer with information. Keep your copy short and to the point. Use short sentences, break the text up with headings, and add bullet points to make your page skimmable.
8. Filter Out Negative Keywords in Your Advanced Amazon Ads
Want to cut down on wasteful ad spend? Filter out negative keywords you don’t want to rank for on the site.
A negative keyword excludes a word or a phrase that isn’t a good match for your product.
Doing so can help you save a lot of money, and not using this tactic is one of the biggest Amazon ad mistakes you can make.
For example, if you’re selling leggings, you might want to rank for keywords like:
- Leggings for women
- Leggings with pockets
- High-waisted leggings for women
But you wouldn’t want to rank for a keyword like “Lululemon leggings.”
The buyer intent is for a brand that isn’t you, and paying to rank for that phrase is going to give you low ROI.
For an advanced Amazon result, look into filtering out keywords receiving large amounts of traffic but few sales.
Not sure what keywords to add to your negative filter?
- Go to the “Customer Search Term Report”
- Select the “spend” filter
- Look for keywords bringing in little-to-no sales
- Add those phrases to your negative filter
Conclusion
By following these advanced Amazon tips, you can start selling more while spending less on ads and become a successful e-commerce business.
You can achieve this without a gigantic ad budget. You don’t need to spend hundreds of dollars to see results and start converting your impressions into paying customers.
What you need is strong keyword research and an ad strategy you’re constantly tweaking.
Remember, Amazon is not a “set it and forget it” platform.
Your winning formula is going to change continuously. You need to stay on top of your analytics to adjust your strategy and pivot before losing traction in search and seeing a drop in sales.
How are your listings performing after implementing these advanced Amazon ad tips?
The post 8 Advanced Amazon Ad Tips to Improve Your Sales appeared first on Neil Patel.
A Deep Dive Into Facebook Ads: How to Create, Optimize, and Test Facebook Ads
As a savvy internet user, you might think no one clicks on Facebook ads.
You’d be wrong.
Facebook is on track to make over $60 billion in revenue this year from advertising.
Someone’s clicking.
How do you get them to click your Facebook ads? More importantly, how do you get them to buy your product or sign up for your email list?
Many marketers who have tried Facebook ads, especially in their early days, decided that Facebook advertising doesn’t work.
Don’t believe them.
If you’re totally new to Facebook, start with this Facebook Marketing Guide. Then come back to this post for a deep dive into advertising.
In this advanced Facebook guide, you’ll learn which businesses are the best fit for Facebook ads and how to run successful campaigns.
We’ll cover the most common mistakes marketers make and the biggest factor in your ad’s success.
You can learn more and create your first ad at Facebook.com/advertising.
How Do Facebook Ads Work?
Facebook ads now come in several varieties. You can promote your Page, posts on your Page, actions users took, or your website itself. Despite Facebook’s increasing focus on native ads and keeping traffic on its site, you can still be successful in sending users to your website.
There are also several ad formats including images, videos, carousel (multiple images), Instant Experiences, and collections.
Facebook ads are targeted to users based on their location, demographic, and profile information.
Many of these options are only available on Facebook. After creating an ad, you set a budget and bid for each click or thousand impressions that your ad will receive.
Users then see your ads in the sidebar on Facebook or in their newsfeed.
This guide will walk you through the best practices for creating CPC ads that drive traffic to your website.
Facebook’s other ad options are great for driving engagement and brand awareness, but ads driving users off-site are still the best option for direct response advertisers looking to make a sale.
Who Should Advertise on Facebook?
Many businesses fail at Facebook advertising because they are not a good fit. You should always test new marketing channels, especially before demand drives up prices, but make sure to consider whether your business model is a good fit for Facebook.
In the past, Facebook ads were more like display ads than search ads — though new versions of ads, like product ads, allow advertisers to sell products directly to users.
Here are a few types of businesses that are likely to succeed with Facebook advertising.
Businesses with Low-Friction Conversions
The businesses that succeed with Facebook ads ask users to sign up, not to buy. You must use a low-friction conversion to be successful.
A visitor to your website wasn’t looking for your product. They clicked your ad on a whim. If you’re relying on them to immediately buy something to make your ad ROI positive, you will fail.
Facebook users are fickle and likely to click back to Facebook if you ask for a big commitment (purchase) upfront. Instead, stick to simple conversions like signing up for your service, filling out a short lead form, or submitting an email address.
Even if you sell products, not services, you should consider focusing on an intermediate conversion like a newsletter signup. Then you can upsell later through email marketing or Facebook retargeting ads.
Daily deal sites like Groupon, AppSumo, and Fab are good examples of businesses that can succeed with Facebook advertising. After you click one of their ads, they just ask for your email address. They’ll sell you on a deal later.
Business Model with Long Sales Cycle or Small Purchases
Even if you only ask for an email address initially, you’ll need to eventually make money from these users if your ads are to be profitable.
The best business model that fits for Facebook ads earn revenue from their users over time, not all at once. A user may have given you their email, but you’ll need to build more trust before they are likely to buy anything.
You shouldn’t depend on one big purchase. Several smaller purchases are ideal.
Daily deal and subscription sites are great examples of business models that can thrive on Facebook. Both have customers whose lifetime value is spread out over six months or more.
At Udemy, they focus on getting users to sign up on their first visit. By aiming to be profitable on ad spend in six months (not one day), they turn Facebook users into long-term customers.
They target a 20% payback on ad spend on day one and 100% payback in six months. These numbers can serve as a rough guide for your business.
How to Target Facebook Ads
The number one mistake most marketers make with Facebook ads is not targeting them correctly.
Facebook’s ad targeting options are unparalleled. You can target by demographics and create custom or lookalike audiences to target users similar to your best customers. You can also use retargeting ads to target users who have interacted with your page, or visited your website.
On Facebook, you can directly target users by:
- Location
- Age
- Gender
- Interests
- Connections
- Relationship Status
- Languages
- Education
- Workplaces
Each option can be useful, depending on your audience. Most marketers should focus on location, age, gender, and interests.
Location allows you to targets users in the country, state, city, or zip code that you service.
Age and gender targeting should be based on your existing customers. If women 25-44 are the bulk of your customers, start out targeting them. If they prove to be profitable, you can then expand your targeting.
Interest targeting is the most powerful but misused feature of Facebook ads. When creating an ad, you have two options: broad categories or detailed interests.
Broad Category Targeting
Broad categories include topics like Gardening, Horror Movies, and Consumer Electronics. Recently, Facebook has added newer targets like Engaged (1 year), Expecting Parents, Away from Hometown, and Has Birthday in 1 Week.
Broad interests may seem like an efficient way to reach a large audience. However, these users often cost more and spend less. You’ll also need to install the Facebook pixel.
This used to be an ineffective way to reach audiences; however the addition of the Facebook pixel and dynamic ads makes this far more effective.
It is worth testing; but detailed interest targeting is often more effective.
Detailed Interest Targeting
Detailed Interest Targeting allows you to target users based on information in their profile including “listed likes and interests, the Pages they like, apps they use, and other profile (timeline) content they’ve provided” (according to Facebook). You’ll find the best ROI using Detailed Interest targeting.
Facebook has an amazing array of interests to target from Harry Potter to underwater rugby. The hard part is choosing the right ones.
When targeting detailed interests, Facebook provides the size of the audience and other suggested likes and interests. You won’t have any competitive data. Once you select interests for an ad, Facebook will show an aggregate suggested bid.
Many marketers target the largest groups possible.
This is a mistake. These groups are more expensive and less targeted.
Rather than target broad terms for your niche like “yoga” or “digital photography,” focus on specific interests. Research which magazines and blogs your customers read, who they follow on Twitter, and which related products they buy.
If you use laser-focused interests like these, you’ll reach the people who are most interested in your topic and the most willing to spend money on it.
For example, if you wanted to sell a new DJ course, don’t just target the interest “disc jockey.”
Instead, create ads targeting DJ publications like DJ Magazine and Mixmag. Then created another ad targeting DJ brands like Traktor and Vestax.
Combine smaller, related interests into a group with an audience of 50,000 to 1M+. This structure will create ads with large audiences that are likely to convert.
Advanced tip: Use Facebook Login as a sign-up option on your site. When users connect via Facebook, you’ll be able to analyze their interests. Index these interests against the number of fans of their respective Facebook Pages. You’ll be left with your high-affinity interests.
Facebook Lookalike Audiences
In addition to targeting users directly, Facebook gives you the ability to Lookalike Audiences.
So what are Facebook Lookalike Audiences? These are Facebook users that are similar to your current users. You’ll need to have Facebook Pixel or other custom audience data, like an email list. Then, you can ask Facebook to find similar users.
They are highly customizable — for example, you could create a “new customer” ad, then exclude current customers from seeing your ads.
This page on Facebook will walk you through how to create Lookalike audiences.
Retargeting with Facebook Ads
Retargeting ads allow you to reach customers who are already familiar with your brand. You can double down by creating dynamic ads that show people items they are likely to be interested in.
For example, you could retarget users who have visited your site, left items in their cart, or clicked on an ad.
To create a retargeting ad, the first step is to install the Facebook Pixel. Follow this guide in Facebook’s Business center to get started.
Images for Facebook Ads
The most important part of your Facebook ad is the image. You can write the most brilliant copy in the world, but if your image doesn’t catch a user’s eye, you won’t get any clicks.
Don’t use low-quality images, generic stock photography, or any images that you don’t have the rights to use. Don’t steal anything from Google Images. Unless you’re a famous brand, don’t use your logo.
Now that we have the no’s out of the way, how should advertisers find images to use? Buy them, create them yourself, or use ones with a Creative Commons license.
Below you’ll learn which types of images work best and where specifically to find them.
People
Images of people work best. Preferably their faces. Use close-ups of attractive faces that resemble your target audience.
Younger isn’t always better. If you’re targeting retirees, test pictures of people over 60. Using a pretty 25 year old girl wouldn’t make sense.
Facebook sidebar ad images are small (254 by 133 pixels). Make sure to focus on a person’s face and crop it if necessary. Don’t use a blurry or dark picture.
Use this ad image guide on Facebook to see the size requirements for other ads, like desk top news feed, mobile news feed, instant articles, stories, etc.
Advanced tip: Use images of people facing to the right. Users will follow the subject’s line of sight and be more likely to read your ad text.
Aside from models, you can also feature the people behind your business and showcase some of your customers (with their permission, of course).
Typography
Clear, readable type can also attract clicks. Bright colors will help your ad stand out.
Just like with text copy, use a question or express a benefit to the user. Treat the text in the image as an extension of your copy.
Funny
Crazy or funny pictures definitely attract clicks. See I Can Has Cheeseburger, 9GAG, or any popular meme.
Unfortunately, even with descriptive ad text, these ads don’t always convert well. If you use this type of ad, set a low budget and track the performance closely. You’ll often attract lots of curiosity clicks that won’t convert.
How to Create Images for Facebook Ads
You have three options to find images: buy them, find ones that are already licensed, or create them yourself.
You can buy stock photography at many sites including iStockPhoto or Big Stock. Don’t use stock photos that look like stock photos. No generic businessmen or stark white backgrounds, please.
Users recognize stock photos and will ignore them. Instead, find unique photos and give them personality by cropping or editing them and applying filters. You can use Pixlr, an online image editor, for both.
If you don’t have the money to buy photos, you can search for Creative Commons licensed images.
The third option is to create the images yourself. If you’re a graphic designer, this is easy. If you aren’t, you can still create typographic images or use basic image editing to create something original from existing pictures.
Rotate Ads
Each campaign should have at least three ads with the same interest targets. Using a small number of ads will allow you to gather data on each one. For a given campaign, only one to two ads will get a lot of impressions, so don’t bother running too many at once.
After a few days, delete the ads with the lowest click-through rates (CTRs) and keep iterating on the winners to continually increase your CTR.
Aim for 0.1% as a benchmark. You’ll likely start out closer to the average of 0.04%.
Writing Successful Facebook Ad Copy
After seeing your image, users will (hopefully) read your ad text. Here you can sell them on your product or service and earn their click.
Despite the 40 character headline and 125 character body text limits, we can still use the famous copywriting formula AIDA.
- (A)ttention: Draw users into the ad with an attention-grabbing headline.
- (I)nterest: Get the user interested in your product by briefly describing the most important benefit of using it.
- (D)esire: Create immediate desire for your product with a discount, free trial, or limited time offer.
- (A)ction: End the ad with a call to action.
AIDA is a lot to fit into 165 characters. Write five or ten ads until you’re able to fit a succinct sales pitch into the ad.
Here’s an example for an online programming course:
Become a Web Developer
Learn everything you need to become a web developer from scratch.
Save 65%. Enroll now!
Bidding on Facebook Ads
Like on any ad network, strategic bidding can mean the difference between profit and a failed test.
After you create your ad, Facebook will provide a suggested bid range. When you’re just starting out, set your bid near the low end of this range.
Your CTR will quickly start to dictate the price you’ll need to pay for traffic. If your CTR is high, your suggested bids will decrease.
If your CTR is low, you’ll need to bid more for each click. Optimize your ads and targets to continually increase your CTR.
In addition to click volume, your bid will also dictate how much of your target audience you’re able to reach.
Facebook provides a great chart for every campaign showing the size of your target audience and how much of that audience you’ve reached.
Increasing your bid will help your ad reach more of your target audience. If your ad is performing well but you’re reaching less than 75% of your target audience, you can increase your bid to get more clicks.
If your audience penetration is high, increasing your budget will increase your ad’s frequency: how many times a targeted user will see it.
Landing Pages for Facebook Ads
Getting a click is only the beginning. You still need the visitor to convert.
Make sure to send him to a targeted, high-converting landing page. You know their age, gender, and interests, so show them a page that will solve their problems.
The landing page should also contain the registration form or email submit box that you’ll track as a conversion.
Focus the landing page on this action, not the later sale. If you want visitors to sign up for your newsletter, show them the benefits or offer a free gift for their email.
How to Track Facebook Ads Performance
Facebook no longer offers conversion tracking. Facebook’s Ads Manager is great for data within Facebook but can’t provide information on users who have left the site.
To properly track the performance of your Facebook campaigns, you’ll need to use an analytics program like Google Analytics, or your own back-end system. Tag your links using Google’s URL builder or your own tracking tags.
Conversion Tracking
As mentioned above, make sure to separate campaigns by interest groups so that you can see how each one performs.
You can track them using the utm_campaign parameter. Use the utm_content parameter to differentiate between ads.
Ad-level tracking is useful when testing eye-catching images and before you’ve established a baseline CTR and conversion rate.
Performance Tracking
You will also need to monitor your performance within the Facebook interface. The most important metric to track is the click-through rate. Your CTR affects both the number of clicks you’ll receive and the amount you will pay per click.
Ads with a low CTR will stop serving or become more expensive. Ads with a high CTR will generate as many clicks as will fit within your budget. They will also cost less. Keep a close eye on CTR by interests and ads to learn which audiences work best and which ads resonate with them.
Keep in mind: Even the best ad’s performance will decline over time. The smaller your target audience is, the faster this will happen. Usually, you’ll see your traffic start to drop off in 3-10 days.
When this happens, refresh the ads with new images and copy. Duplicate your existing ads then change the image and ad text.
Do not edit the existing ad. Delete any existing ads not getting clicks. By the next day, you’ll see the new ads accruing impressions and clicks.
Monitor the images’ performance over time to see which generate the best CTR and maintain their traffic the longest. You can rotate high-performing images back in every few weeks until they stop getting clicked at all.
Conclusion
Despite the learning curve, Facebook advertising can be a great marketing channel for the right business. The most important points to remember are target specific interests, use eye-catching images, give users a low-friction conversion, and track everything.
After a week or two of learning what works for your business, you’ll be able to generate a steady source of Facebook conversions.
What are your best Facebook advertising tips? Share them in the comments.
The post A Deep Dive Into Facebook Ads: How to Create, Optimize, and Test Facebook Ads appeared first on Neil Patel.
source https://neilpatel.com/blog/deep-dive-facebook-advertising/
How to Sell Products on Facebook Marketplace
You’ve heard about diversifying your income streams, but what about your e-commerce sales channels?
If you’re selling physical products, and you’re only relying on ONE channel to bring home the bacon, it’s time to switch things up with Facebook’s social commerce platform, Marketplace.
It’s a simple, easy, cost-effective way to hit the ground running and increase your sales:
- It’s free to use.
- It comes with a built-in audience of 800 million monthly users.
- You don’t need a website to sell.
- And you can create listings on the go with the Facebook app.
And when you combine that with statistics like:
- 78% of US citizens use Facebook to find new products.
- 30% of consumers would purchase via Facebook.
- 1 in 4 business owners sells through Facebook.
You’re leaving money on the table and missing out on a competitive edge.
In this post, we are going to dig deep into everything you need to know about Facebook Marketplace, how to create your first listing, the benefits, and what you can do to boost your sales on the platform.
What Is Facebook Marketplace?
Facebook Marketplace is like Craigslist and eBay…only better.
It’s a peer-to-peer platform where you can buy and sell new and pre-owned items.
Facebook Marketplace is the newest way for e-commerce businesses to make sales and take advantage of the social media network’s 2.7 billion monthly active users WITHOUT spending a dime on listings or ads.
All you need to do is upload your item, and in under 60 seconds, you’ll gain access to a local audience ready to buy what you’re selling.
6 Benefits of Selling on Facebook Marketplace
Facebook Marketplace Is Safer than Other Platforms
What makes Craigslist “untrustworthy” is the lack of accountability and transparency.
On Craigslist, you can pretend to be anyone, and there isn’t a lot of information to help buyers and sellers weed out those pesky scammers.
With Facebook Marketplace, there is an added layer of trust. Each buyer and seller is connected to a Facebook account.
It gives you the option to snoop and double-check the person is “real” by:
- Looking at profiles
- Checking how long the account has been active on Facebook
- Seeing previous Marketplace activity
- Reporting any suspicious sellers and buyers
While it’s no guarantee Facebook Marketplace is scam-free, its lack of anonymity is a safer option for everyone.
It’s Free to List an Item
The best thing about using Facebook Marketplace?
You don’t need to pay a single cent to the platform.
It’s free to create a Facebook personal account or business page and free to list an item.
Unlike other platforms who have:
- Non-refundable listing deposits
- Insertion fees
- Final value fees
Facebook Marketplace has none of that. It’s one of the most affordable options for small e-commerce businesses.
Sellers and Buyers Can Send Instant Messages to Each Other
Instant gratification.
It’s a cultural value we’ve adopted from the Internet, and it’s made us impatient.
We expect:
- 24/7 customer service
- Lightning-fast website load times
- The ability to order taxis, food, and even dates with a swipe of our finger
So why should online shopping be any different?
Facebook addresses our addiction by allowing buyers and sellers to communicate instantly with Messenger.
It’s a genius inbound marketing tactic.
If a customer has a question about your product, and you don’t reply, you risk losing the sale.
Facebook Marketplace nips any potential profit pitfalls in the bud by helping you close the deal before the person moves on and buys from someone else.
You Have Better Odds of Making a Sale
I don’t know about you, but when I hop onto sites like Craigslist, I’m SEARCHING for something specific.
Facebook Marketplace works a little bit differently. The platform capitalizes on user’s scrolling habits, which increases the chances of someone stumbling across your item.
Users will see Marketplace ads in their timeline and in recently viewed items, increasing the chance of a sale.
Then there is the sheer amount of people using Marketplace every month.
According to Facebook, 800 million people use the platform, which is considerably less than Craigslist’s 55 million monthly users.
Post Your Listing to Facebook Groups
Facebook is full of “buy & sell” groups.
Inside each one are people primed to buy, making it easier than eBay, Gumtree, or Craigslist to make a sale.
Facebook takes it a step further by allowing you to post your listing to relevant “buy & sell” groups in your area.
You can list your item in up to ten groups you’re a member of on a mobile device.
On desktop, you select ten at a time and then go back and add the listing to ten more until you’re done.
Doing so increases your organic reach on Facebook and gives you invaluable exposure, even with a zero ad budget. Just make sure you aren’t spammy or over-posting.
Facebook Creates a Personalized Shopping Experience
Facebook’s powerful algorithm doesn’t stop at your newsfeed.
When you click on Marketplace, it greets you with “Today’s Picks.” A curated selection of items related to past searches, likes, and interactions on Facebook.
If your item lands up here, it almost guarantees the user has some interest in what you’re selling.
When you combine that with the platform’s localized shopping experience, it once again boosts your chances of a sale, and that’s some powerful stuff.
How to Sell Products on Facebook Marketplace
Setting up a listing on Facebook Marketplace is ridiculously easy.
The “platform” is built into Facebook’s desktop site and mobile app, and it takes only a minute to set up a listing on Facebook Marketplace. Whereas on platforms like eBay, the process is much, much longer. With more fields to fill out, it can take a larger chunk of your time getting your items listed and live.
Want in on all the action?
Follow these four easy steps to get your first Facebook Marketplace listing up on the platform.
Step 1: Access Facebook Marketplace
Log onto Facebook via your desktop and select Marketplace on the left-hand side of the screen.
If you don’t see it on the menu, click the “See More” button, scroll down until you see the Marketplace icon, and select it.
For smartphone users, open the app and tap the “shop front” icon at the top of the screen.
NOTE: You don’t need a separate account to use the feature. You can sell with a personal or business Facebook account.
Step 2: Create Your First Listing
On the left-hand side of the screen, click the blue “+Sell Something” button.
A new screen will load, prompting you to choose a listing type from the following options:
- Item for sale
- Vehicle for sale
- Property for rent or sale
- Job opening
For mobile users, tap the “Sell” button at the top of the screen and select your listing type.
Step 3: Fill Out Your Listing
Next, fill out the following information about your listing:
- Add photos (you’ll need AT LEAST one)
- Create your listing title (remember to use keywords people are searching for)
- Add your price
- Choose a relevant listing category from the drop-down list
- Select the condition of the item you’re selling from the drop-down list
- Add relevant product tags
- Add your location
- Select the number of items available
- Delivery method (shipping or local pick up)
- Shipping rate (if applicable)
Facebook Marketplace Categories
You can list items in the following categories:
- Classifieds
- Clothing & Accessories
- Deals
- Electronics
- Entertainment
- Family
- Hobbies
- Home & Garden
- Housing
- Vehicles
When you’re done, click “Publish”, and your first Facebook Marketplace listing is officially live!
Step 4: Closing the Sale
Once a potential buyer stumbles across your listing, you can discuss all the details through Messenger.
When you’re both happy, payment is made through processors like Shopify or BigCommerce.
How to Increase Your Facebook Marketplace Sales
Maximize your sales on Marketplace with these simple yet effective tips and tricks.
Do Your Research
Before you create your first listing, do your research.
Hop onto Marketplace and see what items are popular in your niche. You can do this by sleuthing on categories to see the best-sellers and visiting business pages.
If a page has a store, the top-performing products are always listed first.
By putting in the time to see what’s trending on the platform, you’ll get a good idea of supply and demand, price points, and how you can differentiate yourself from everyone else.
Use Facebook Ads
Once you know what products are popular, you can create Facebook ads for your listings.
And because you’ve done your research and know there’s a strong interest, you’ll see a much higher ROI and an increase in sales.
Using ads also allows you to retarget people who have bought from you in the past and follow your page.
Optimize Your Listing with Keywords
SEO isn’t only for websites and bloggers. The same principles apply to Facebook Marketplace.
If you want your listing to rank on the search results and get found by your ideal customer, you need to make sure you’re using the right keywords.
Optimize your listing by using your main keywords in the title and semantic keywords in the product’s description.
For example, let’s say you’re selling an iPhone. A buyer would want to know things like:
- The model
- Storage capacity
- The color
- The condition of the device
- What accessories it comes with (like a charger, AirPods, etc.)
Those are all keywords you want to include in your listing to rank higher in the algorithm.
Improve Your Photos
93% of consumers say visual appearance is the key deciding factor when making a purchase.
So if your photos are a blurry, pixelated mess and you have no sales, it’s time to up your product photography game.
The good news?
You don’t need to hire a professional photographer.
You can get high-quality photos using only your smartphone.
All you need is:
- Good, natural lighting
- A clean background (a solid black or white background works best)
- A tripod (if you have shaky hands)
- Presets (you can find free ones for Lightroom Mobile on Pinterest)
With these four things in your arsenal, your listings will instantly become more visually appealing.
NOTE: When taking photos of your products, make sure to show any defects and warranty information, and avoid stock photos. It will make your listing appear fake.
Aim for a Strong Seller Record
Facebook gives sellers two separate badges for how well you interact with customers. Make it a goal to work towards both badges to improve your reputation, trust, and sales with potential customers.
- Very Responsive Badge: Awarded to sellers who respond quickly on Messenger to potential buyers.
- Community Recommended Badge: Awarded to sellers with a high rating on Marketplace.
Include Delivery/Shipping
Want to stand out and give your buyers a “wow” customer experience?
Include shipping/delivery.
Add a small markup to your base price, and watch your items fly off the shelves!
Choose the Right Category
No one likes spam.
Don’t list your DSLR camera in the appliances section. It’s annoying and an easy way for your account to get flagged and possibly blocked from Facebook entirely.
Besides, you want to choose the right category, so the RIGHT people with the RIGHT purchasing intent see your listing.
The appliances section isn’t where budding photographers looking for a deal are hanging out.
Don’t waste your time or anyone else’s.
Conclusion
Facebook Marketplace is no longer a place for casual garage sales. It’s a quick, easy, affordable way for you to grow your e-commerce business.
With access to Facebook’s giant reach, you can find new customers WITHOUT a massive platform or spending money.
All you need to do is take the leap and upload your irresistible offer to the platform, follow my sales-boosting tips, and wait for the money to start rolling in.
Are you going to take Facebook Marketplace out for a spin?
The post How to Sell Products on Facebook Marketplace appeared first on Neil Patel.


